8. Relationship Triples or Relationships
Warning
Skills needed
- 1.2 Using the tutorial
- 2.1.Install Vogon
- 2.2.Create a Vogon Workspace
- 3.1.Vogon User Interface
- 3.2.Basic Navigation
- 4.1.Text Analysis
- 4.2.Creating A .txt file
- 5.2.Vocabulary Selection
- 5.3.Creating A Vocabulary
- 5.4.Concept List Selection
- 5.5.Creating A Concept List
- 6.2.Text Editor Window
- 6.3.Text Editor Window Appellations: Highlighting a Word
- 6.4.Text Editor Window Appellations: Changing or Removing the Word
- 6.5.Text Editor Window Appellations: Baseless Appellations
- 7.2.Graph Editor Window
- 7.3.Graph Editor Window Appellations: Appellating from the Palette Bar
- 7.4.Graph Editor Window Appellations: Appellating from the Bottom Window
- 7.5.Graph Editor Window Appellations: Appellating by Hovering in the Main Window
- 7.6.Graph Editor Window Appellations: Editing & Deleting Appellations
- 7.7.Graph Editor Window Appellations: Baseless Appellations
Note
Skills covered
- 8.1.Introduction to Relationship Triples
- 8.2.Relationship triples theory
- 8.3.Relations in Vogon
- 8.4.The Relations Tab
- 8.5.Creating Relations: Text Editor
- 8.6.Creating Relations: Graphical Editor
- 8.7.Editing Relations
- 8.8.Deleting Relations
- 8.9.Complex Sentences or Nested Triples
- 8.10.Progress Flowchart
8.1. Introduction to Relationship Triples:
In Vogon, a relationship triple, relationship, or relation (all three are synonymous) is information about the grammar of three words and their meaning (appellation) within the text. Vogon uses appellations based on subject, predicate, and object statements.
Relationship triples or relationships are based on triples theory and are represented as a: (Subject)-[Predicate]-(Object).
The (Subject)-[Predicate]-(Object) correspond to appellations that are in a text.
All relationship triples created in Vogon will populate the Text Editor, the Graphical Editor, and the Relations tab in Vogon.
Any words from the text used in relations will be highlighted in orange. Any words from the text used in apellations will be highlighted in green.
8.2. Relationship Triples Theory
Vogon uses relationship triples based on appellations that the user has created. To create a relationship triple the text must already be appellated.
Both in text and baseless appellations can be used to create relationship triples.
Understanding the Relationship Triples Theory allows the user to follow the templates in the standard graph folders, create data sets for individual projects, and utilize the mapping function in Vogon.
8.2.1. Triples Theory in Vogon
Triples Theory allows Vogon to represent relationship triples as relationships.
These relationships represent the (Subject)-[Object]-(Predicate) of sentence, paragraph, or part of text.
Triples have specific directionality. This directionality provides direction and understanding of the triple.
If your grammar is rusty a basic review of subjects, predicates, and objects.
The (Subject) of a sentence or clause:
- tells what the sentence is about
- describes who or what performs the action
- usually is a noun, noun phrase, or pronoun
- usually appears before the verb
The [Predicate] of a sentence or clause:
- completes the meaning of the sentence or clause
- usually comes directly after the subject
- tells something about the subject
- can be a single word (i.e. verb)
The (Object) of a sentence or clause:
- usually a noun or a pronoun, that is influenced by a verb
- usually comes directly after the verb
- can be direct objects (influenced by a verb)
- can be indirect objects (influenced by speech)
- can be object of a preposition
8.2.2. Applying Triples Theory
Let’s apply the triples theory to a sentence. Remember, triples theory can be applied to paragraphs and entire texts. For clarity let’s start with single sentences.
For example, The University of Colorado employs Stanley Cohen.
Breaking down the sentence using basic rules of grammar. The sentence has the following elements and can be represented by the following triple.
(Subject) = University of Colorado
[Predicate] = employ
(Object) = Stanley Cohen
8.3. Relations in Vogon
All relationship triples created in Vogon will populate the Text Editor, the Graphical Editor, and the Relations tab in Vogon.
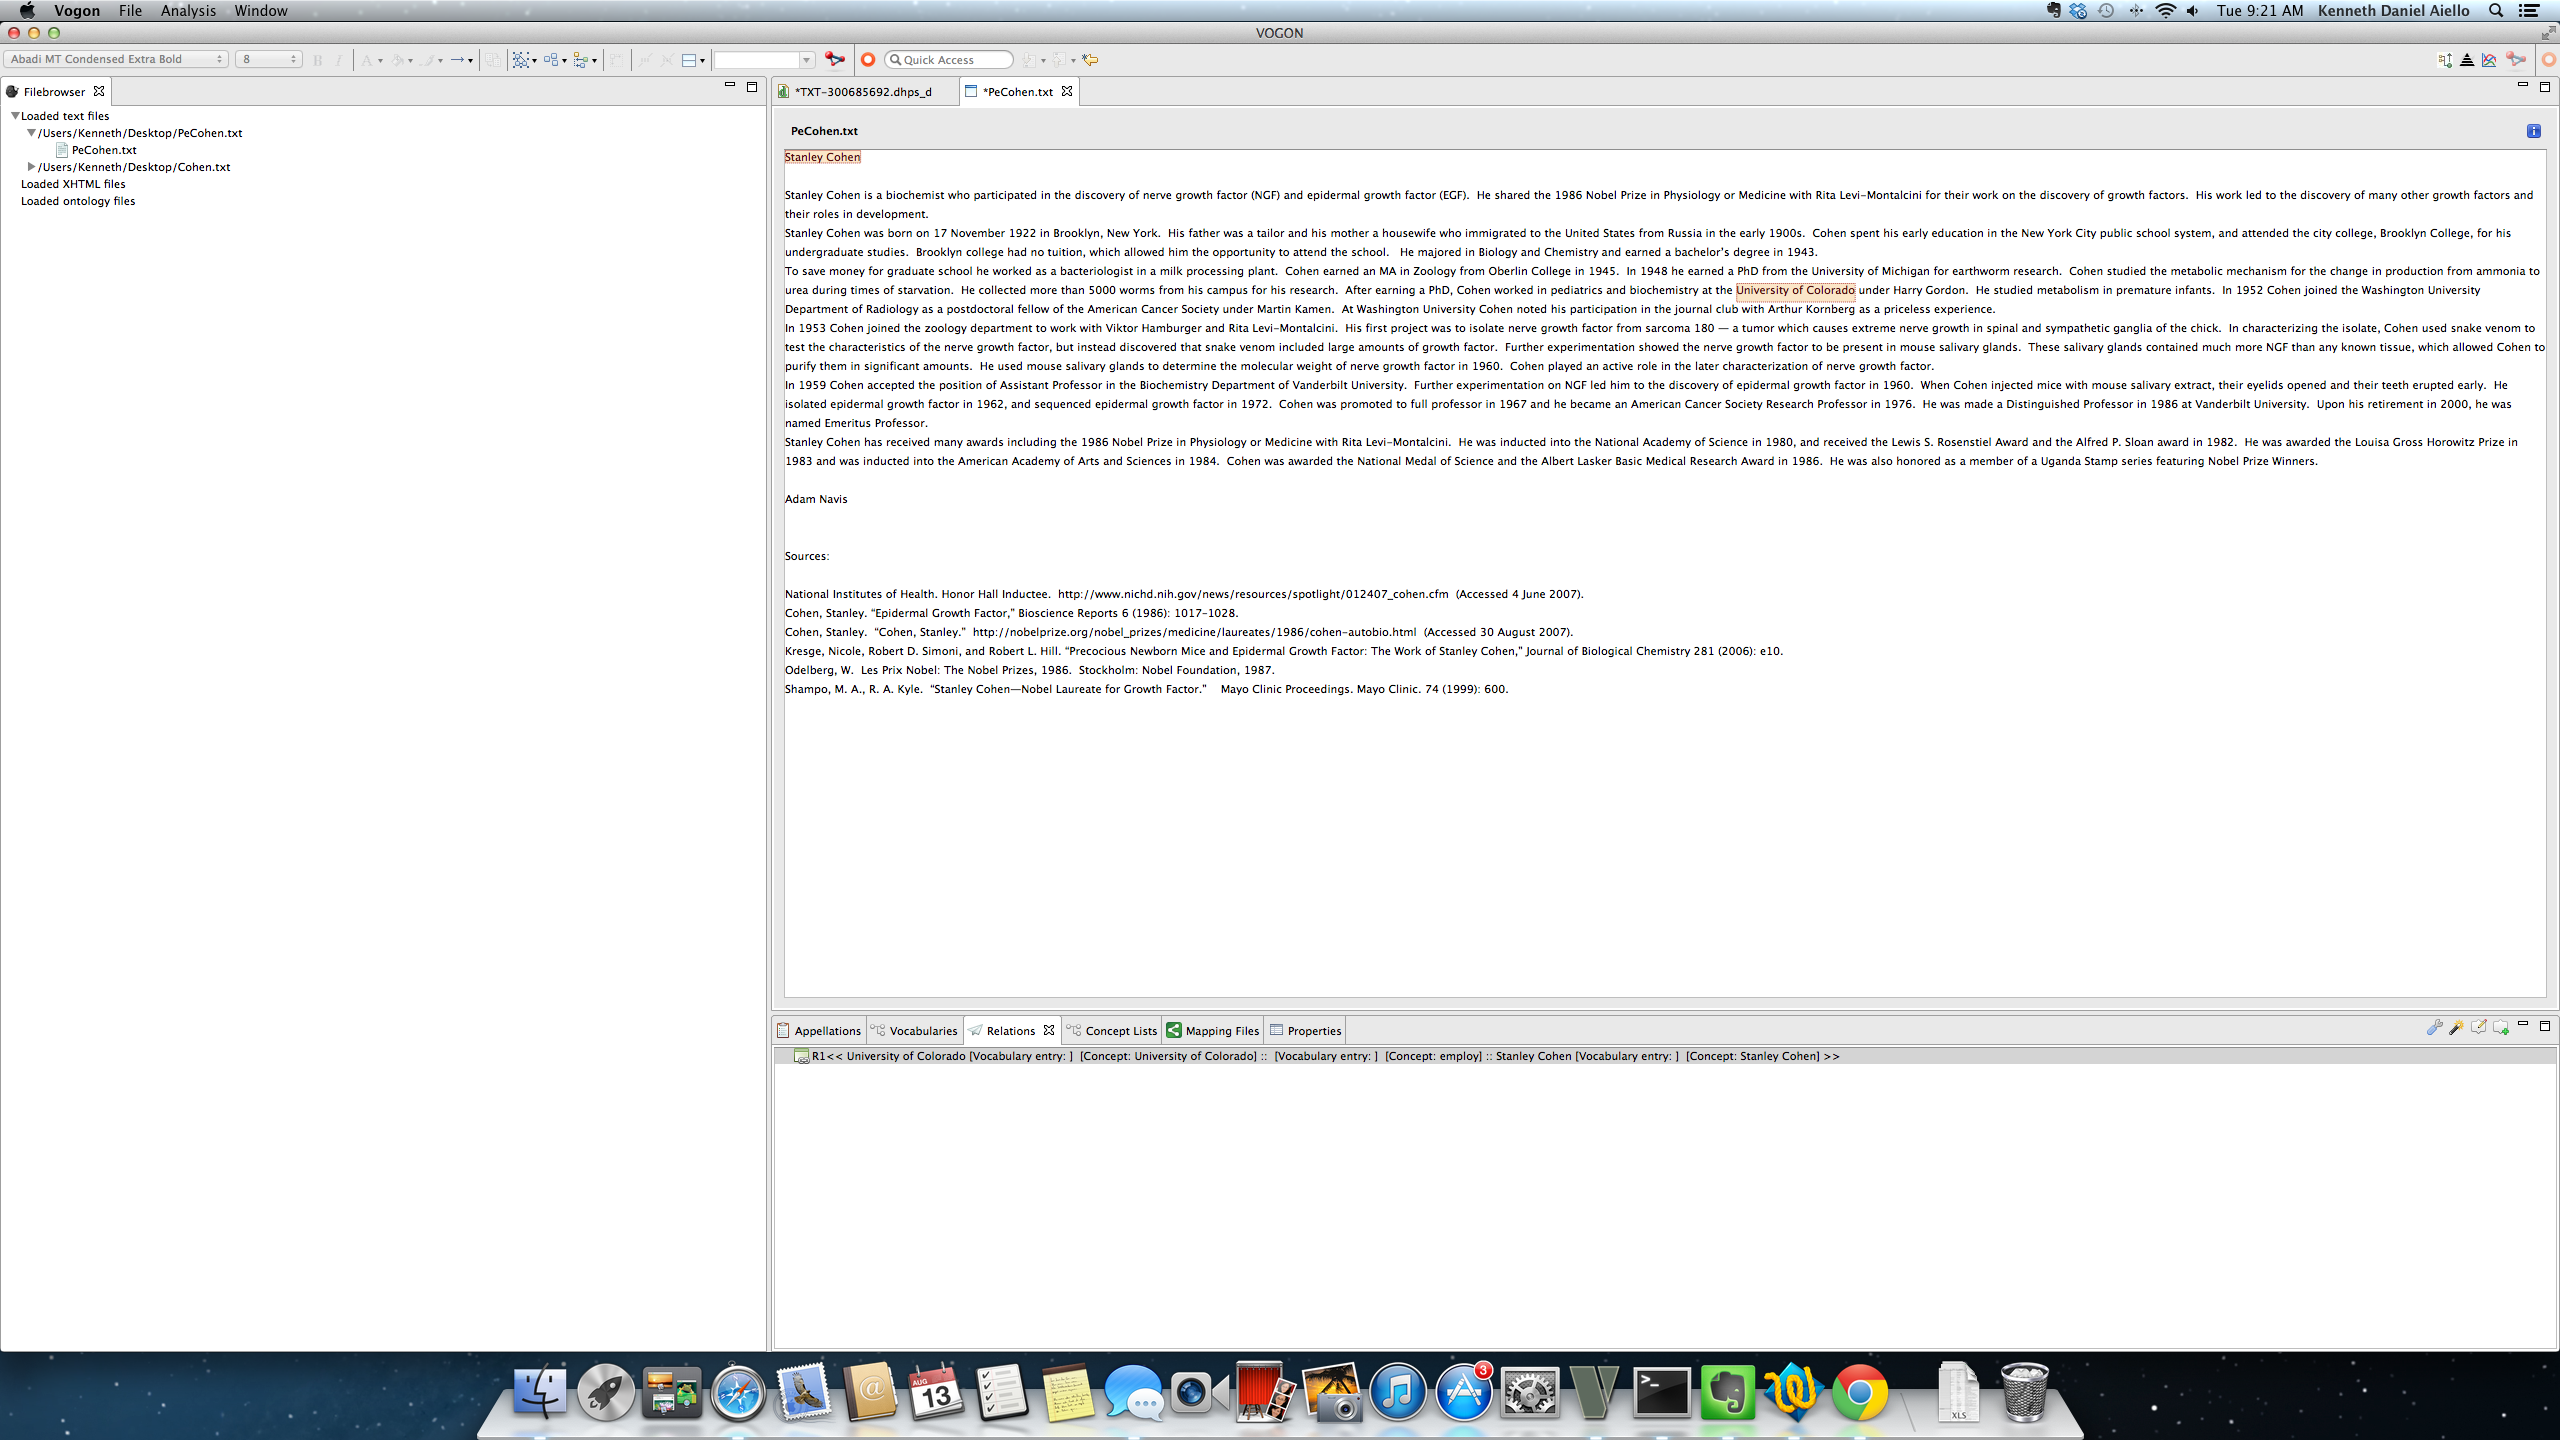
8.3.1. Relations in the Text Editor
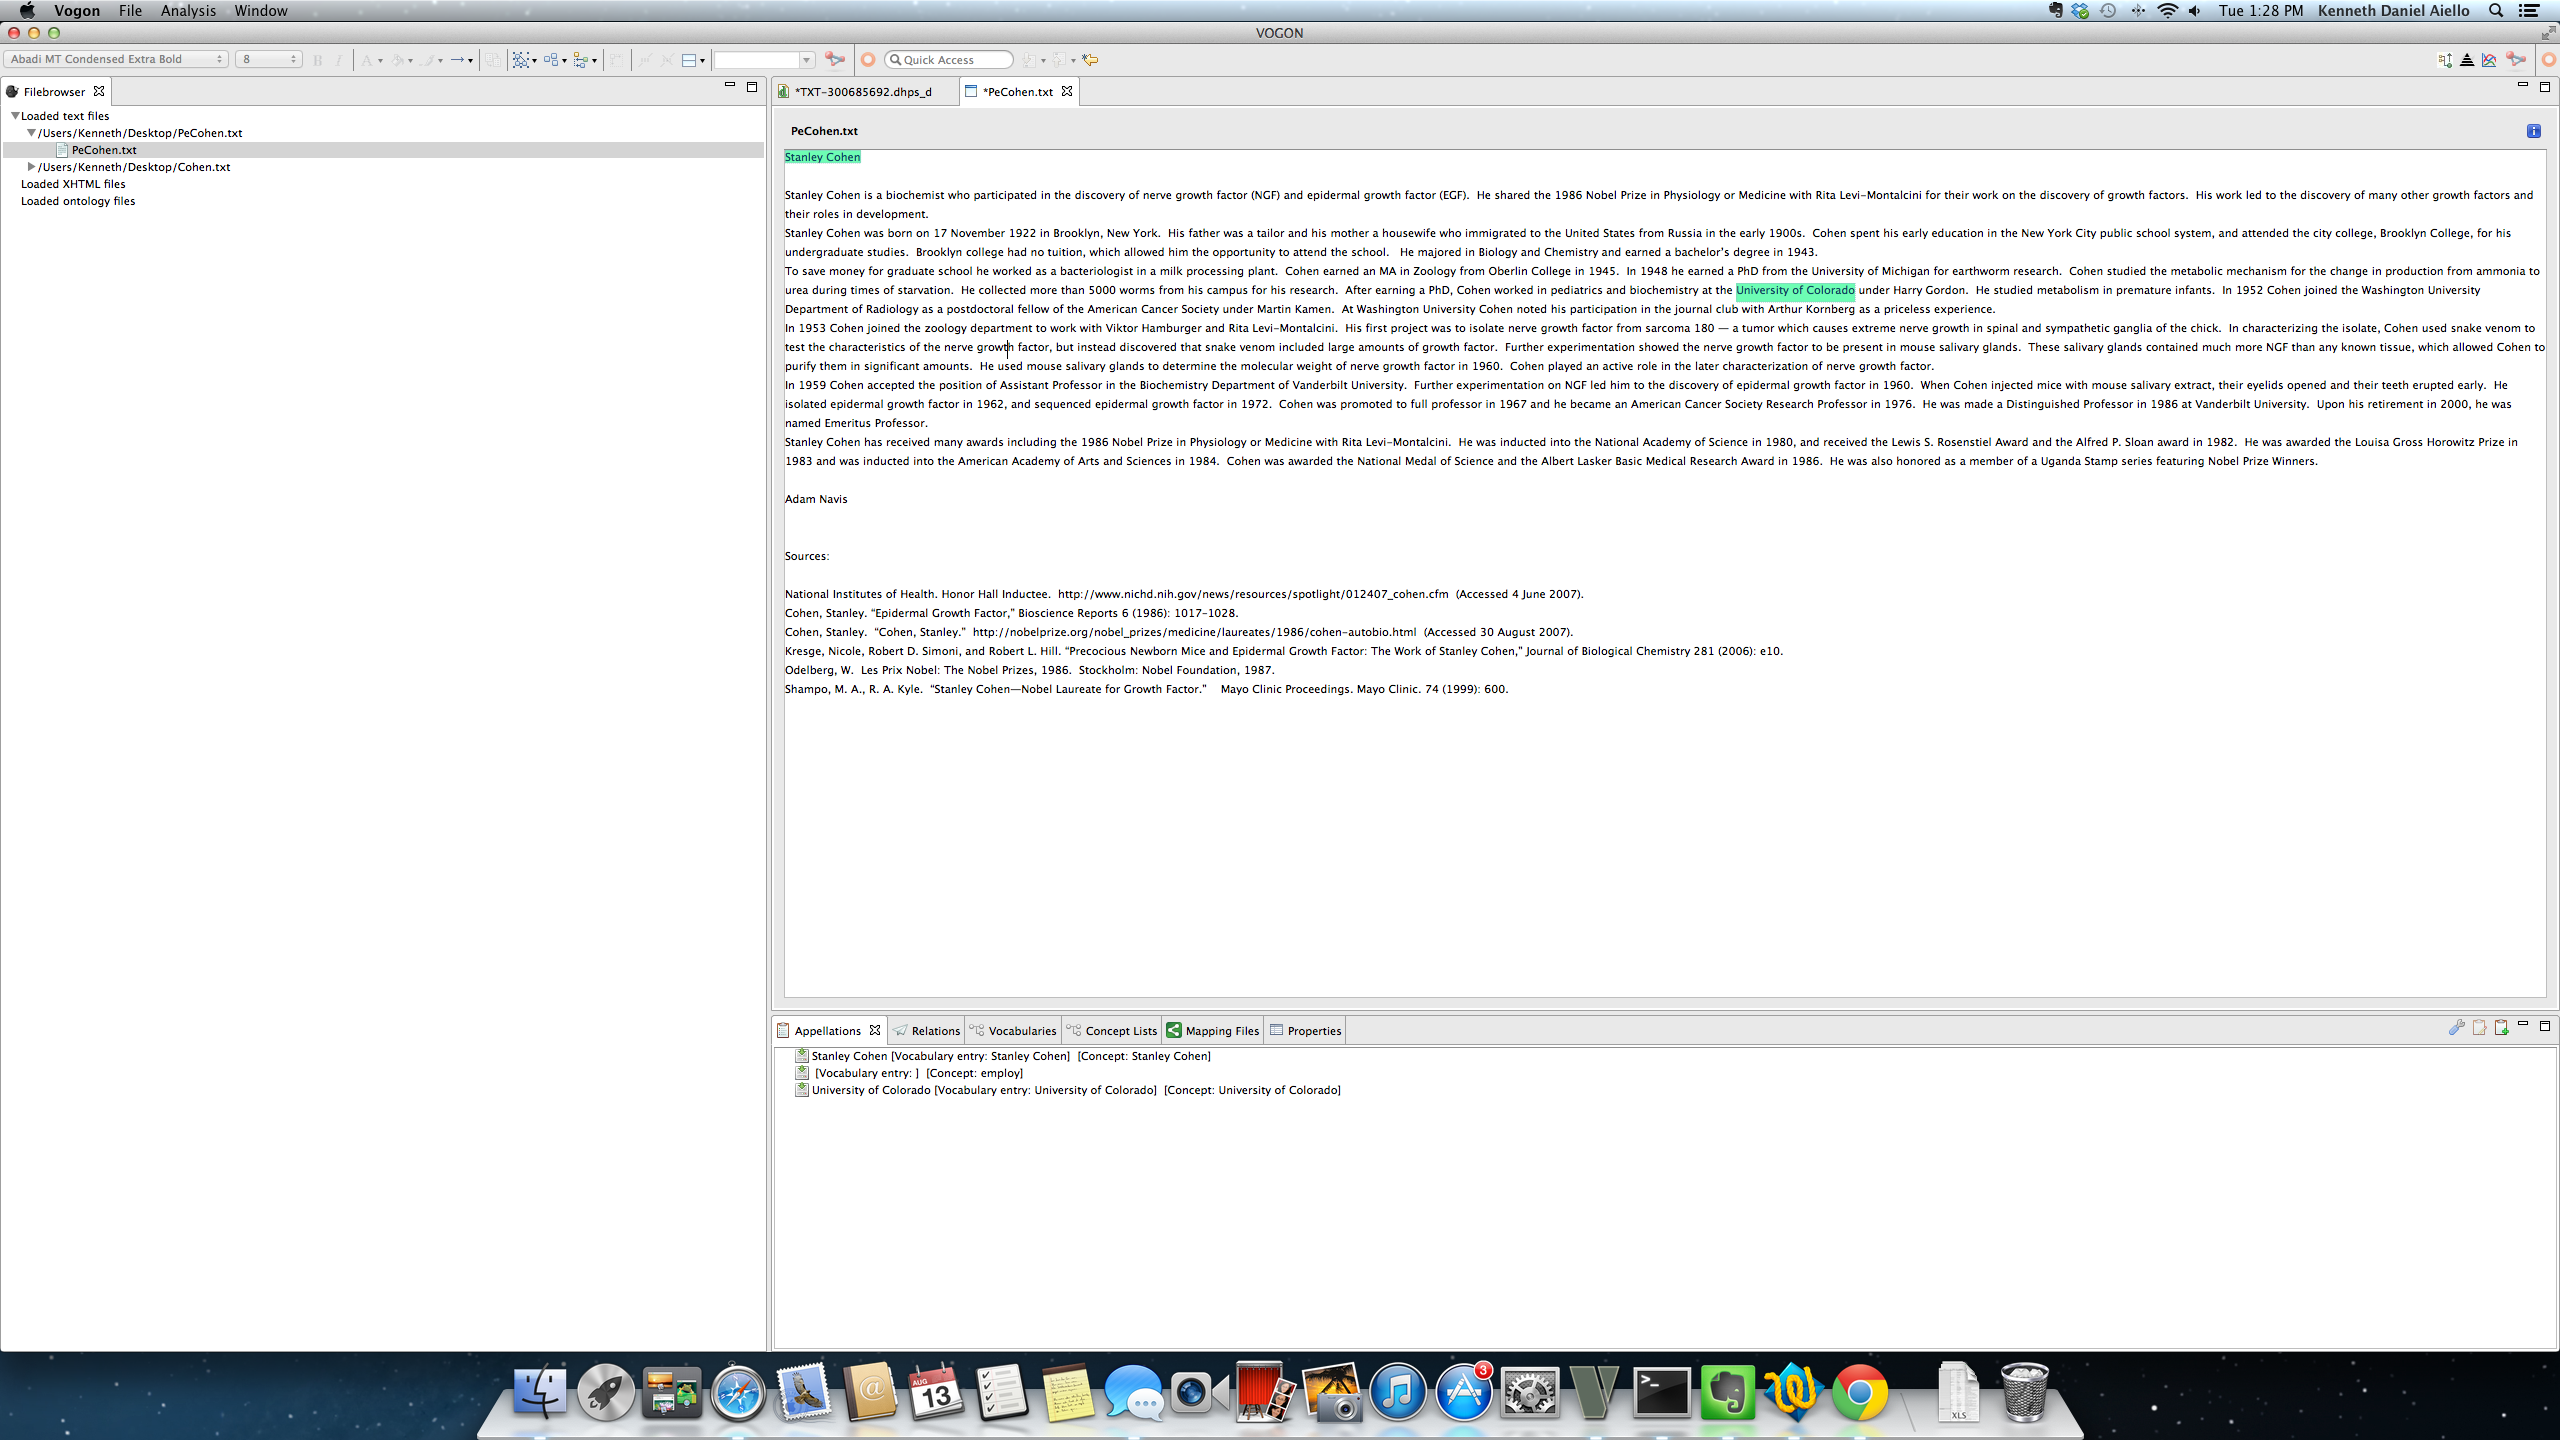
In the Text Editor any appellated words used in relationships will be highlighted in orange. Appellated words not used in relationships will be highlighted in green.
The Text Editor Main Window does not identify a relations subject, predicate, or object.
In this example, the relationship consists of the appellated words Stanly Cohen and University of Colorado. Both words are highlighted in orange.
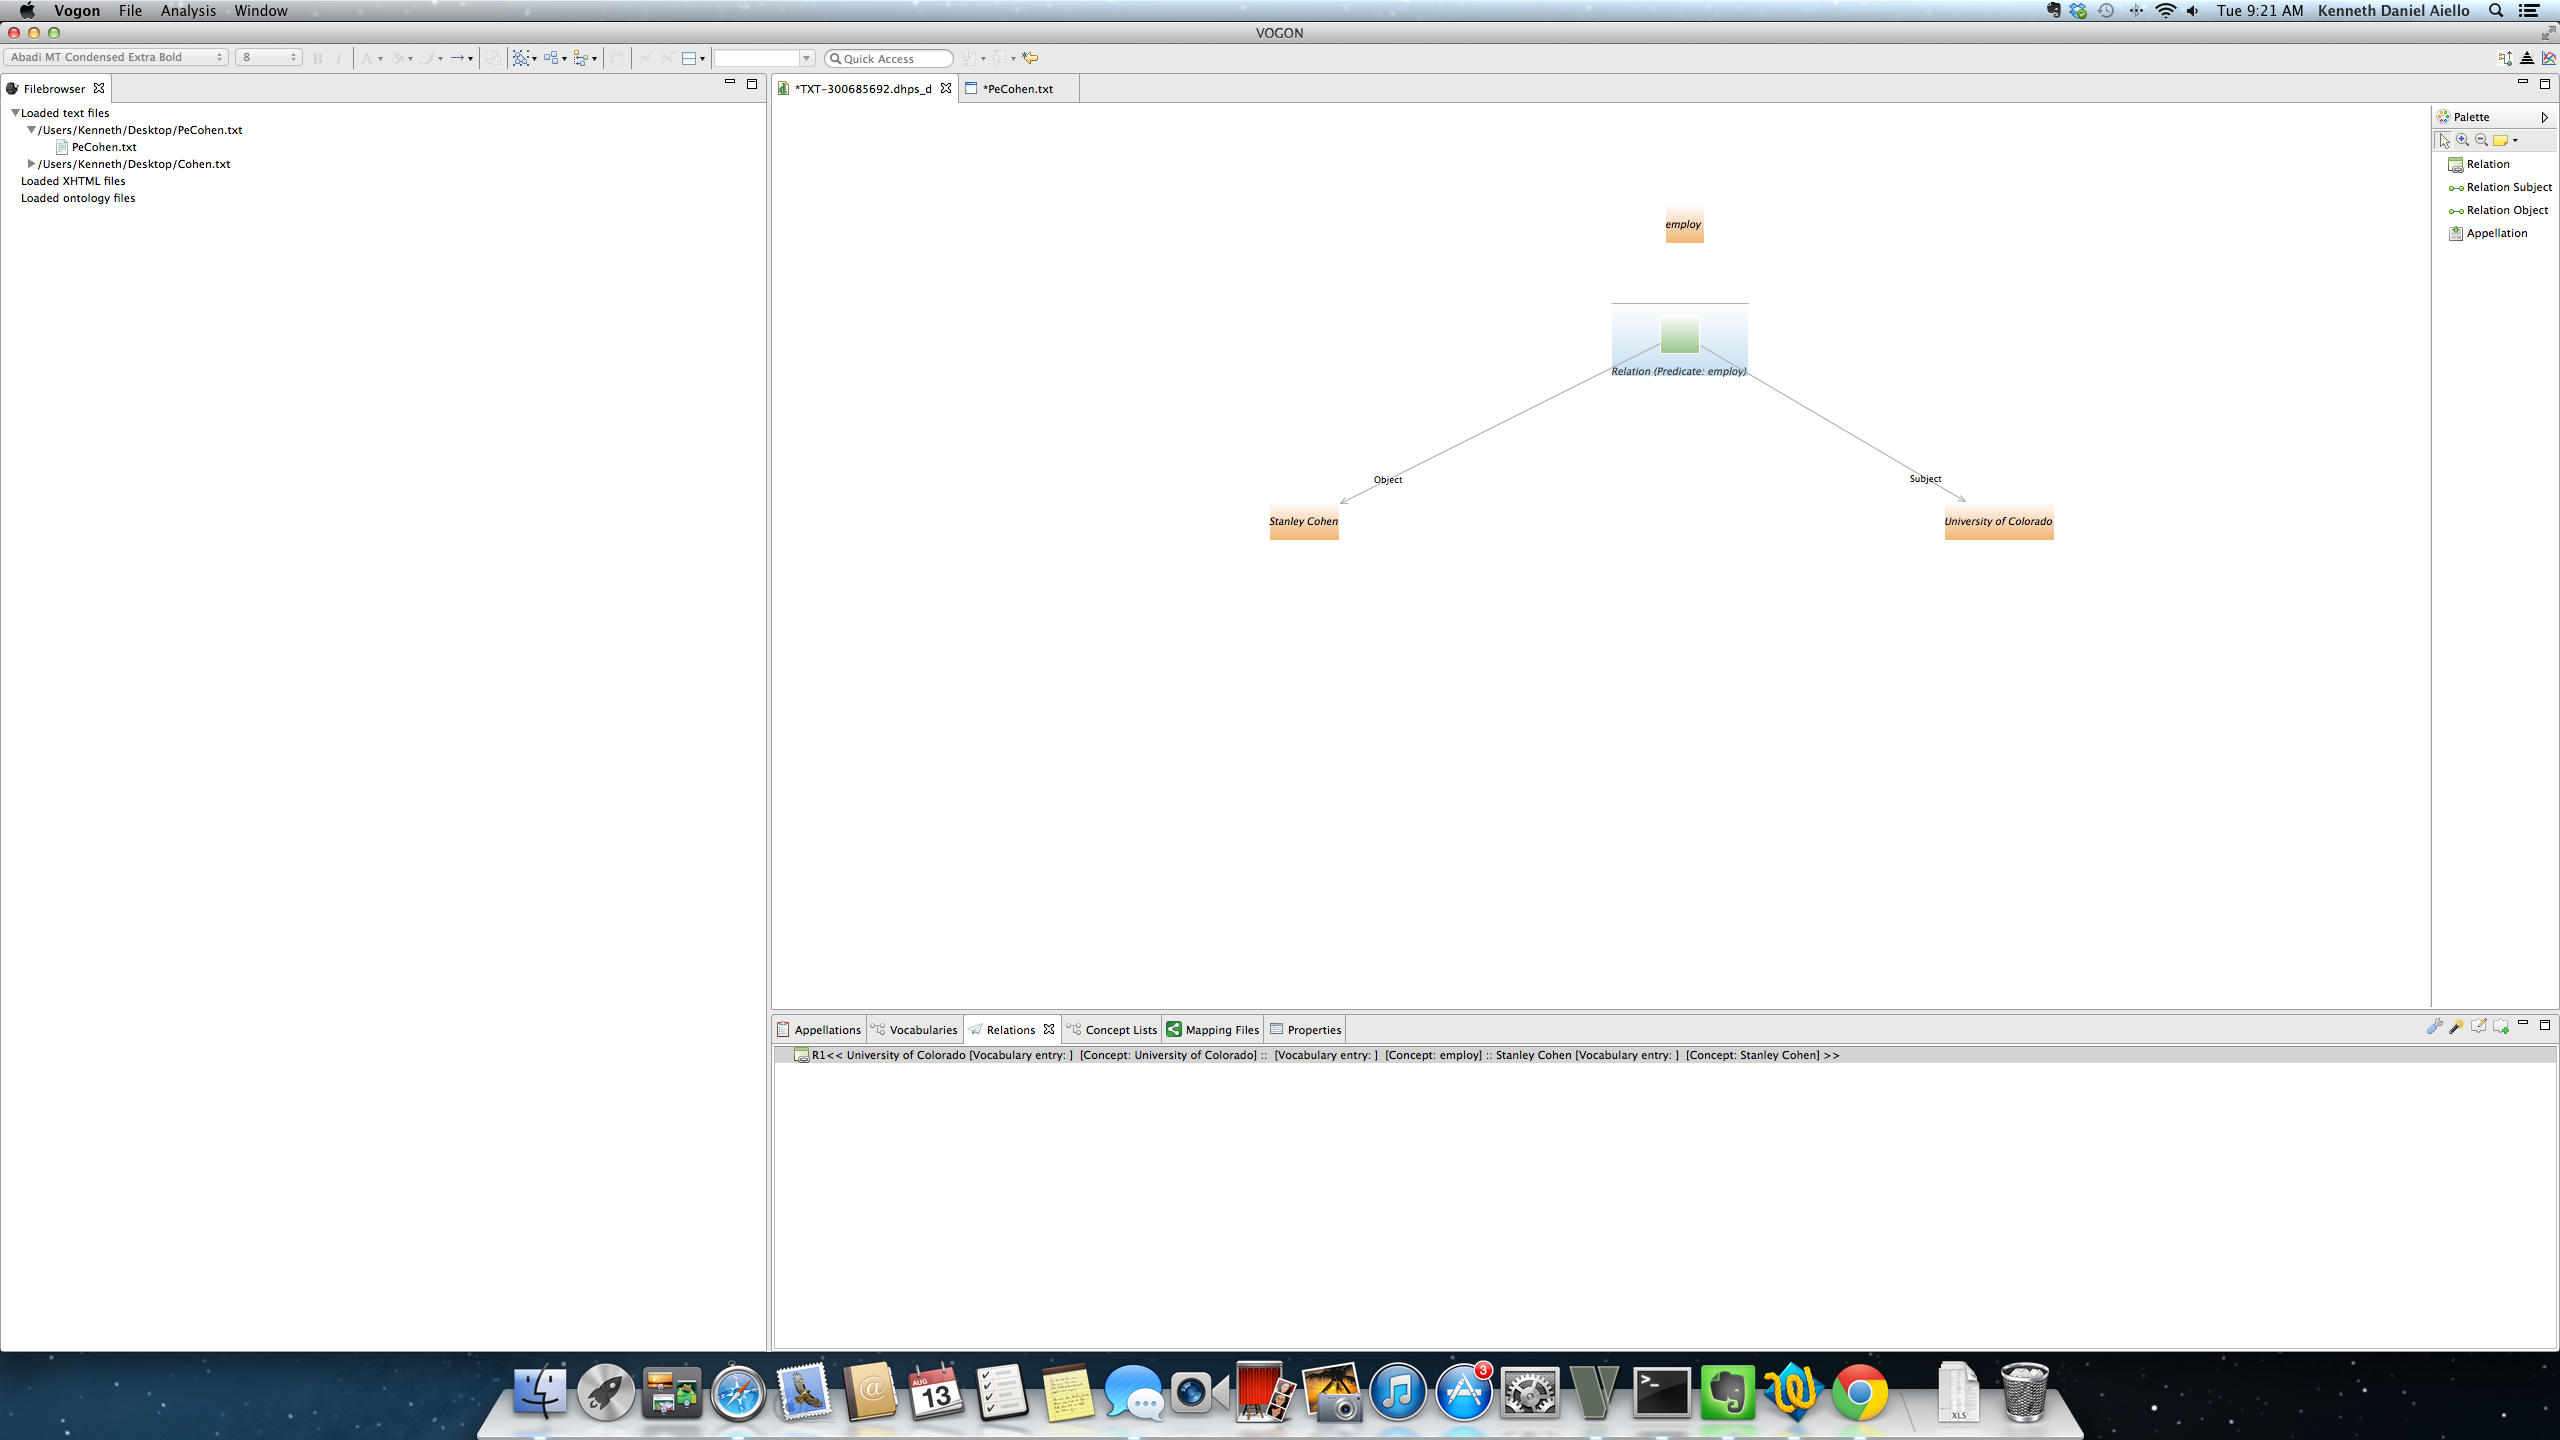
8.3.2. Relations in the Graphical Editor
In the Graphical editor the entire relationship is visible. The subject, predicate, and object of a relationship are easily identified.
The (Subject) is in a orange box with the black arrow subject arrow pointing to it.
The [Predicate] is in a blue box that has a green sqaure in the middle or the Relation Event Compartment box.
The (Object) is in a orange box with the black arrow object arrow pointing to it.
Any relations selected in the Relations tab the appellations will be in red boxes.
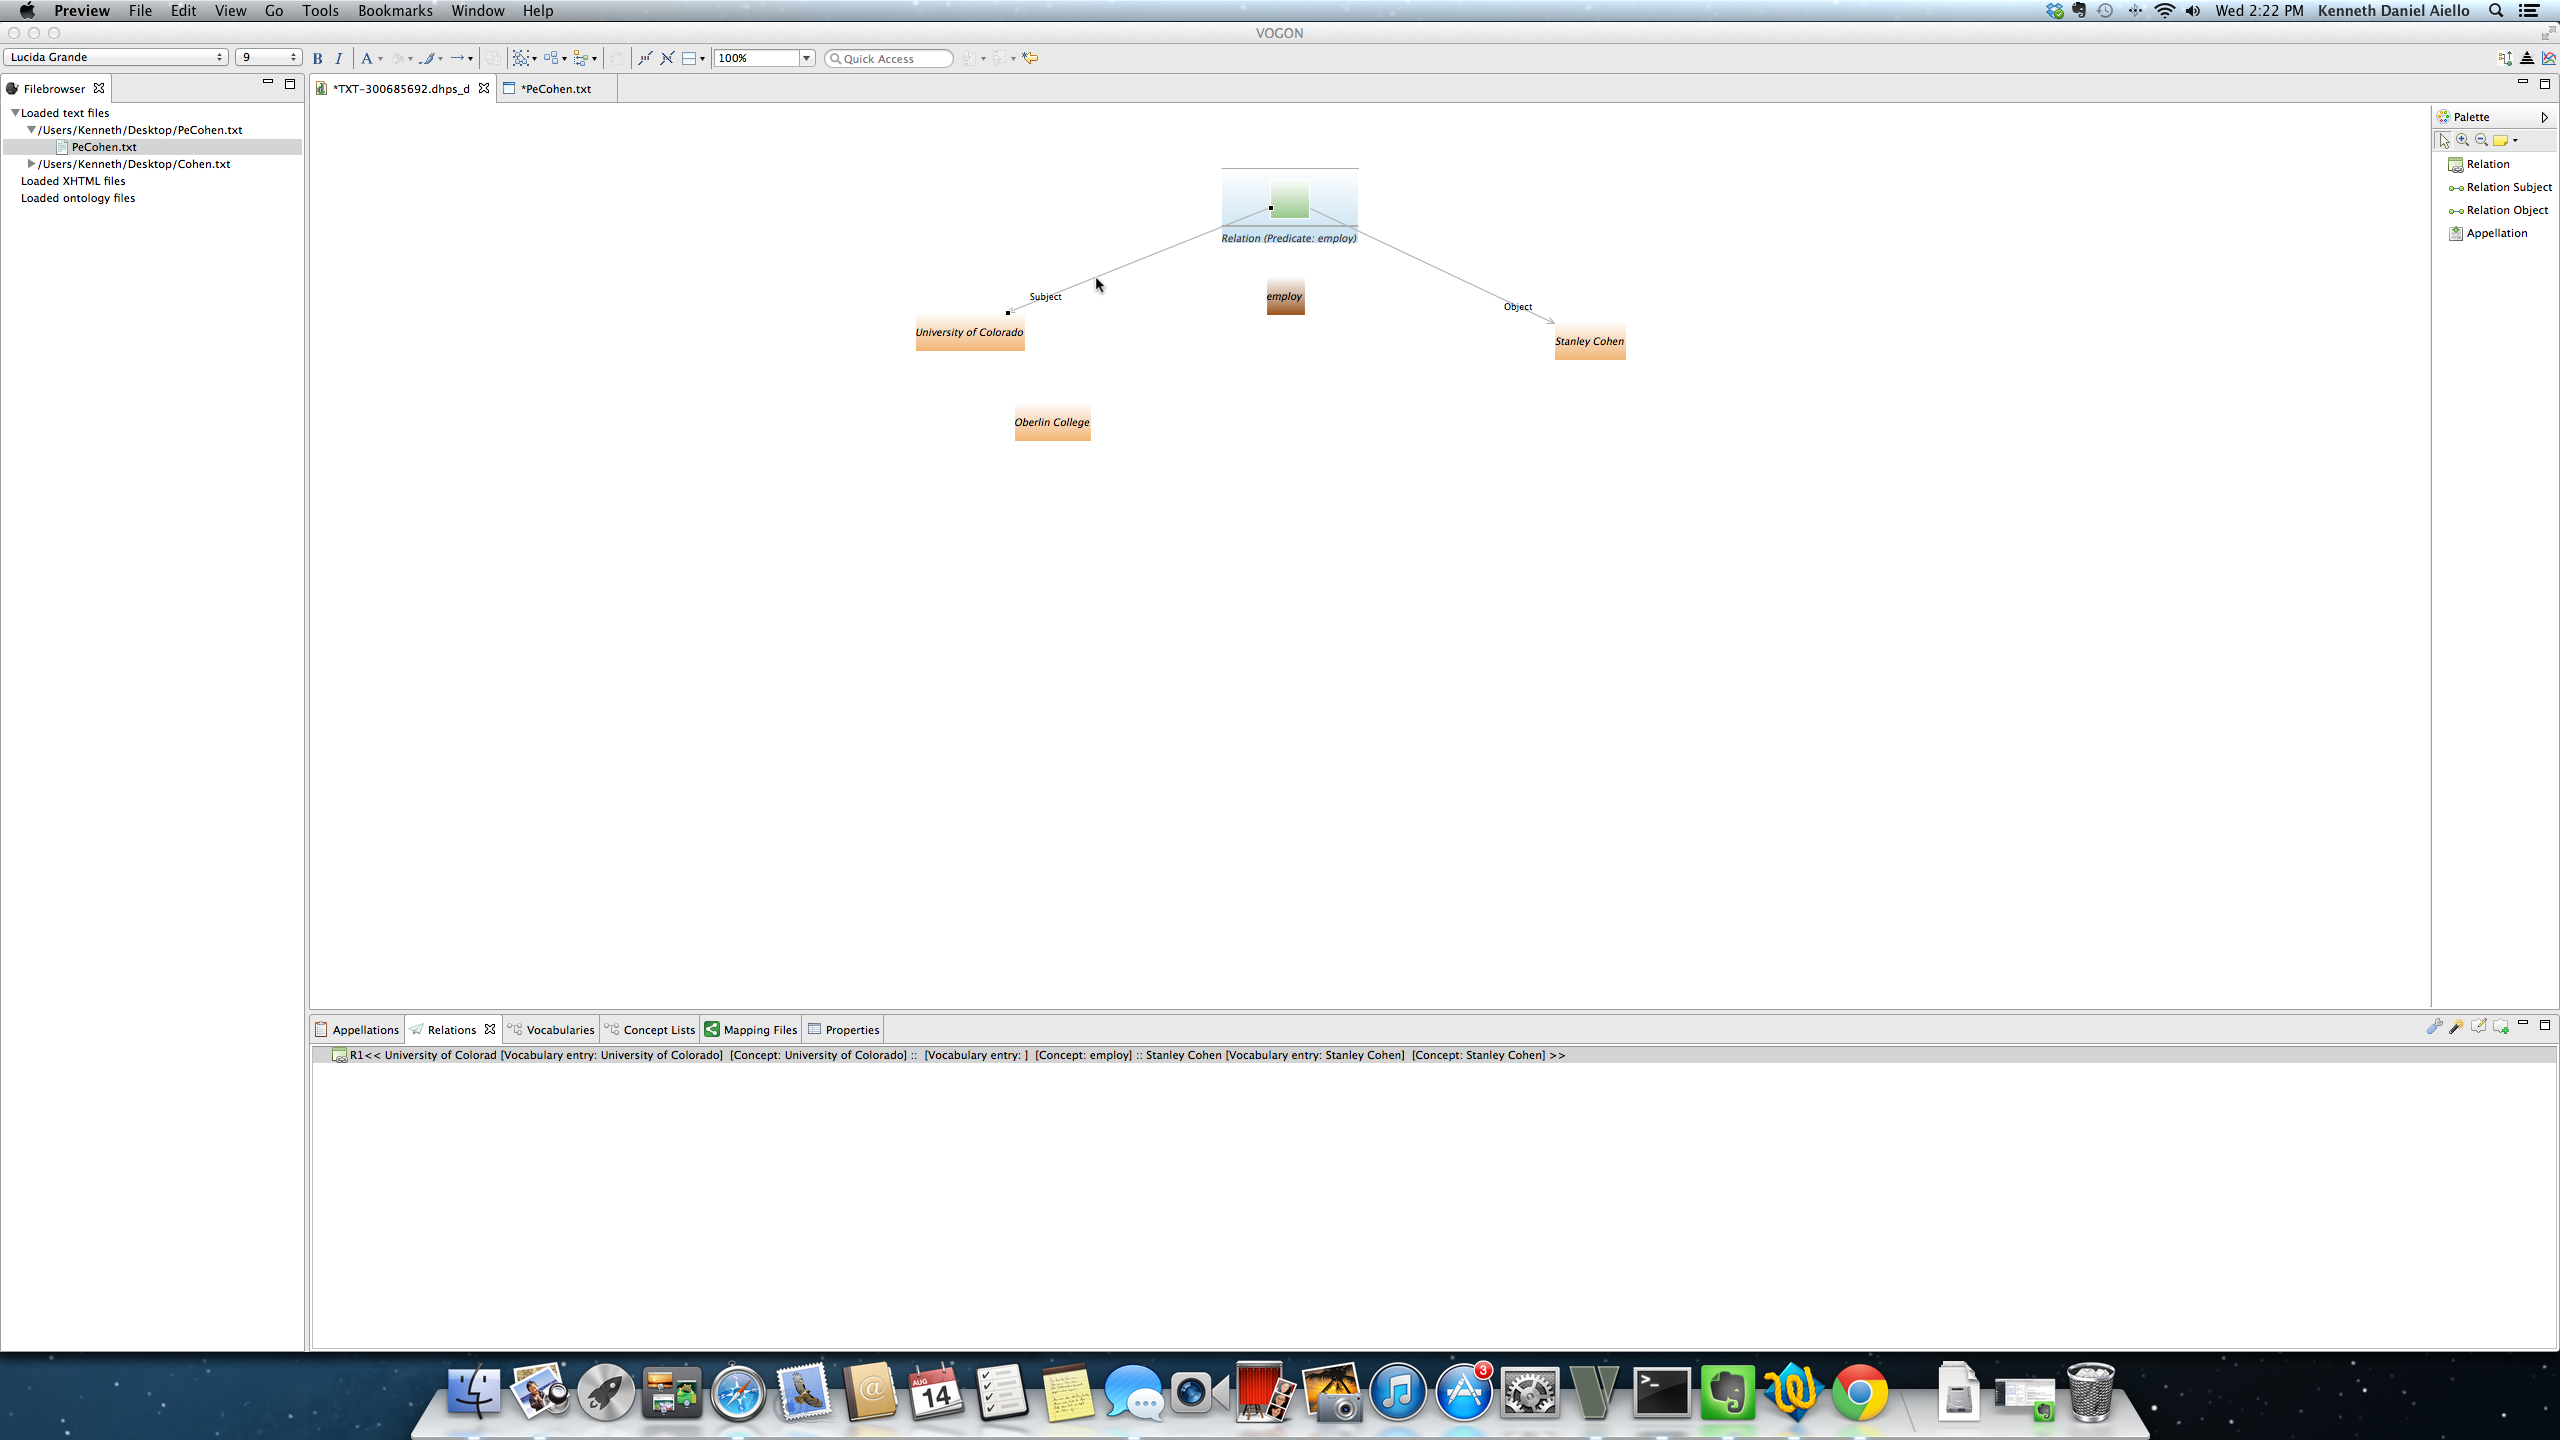
In this example,
The (Subject) or “University of Colorado” is in the orange box with the black arrow subject arrow pointing to it.
The [Predicate] or “Employ” is in the blue box that has a green sqaure in the middle, and the words “Relation (Predicate: employ)
The (Object) or “Stanley Cohen” is in the orange box with the black arrow object arrow pointing to it.
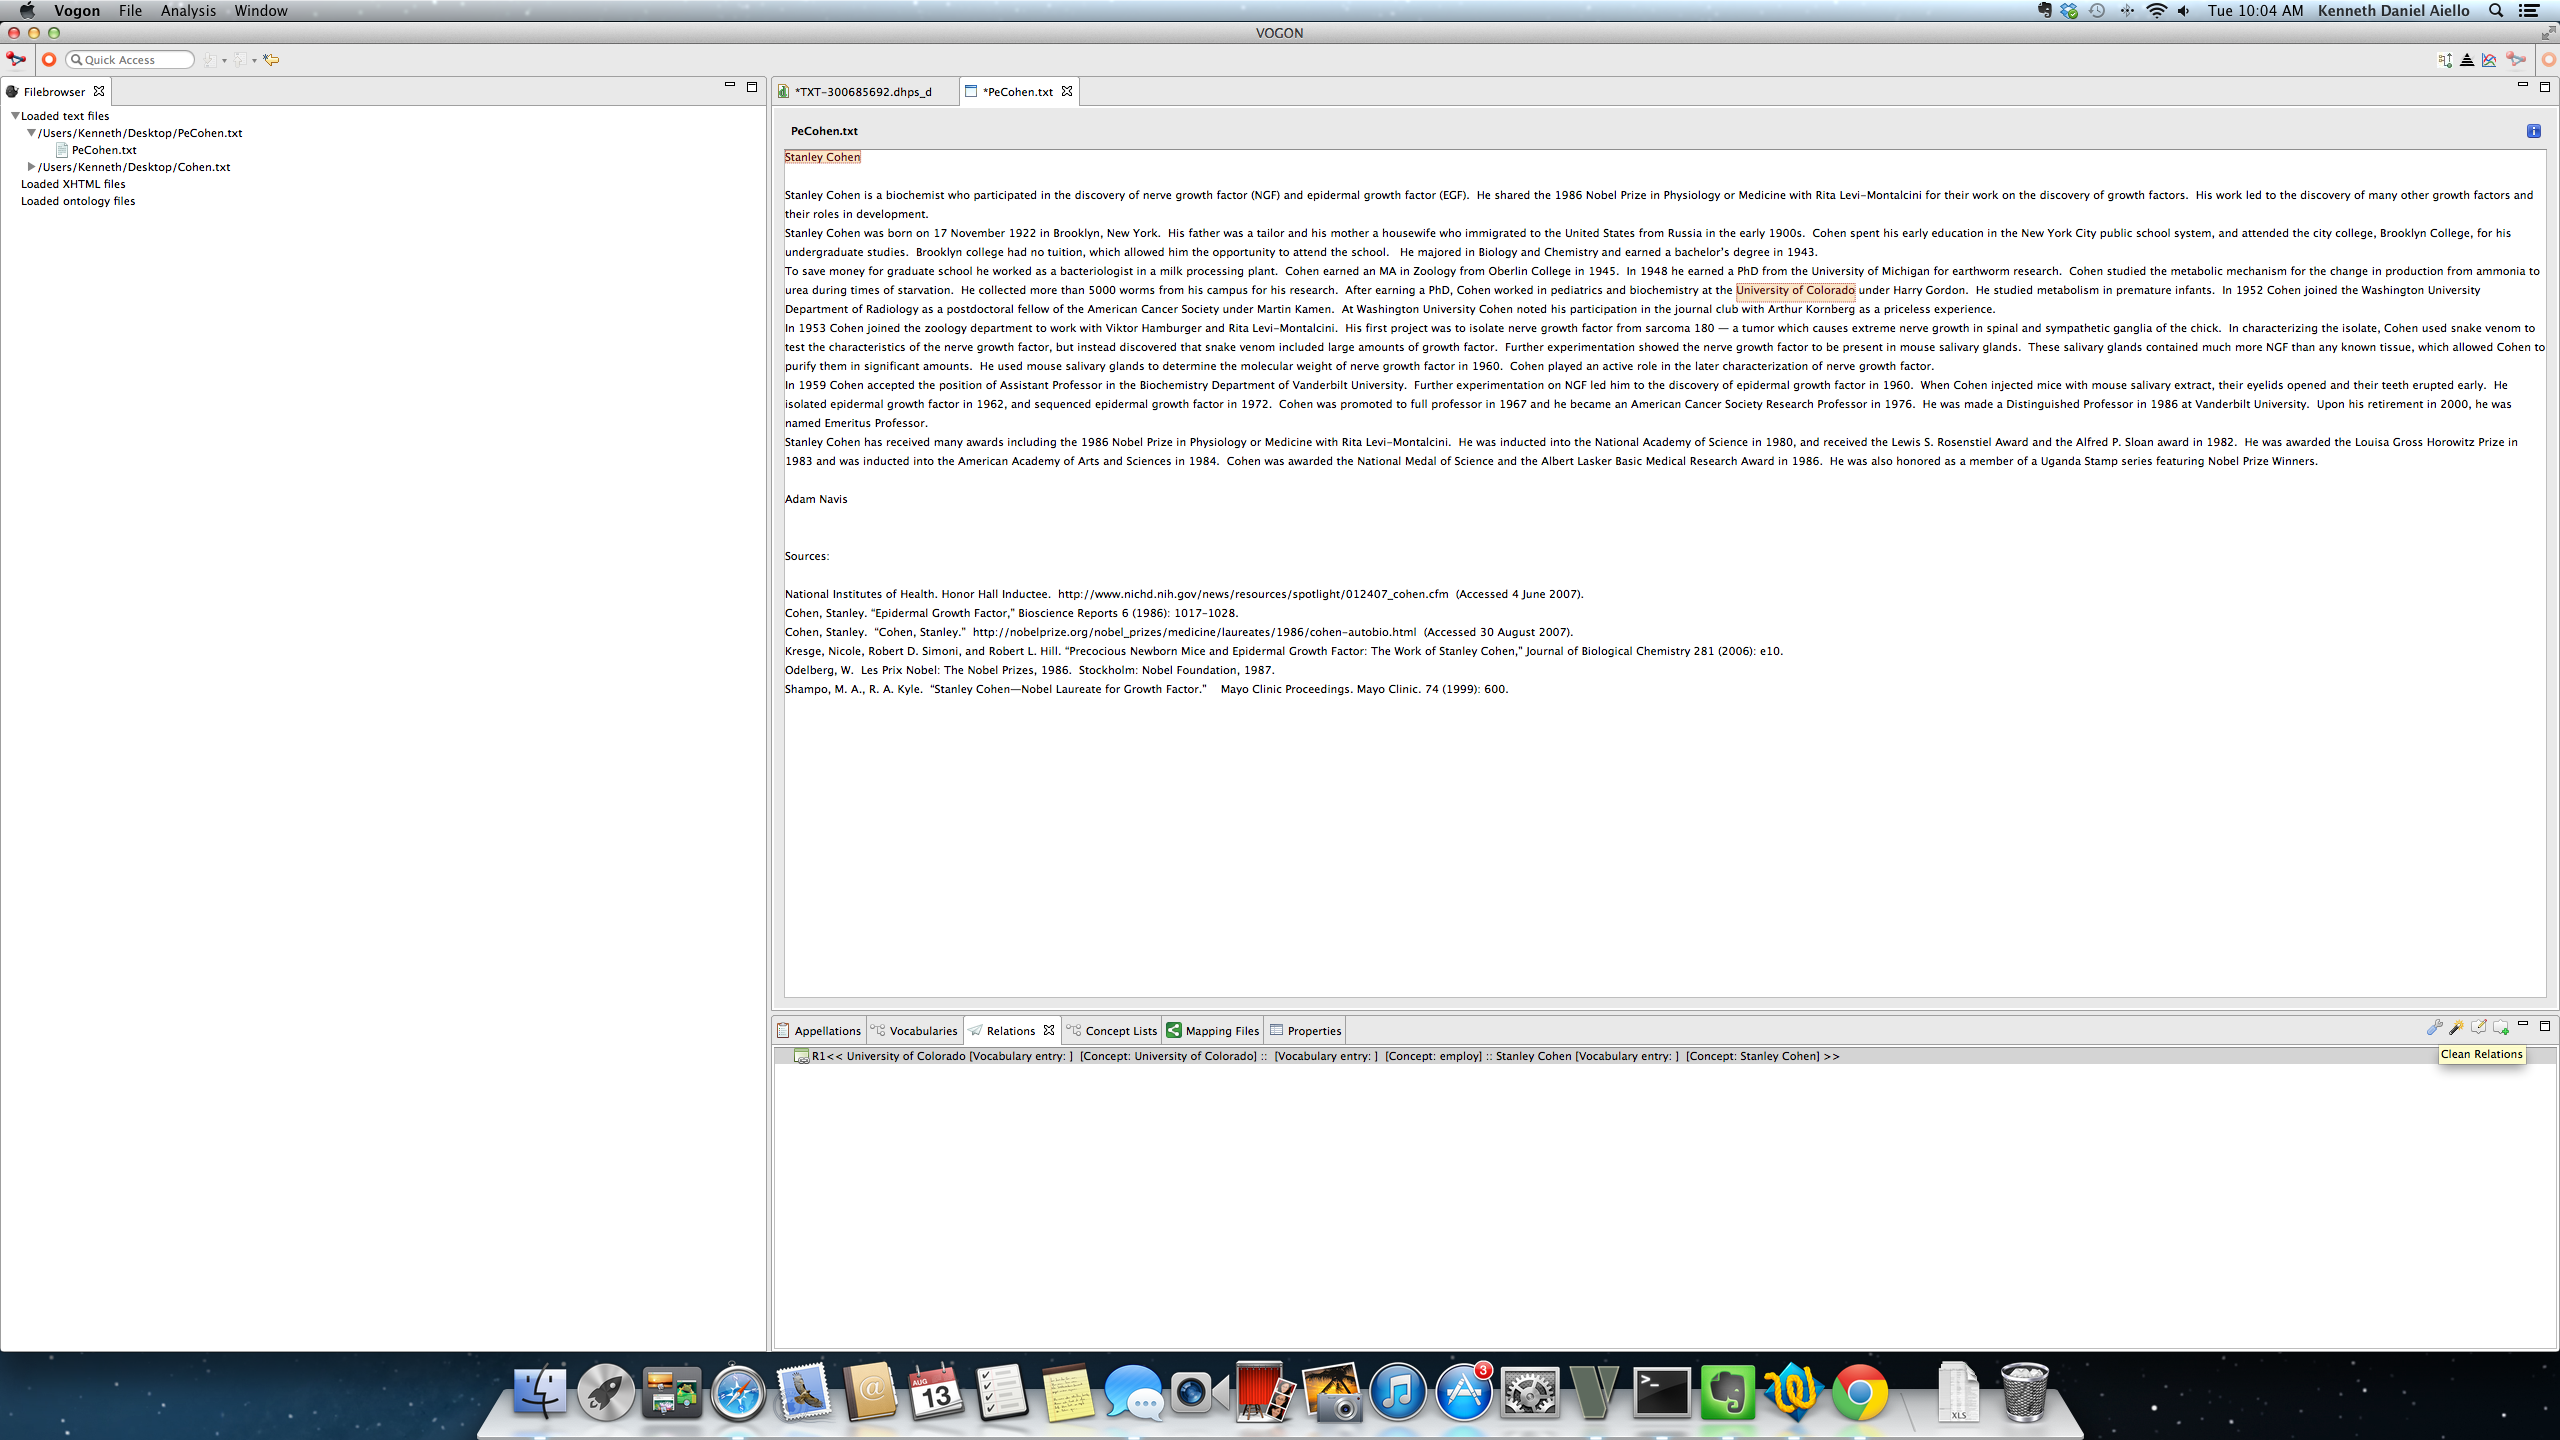
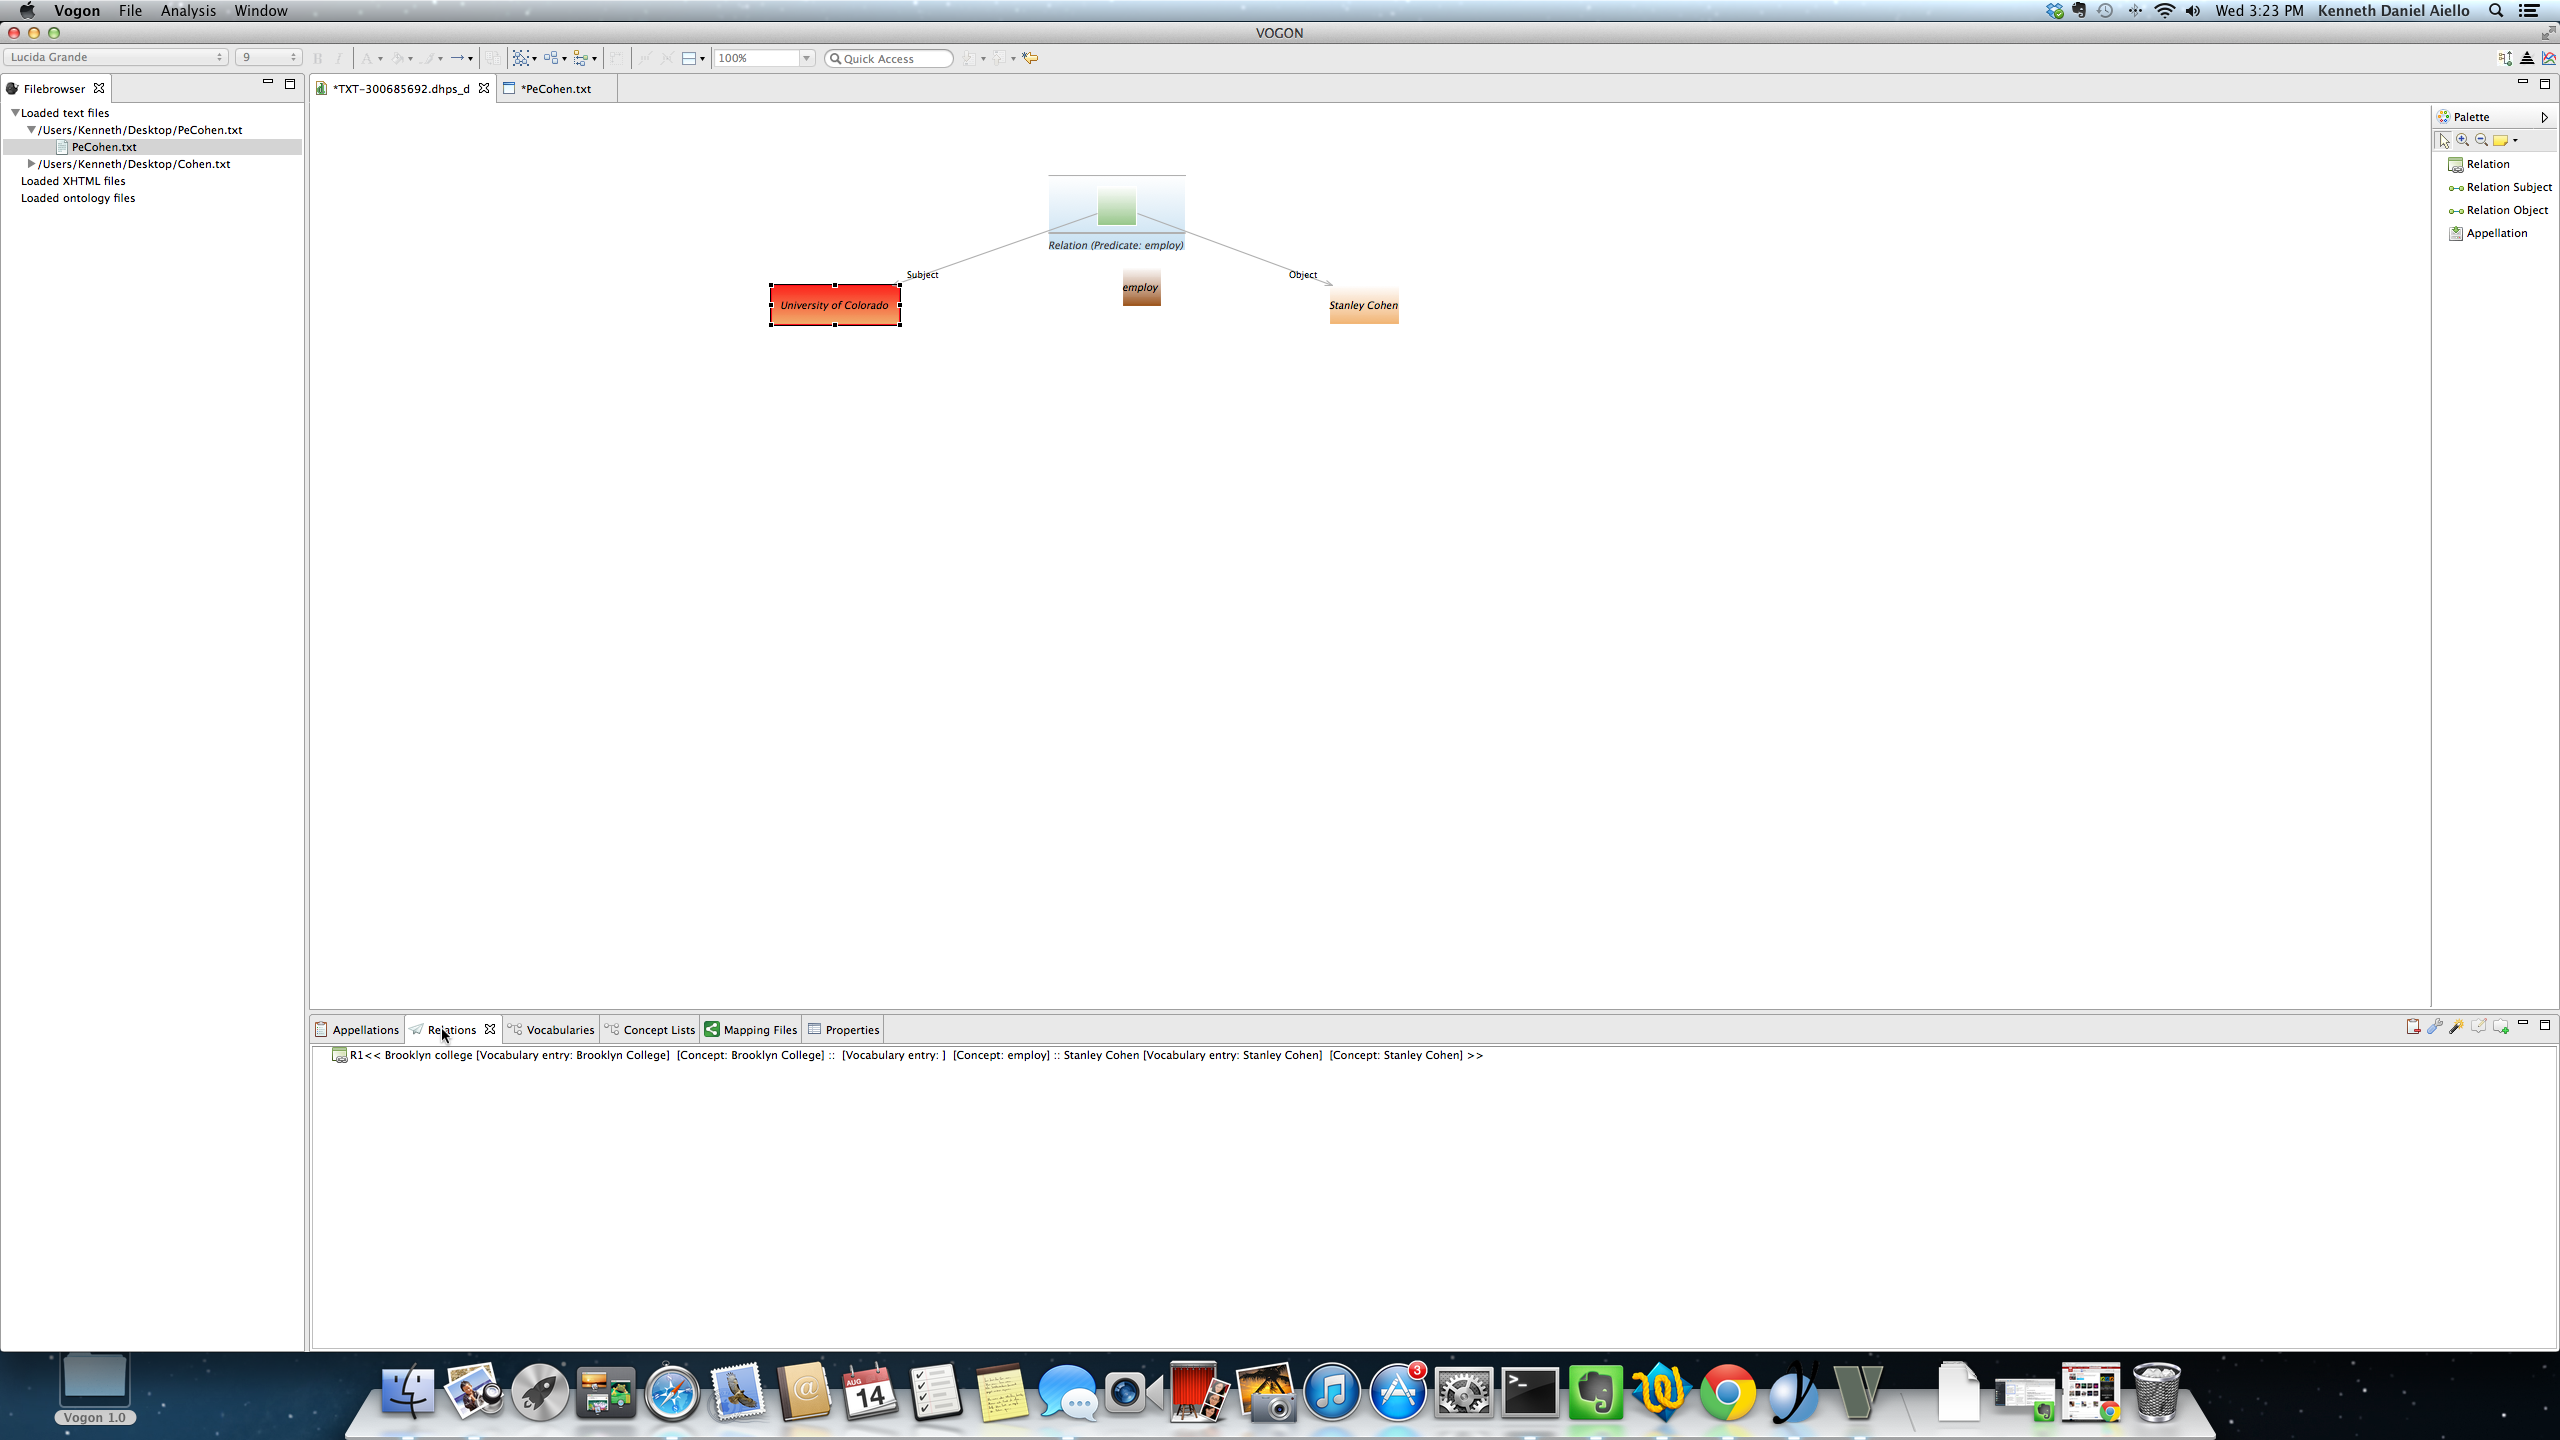
Or represented in the Relations tab as:
R1 << University of Colorado[Vocabulary entry:] [Concept:University of Colorado] :: [Vocabulary entry] [Concept: employ] :: Stanley Cohen [Vocabulary entry::] [Concept: Stanley Cohen] >>
Any relations selected in the Relations tab or in the Graphical Editor Main window the appellations that are part of that relation will be in red boxes. The relation is selected by single clicking on the relation in the Relation tab or in the Graphical Editor Main window. By selecting a relation you can edit the relations size, location, and other properties. To unselect click anywhere in any open area in the Graphical Editor Main window.
Continuing with this example the in the Relation tab the relation R1 << University of Colorado[Vocabulary entry:] [Concept:University of Colorado] :: [Vocabulary entry] [Concept: employ] :: Stanley Cohen [Vocabulary entry::] [Concept: Stanley Cohen] >> is highlighted in blue and the relation in the Graphical Editor Main window the appellations are now red.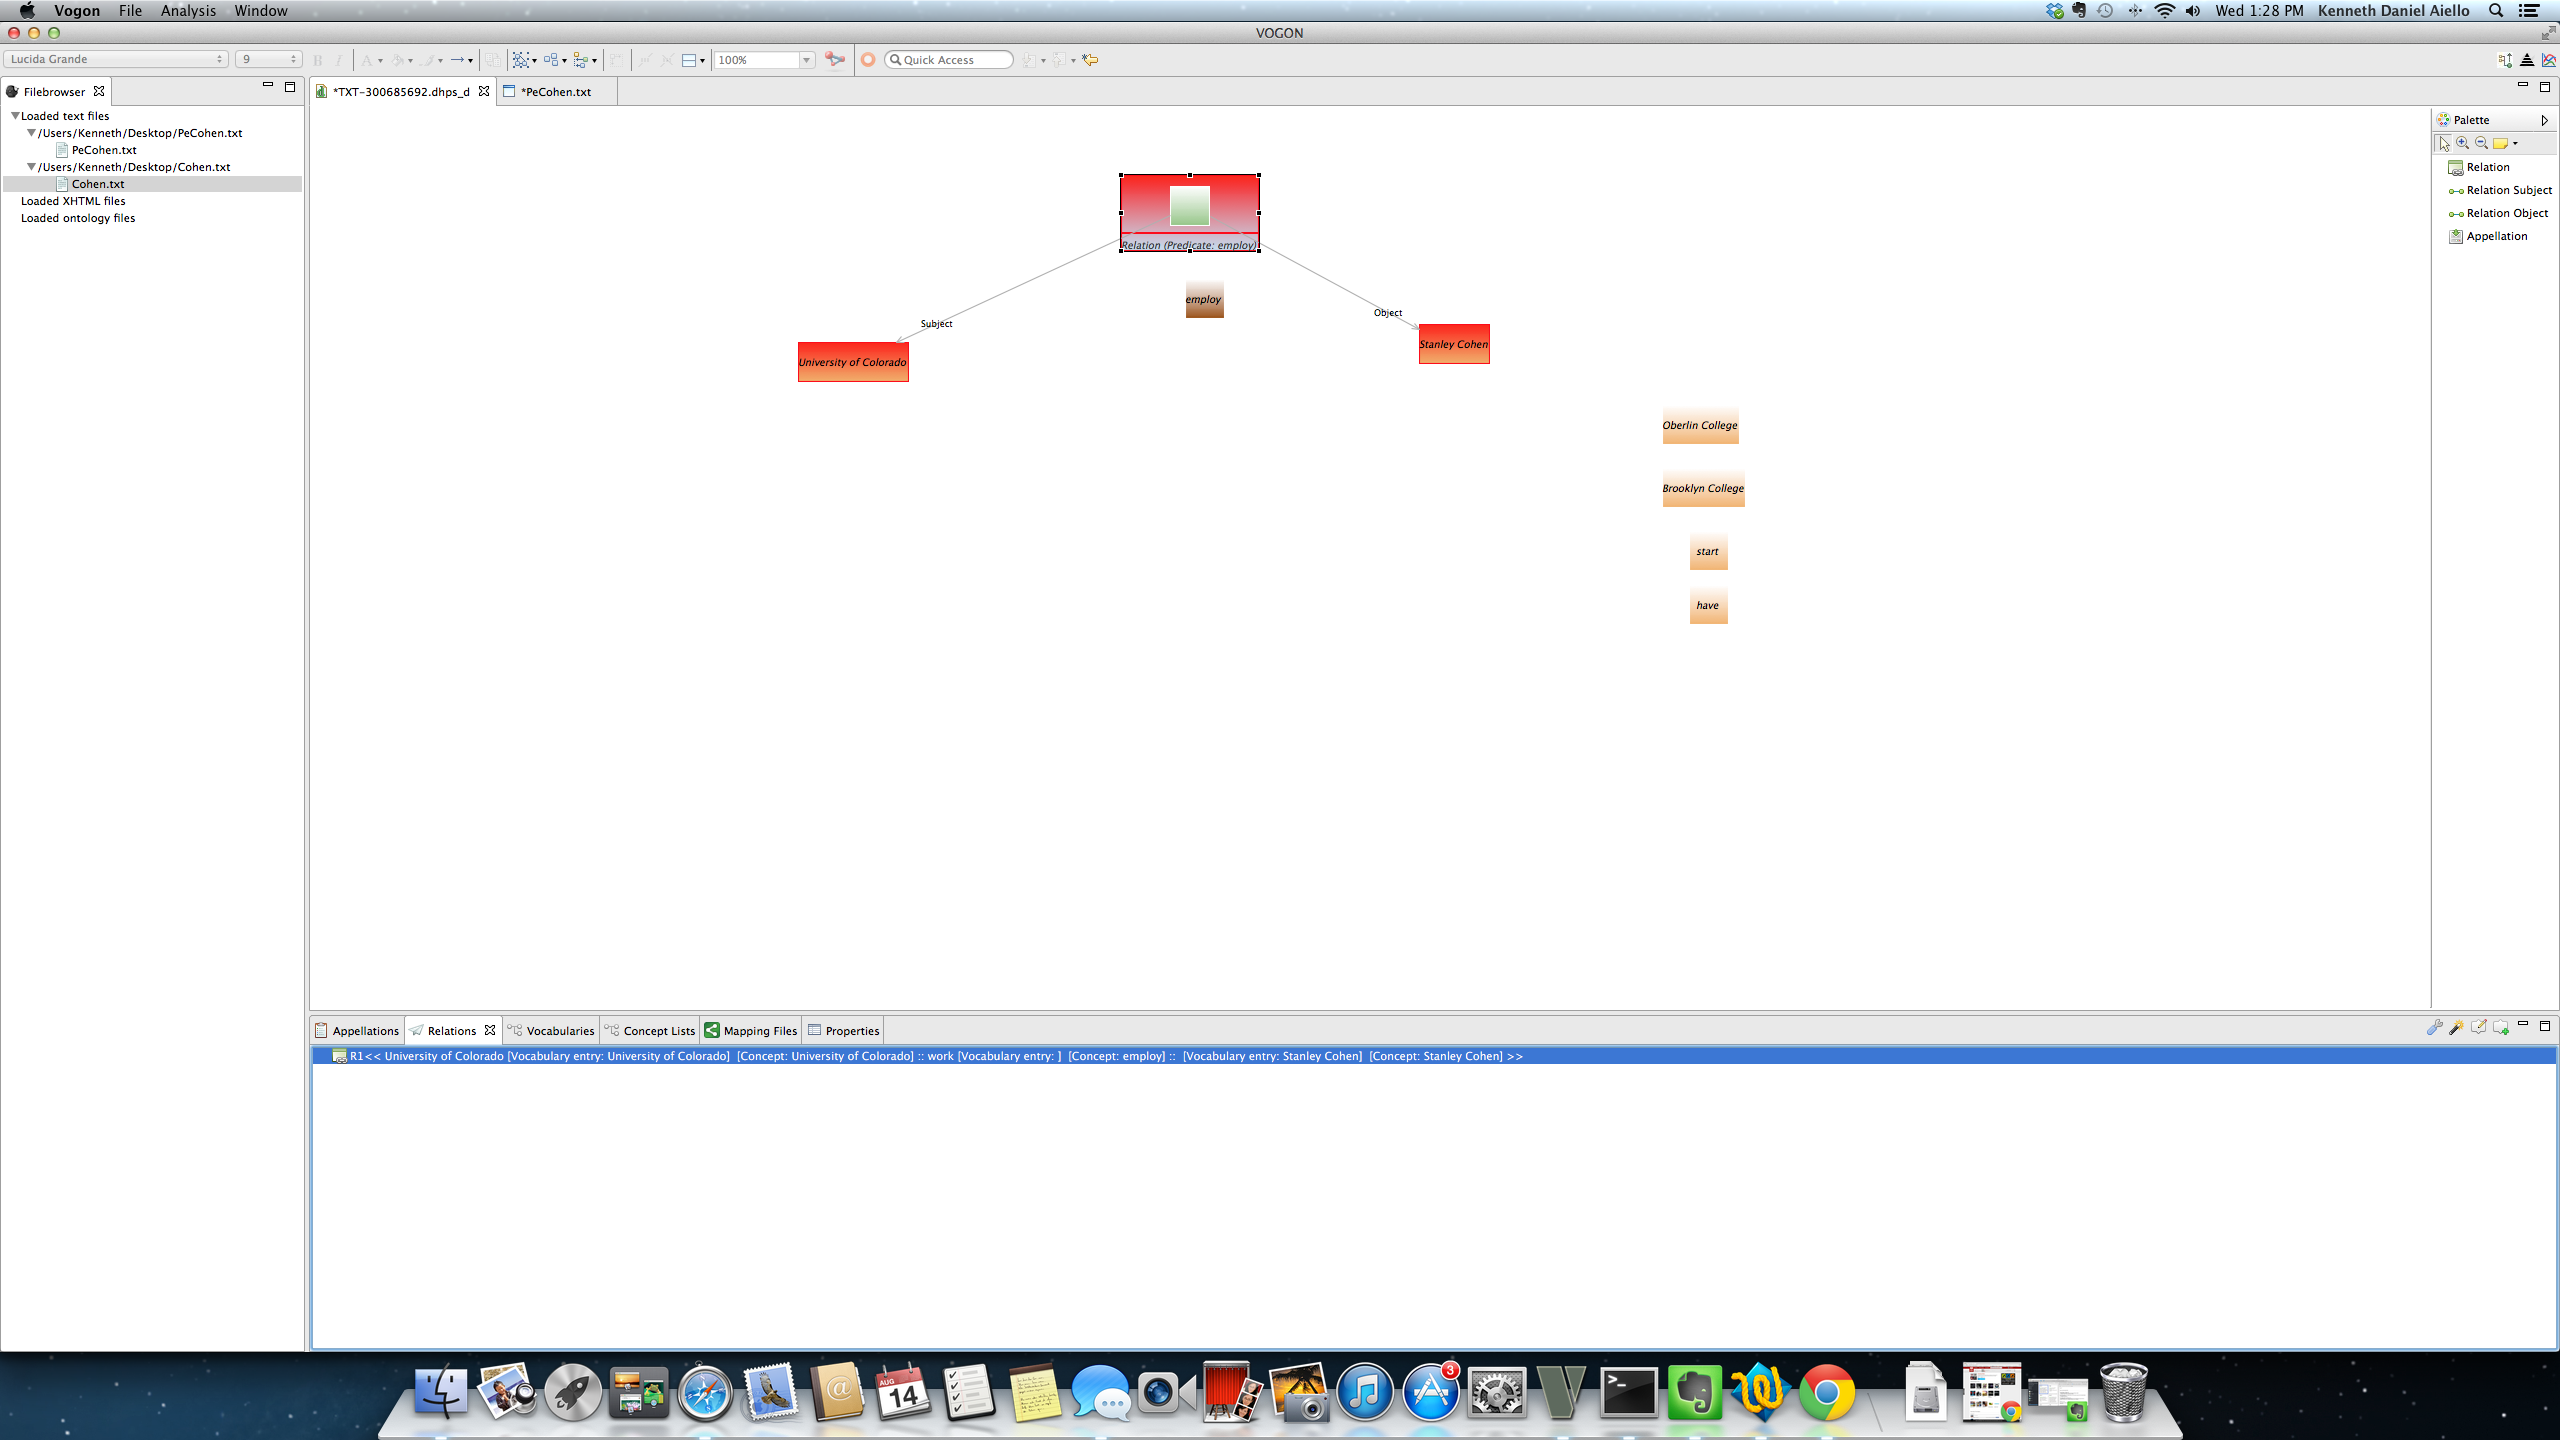
8.4. The Relations Tab
The Relations tab is located in the Vogon User Interface Bottom Window for both the Text and Graphical Editor. The Relations tab has a symbol of a paper airplane.
Every relationship in the Relations Tab is listed in the order it was created.
Each relationship is designated as R n ;( n = the number of triples that are represented). If the relationship represents only one triple, it is represented as R1. If the relationship represents two triples, R2. If the relationship represents three triples, R3 and so on.
The relationship information follows the image of a window with a green top bar, a two link gray chain, R n , and the information from the appellation (Vocabulary and Concept List).
In the following images the Relations tab is highlighted in white, and there is only one triple annottated.
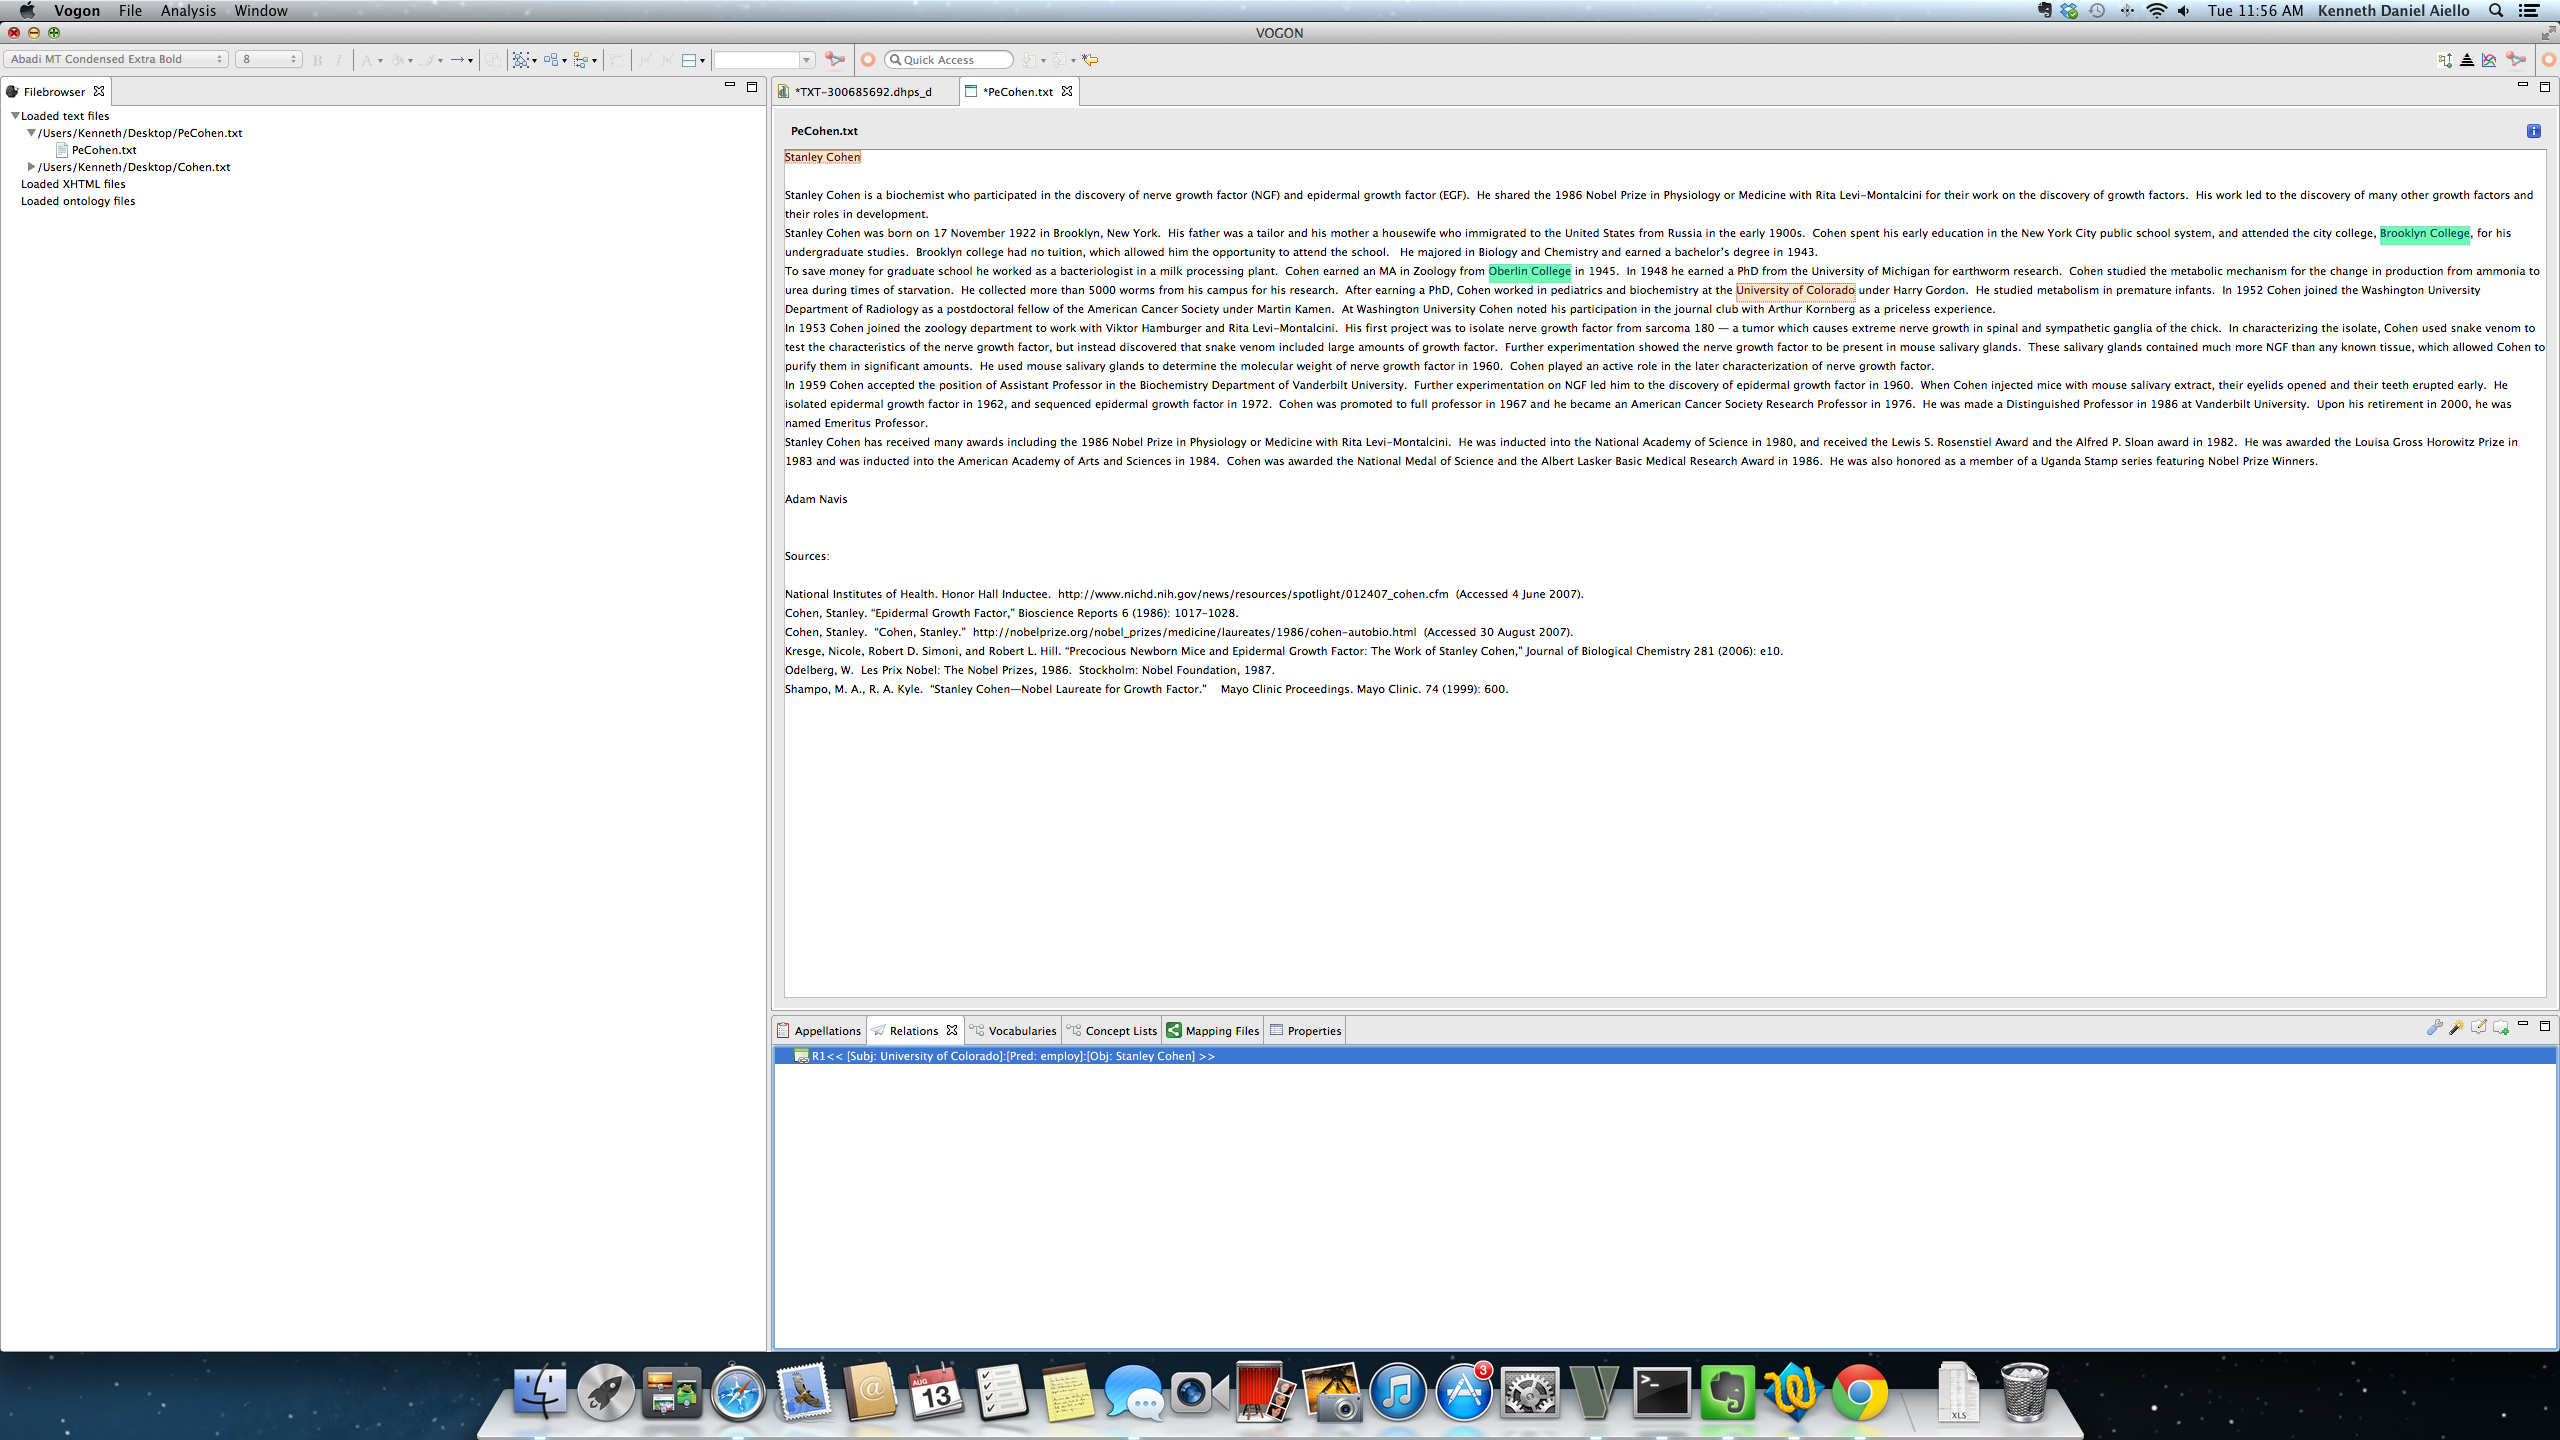
In the example there is one triple annottated, represented as:
[Subj: University of Colorado ]:[Pred employ ]: [Obj: Stanley Cohen ]
Or
R1 << University of Colorado[Vocabulary entry:] [Concept:University of Colorado] :: [Vocabulary entry] [Concept: employ] :: Stanley Cohen [Vocabulary entry::] [Concept: Stanley Cohen] >>
Text Editor
and
Graphical Editor
8.4.1. Relations Tab: Function Buttons
After the Relations tab is selected to the right of all the tabs there are the images of a blue and gray wrench, magic wand, bubble and pencil, bubble with green plus sign, minimize window button, and maximize window button.
These images are the function buttons of the Relations tab. The function buttons and pop up windows are the same in the Text and Graphical Editor.
In order to use the function buttons in the Relation tab the relation must be highlighted blue or gray.
The active relation will be highlighted blue if you are in the Relation tab. Gray if the user is outside the Relation tab.
Active relation in Relation Tab
Active relation outside of Relation tab

8.4.1.1. blue and gray wrench = Clean Relations
By clicking on the Clean Relations button Vogon will perform a check to ensure the relations created have the necessary information and do not contain any errors.
If all of the relations created can be processed by Vogon the following message will pop up
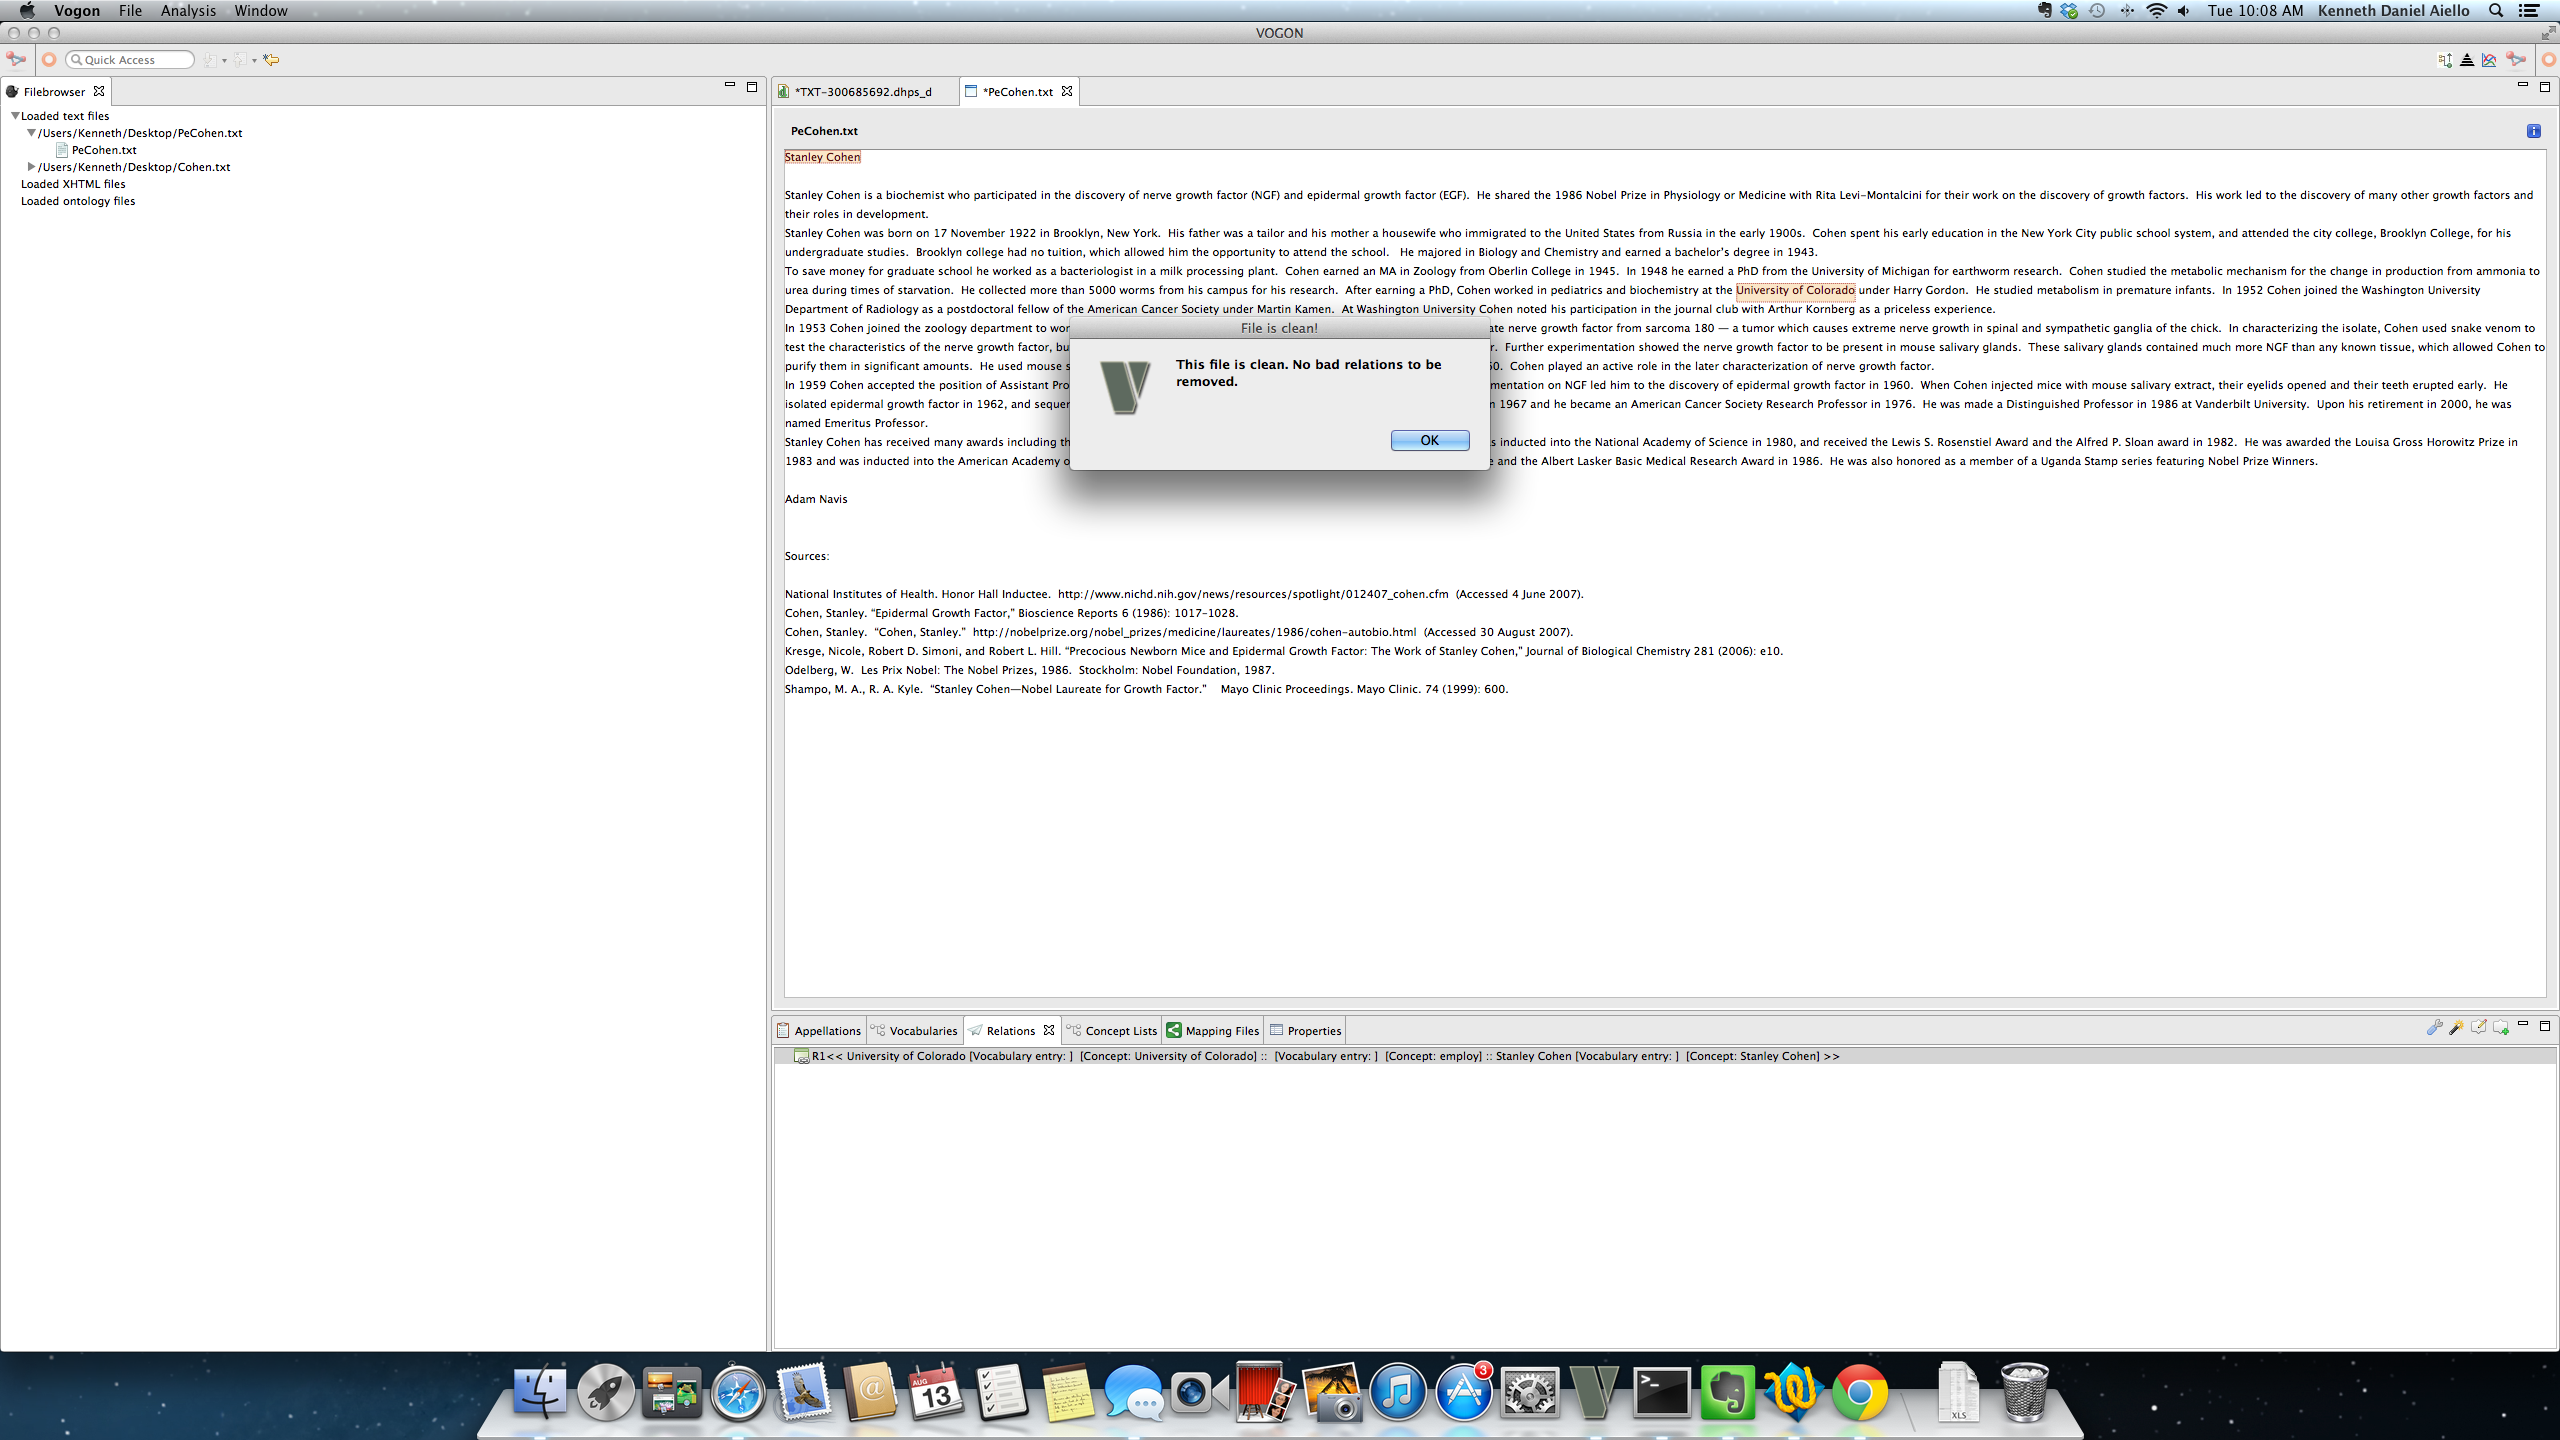
8.4.1.2. magic wand = Change Description Length
The default representation of all relations in the Relation tab created in Vogon is the appellation view. The appellation view displays both the normalization and intepretation of every word in the relation:
The word from the normalization used to create the appellation will be listed before the [Vocabulary entry:] or normalization [Vocabulary entry:]
The concept of the interpretation used to create the appellation will be listed after the [Concept:] or [Concept: interpretation ]
In Vogon the user will see all appellatted words in the Relation tab appellated as:
normalization [Vocabulary entry:] [Concept: interpretation ]
Every relation in the appellation view will have two colons (::) to separate the parts of the triple, and always be in the order
Subject :: Predicate :: Object
in Vogon the user will see:
normalization [Vocabulary entry:] [Concept: interpretation ] :: normalization [Vocabulary entry:] [Concept: interpretation ] :: normalization [Vocabulary entry:] [Concept: interpretation ]
If a baseless appellation (word without a normalization) is part of a relation there will be left unpopulated before the appellated word’s [Vocabulary entry]
In this example, R1 << University of Colorado[Vocabulary entry:] [Concept:University of Colorado] :: [Vocabulary entry] [Concept: employ] :: Stanley Cohen [Vocabulary entry::] [Concept: Stanley Cohen] >>
In this example, the subject and object are text based appellations and have both the normalization and interpretation populated
In this example, the predicate employ is a baseless appellation

By clicking on the Change Description Length button in the Relations tab all relations will now be seen as a triple with only the interpretation of the Subject, Predicate, and Object visible in the Relations tab.
Represented as: R1 <<[Subj: interpretation ]:[Pred interpretation ]: [Obj: interpretation ] >>
In this example there is only one relation, R1 << [Subj: University of Colorado]:[Pred:employ][Obj:Stanley Cohen] >>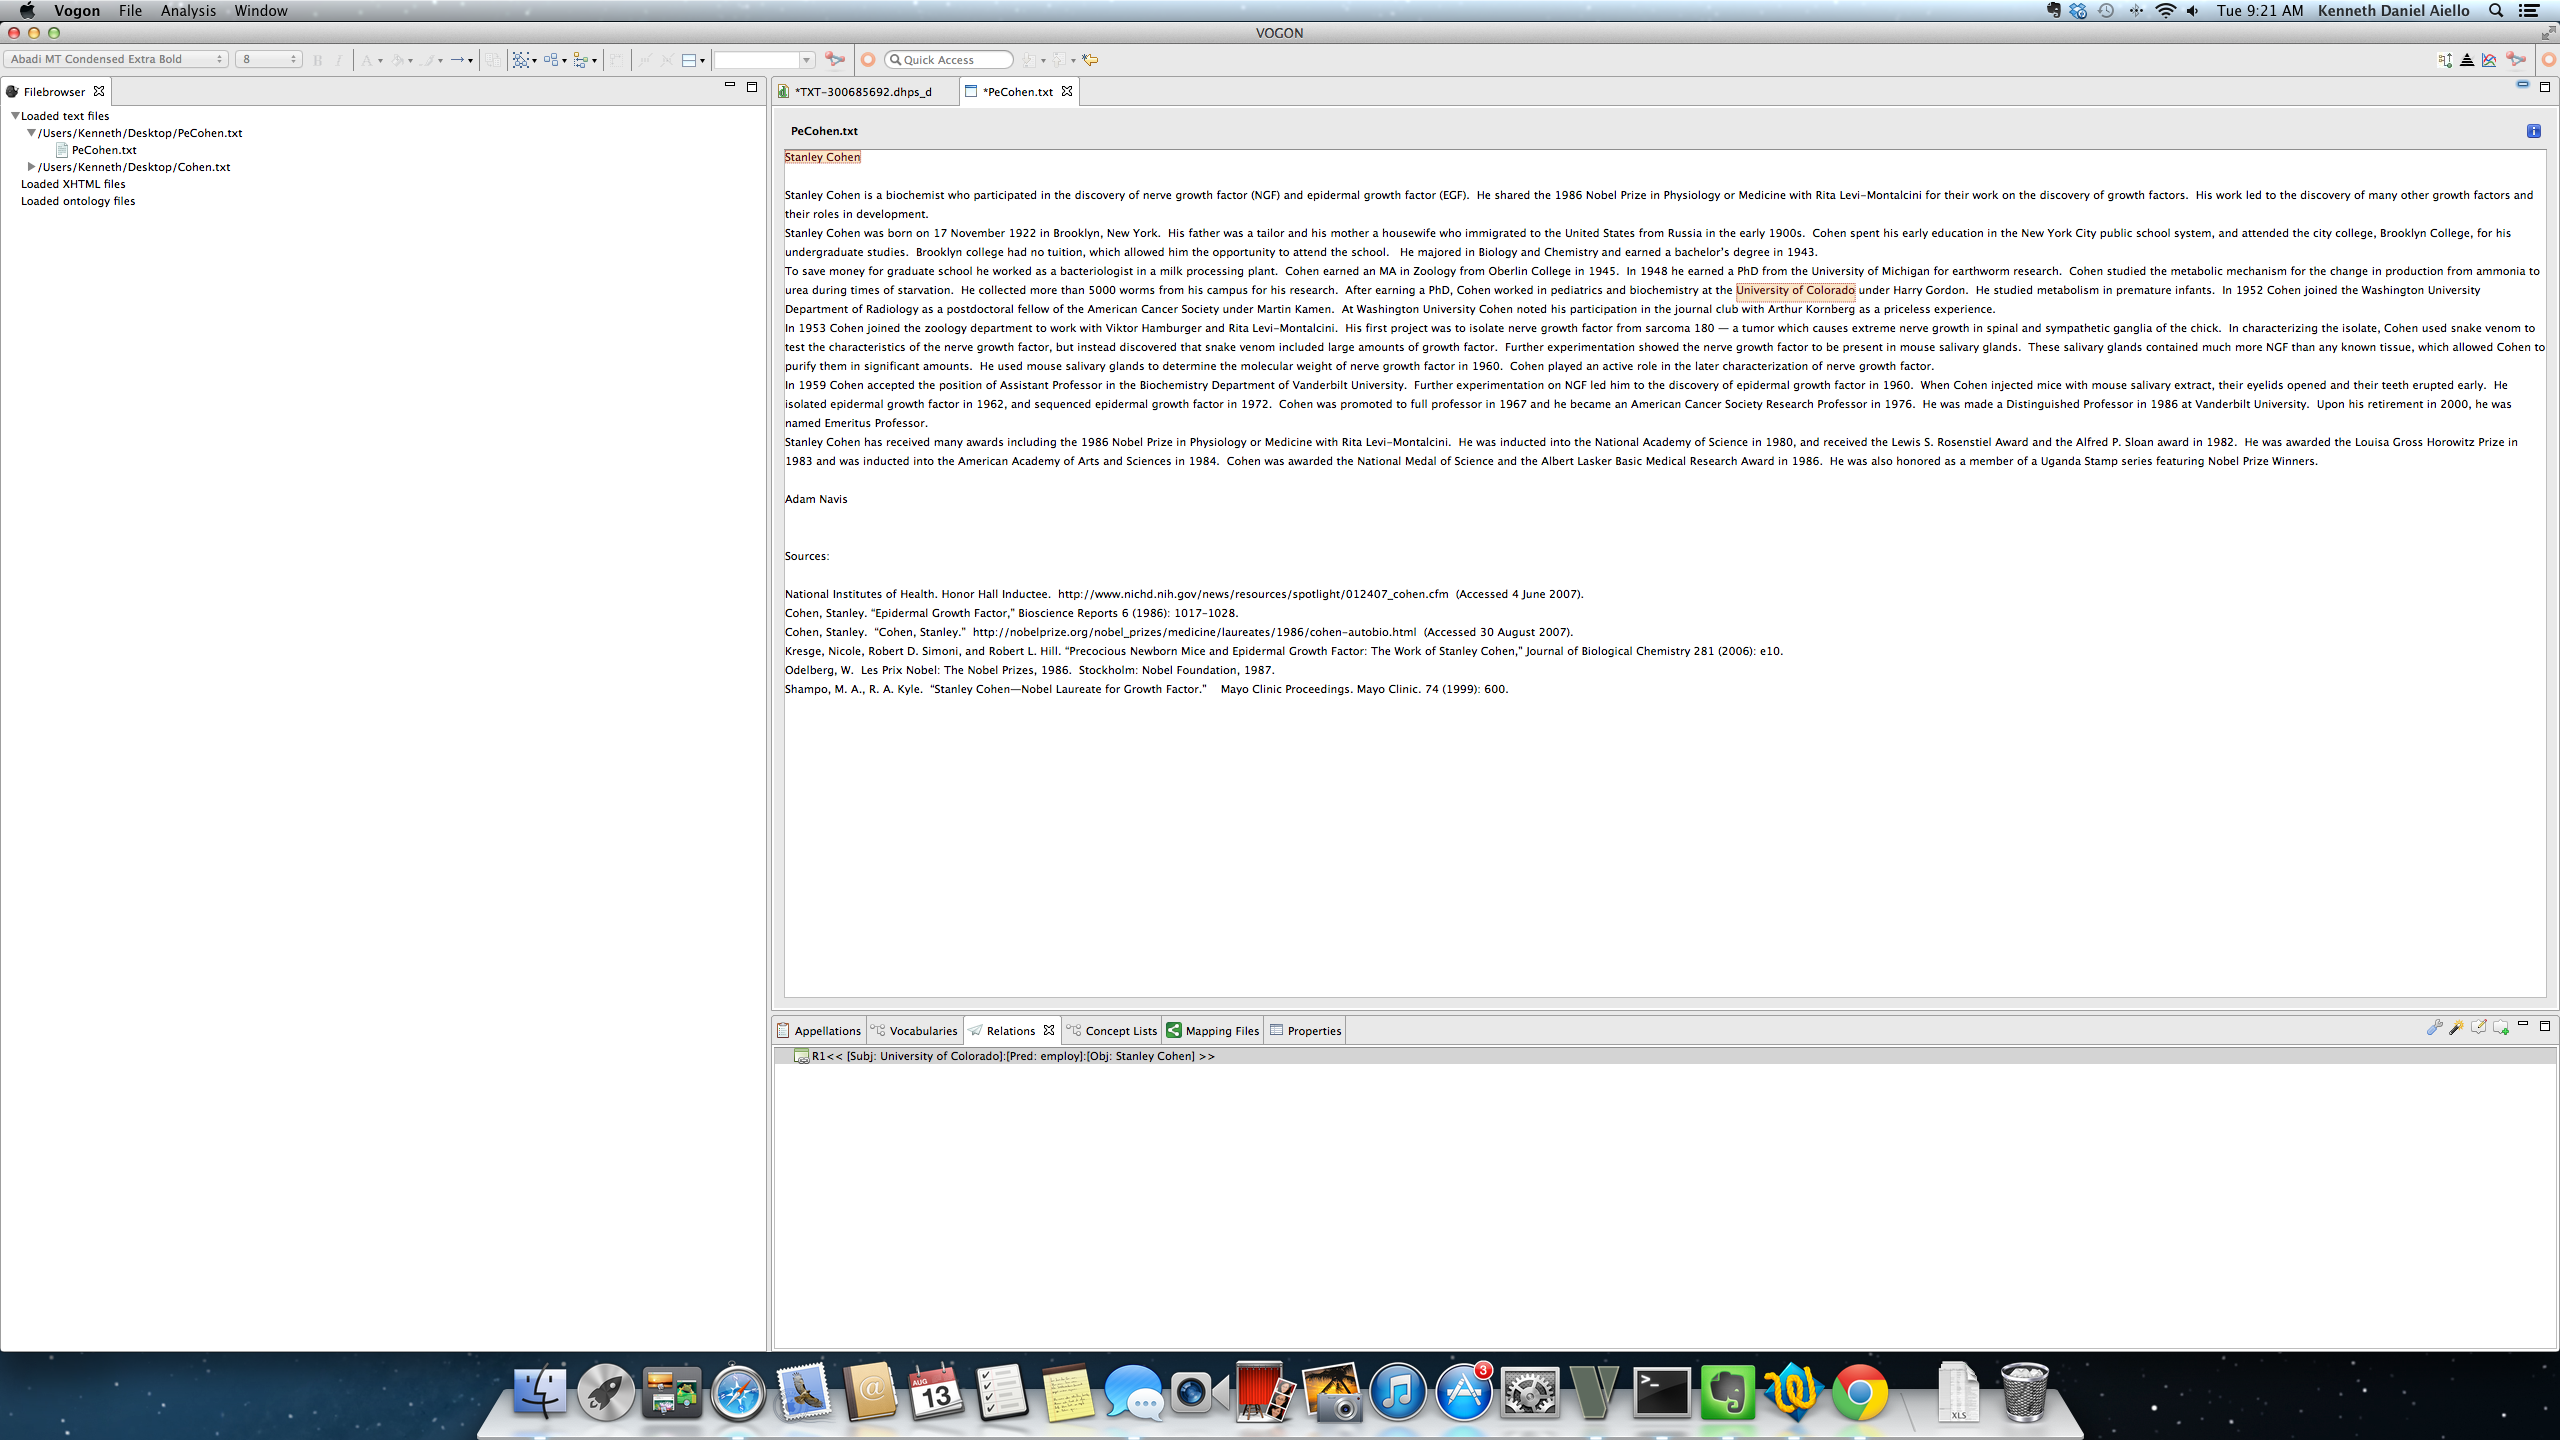
From this point forward in the tutorial relations will only be shown in triples format.
8.4.1.3. bubble with paper and pencil = Edit Relation
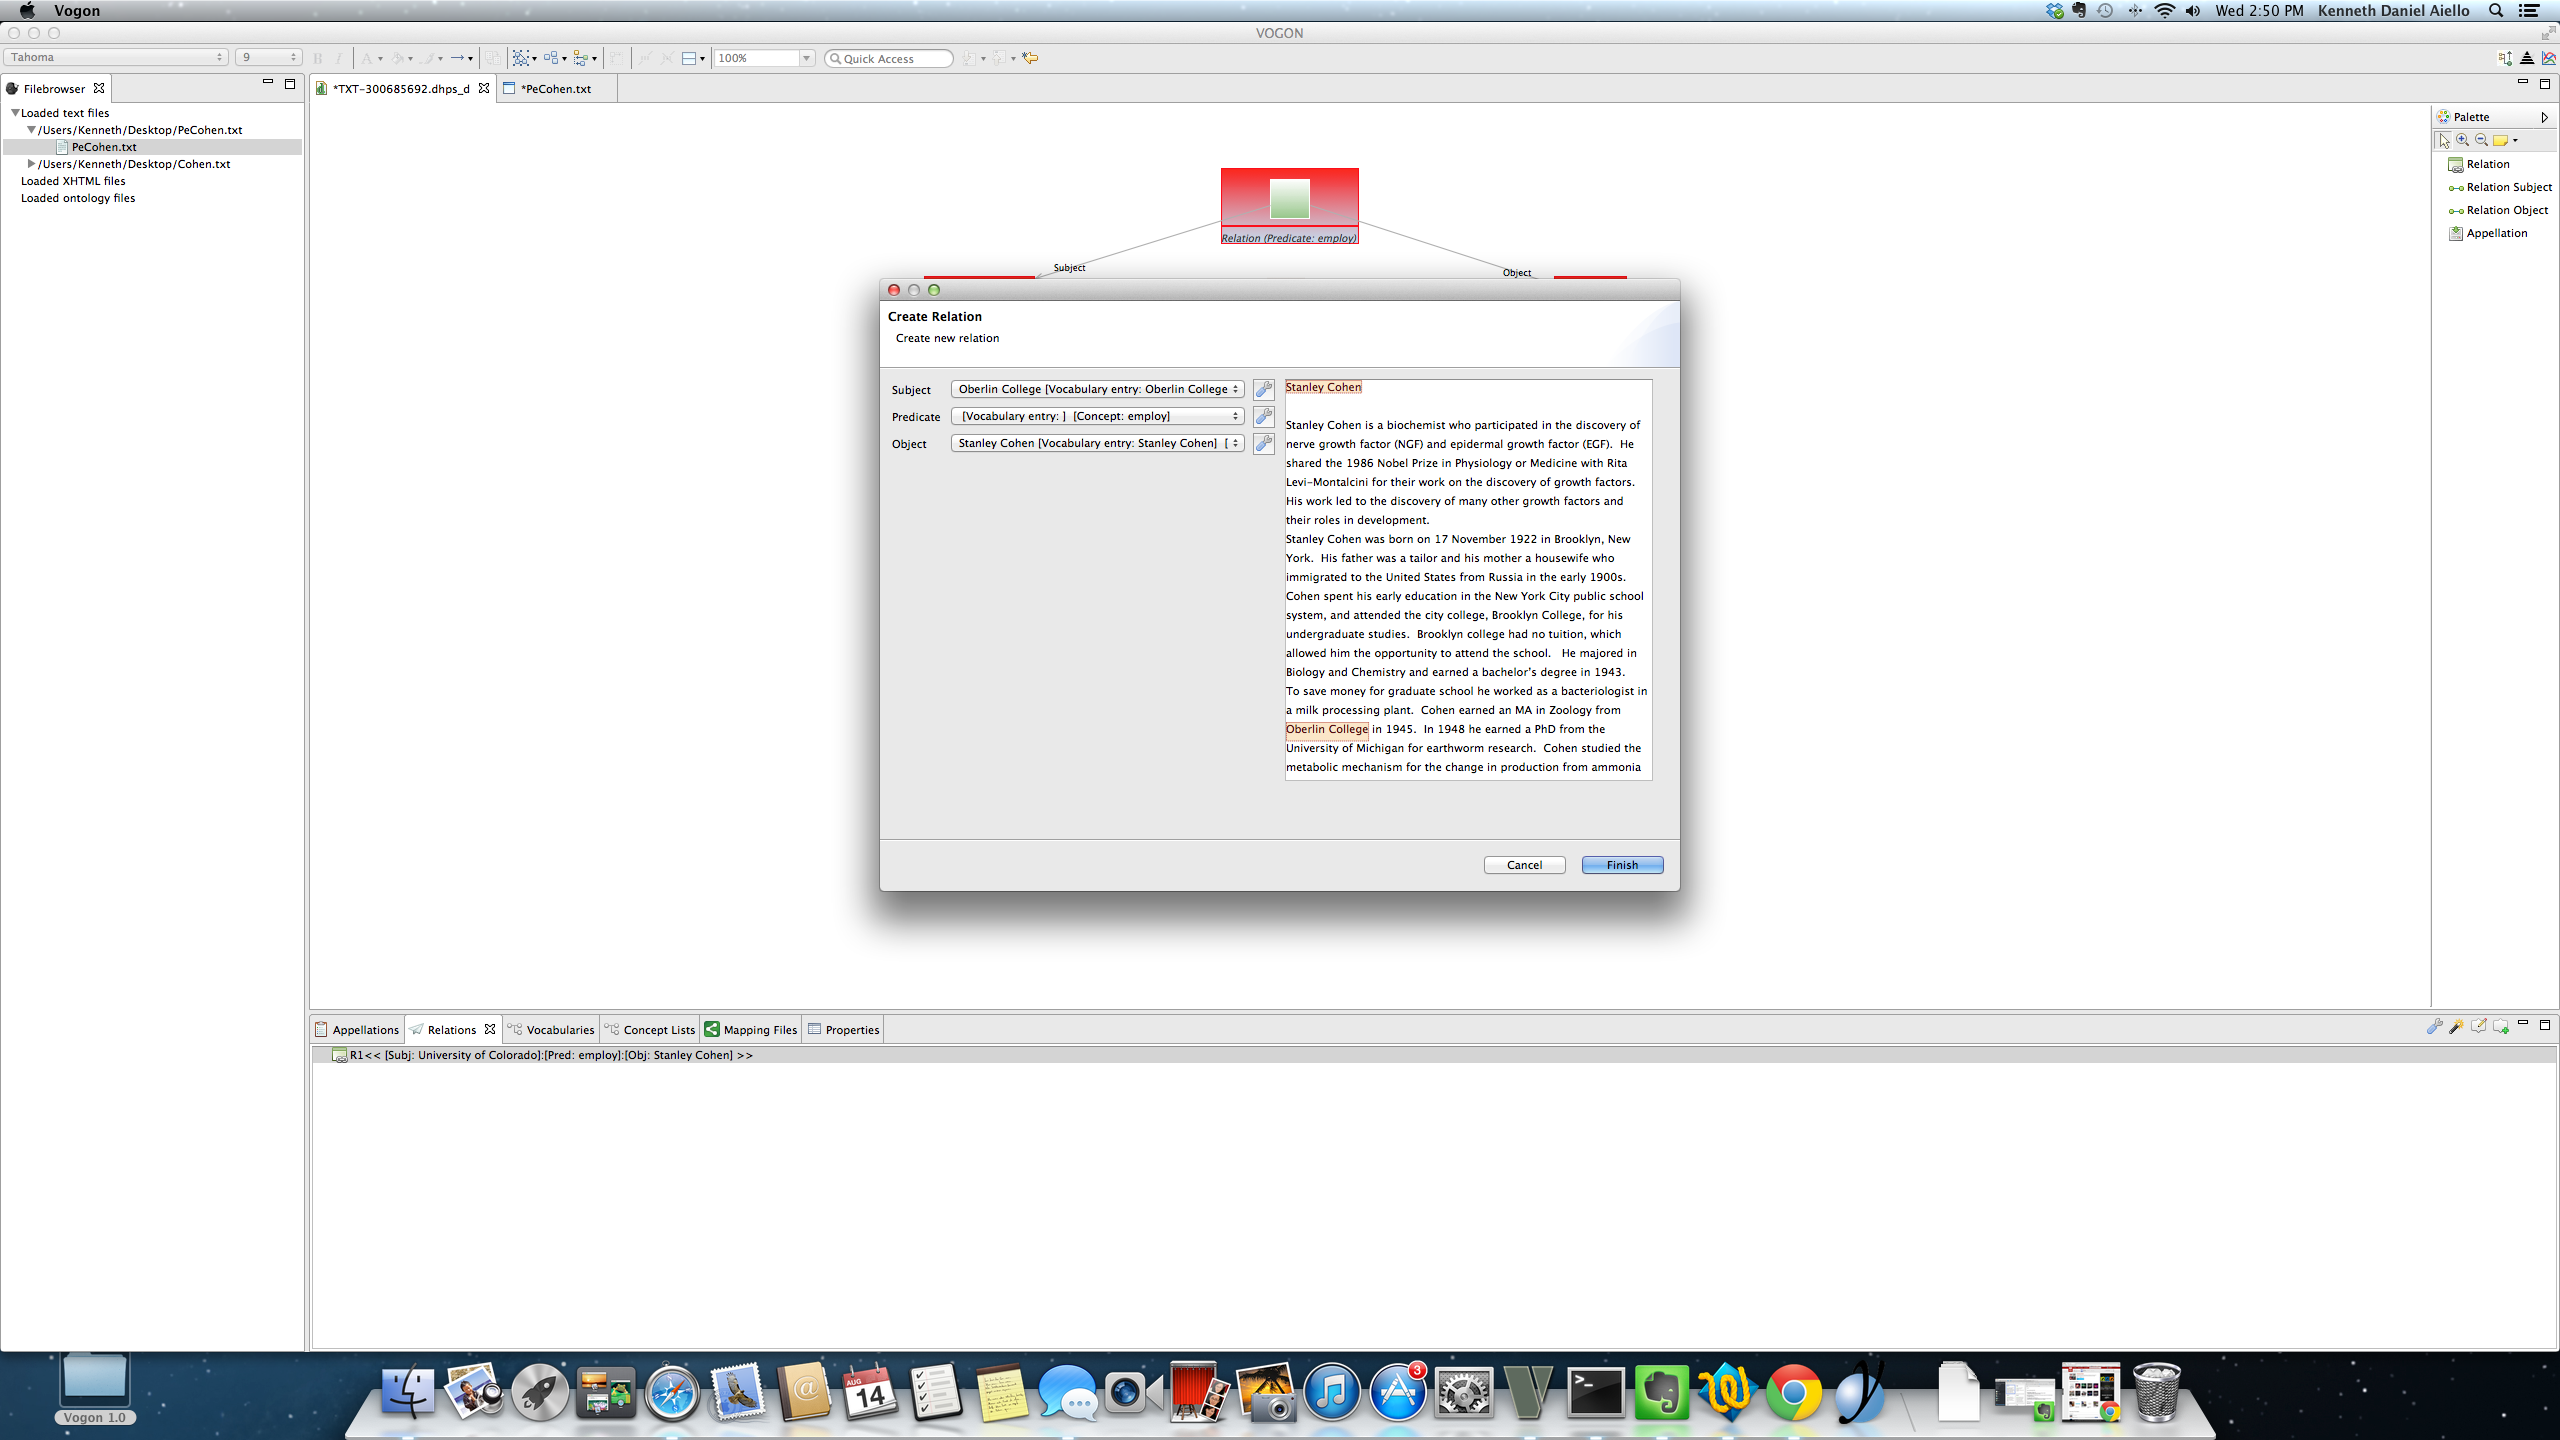
By highlighting a relation and then clicking on this Edit Relation button the Create New Relation window pops up. In this window you can edit or change a single relations Subject, Predicate, and/or Object. The uploaded text file is on the right. All appellated words will be green and all words used in relations will be orange.

After clicking on the Edit Relation button the Create New Relation window pops up.

8.4.1.4. Edit Relation button: Create Relation window:: Relation Triple Bar
Each part of a triple represented has a Subject, Predicate, Object and a Relation Triple Bar populated with the current appellation or relation being used. Clicking on the Relation Triple Bar for any part of the triple allows the user to edit that part of the triple. After clicking on the bar a check mark indicates the current appellation or relation being used. The blue highlight allows the user to select a different appellation or relation. Highlight and then click to change the appellation or relation.The function is carried out by clicking on the blue finish bar.
In this example the Subject bar has been clicked, and the current appellation being used is University of Colorado, indicated by the blue highlight and the check mark.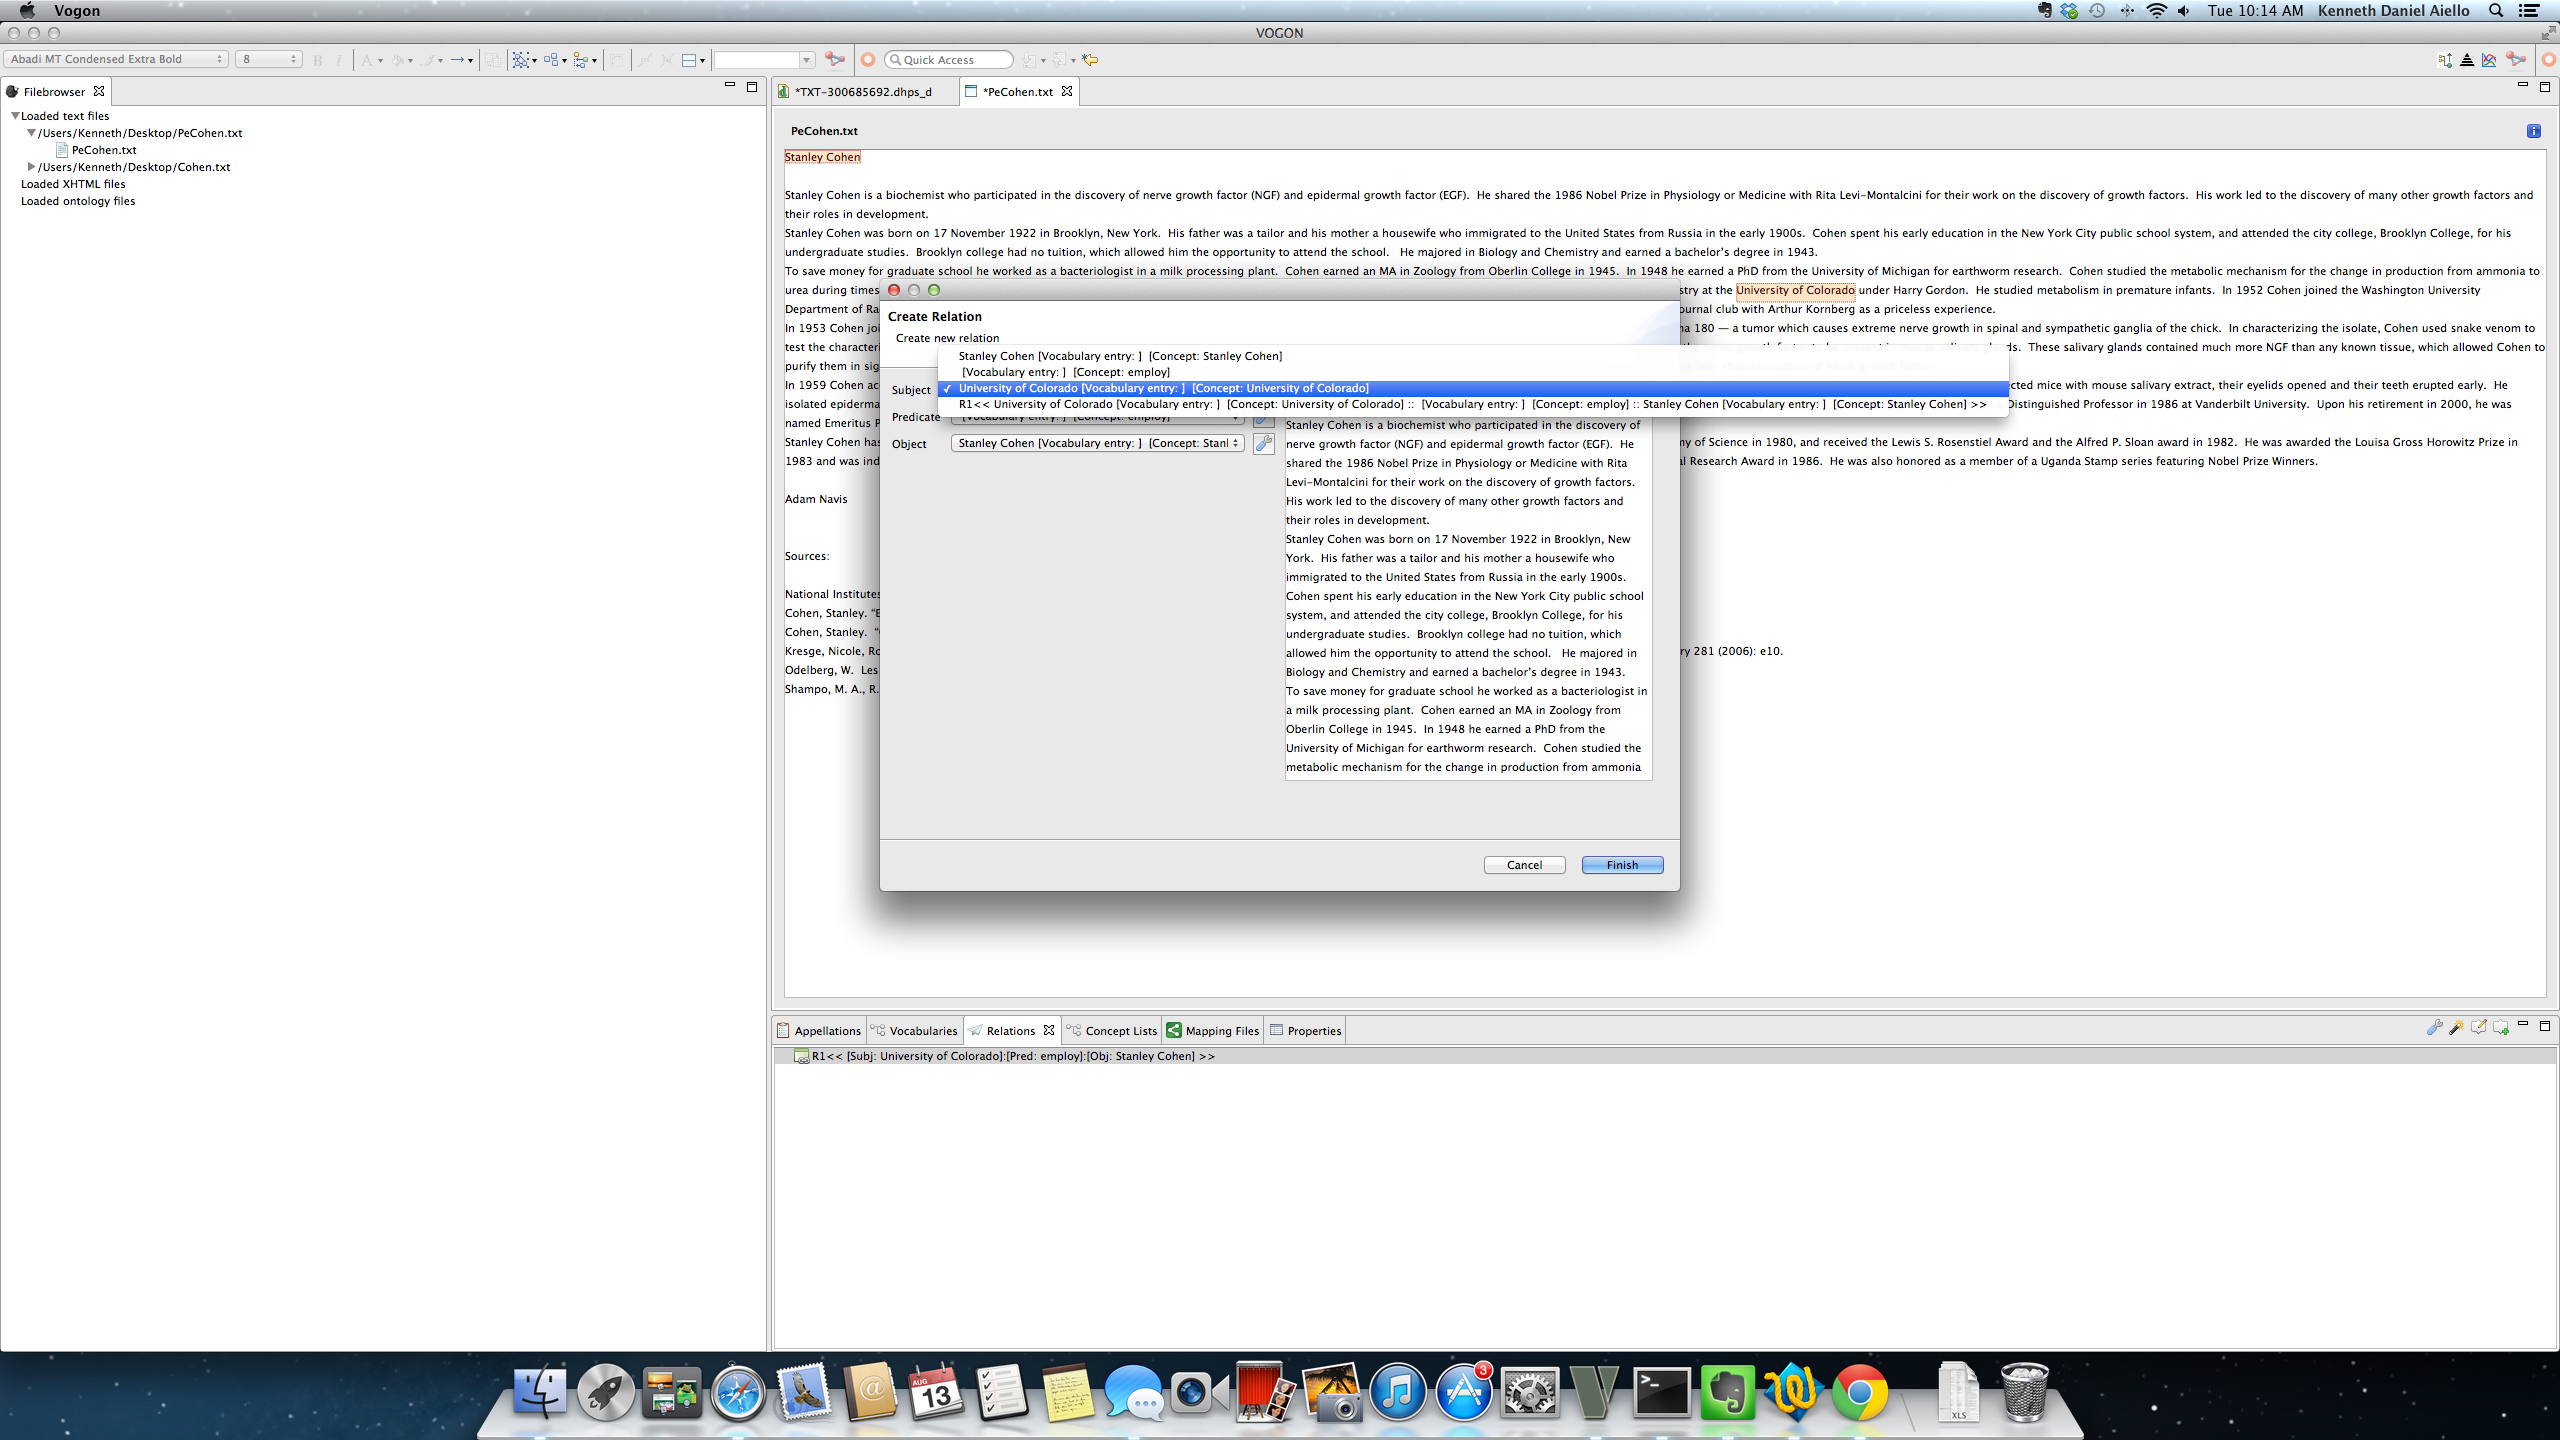
By moving the cursor highlighting a different appellation or relation and then clicking will select and insert the newly selected appellation or relation.
Continuing with this example the Subject bar was clicked, University of Colorado was the previous appellation. Highlighting and clicking on the appellation Stanley Cohen now changes the subject to Stanley Cohen.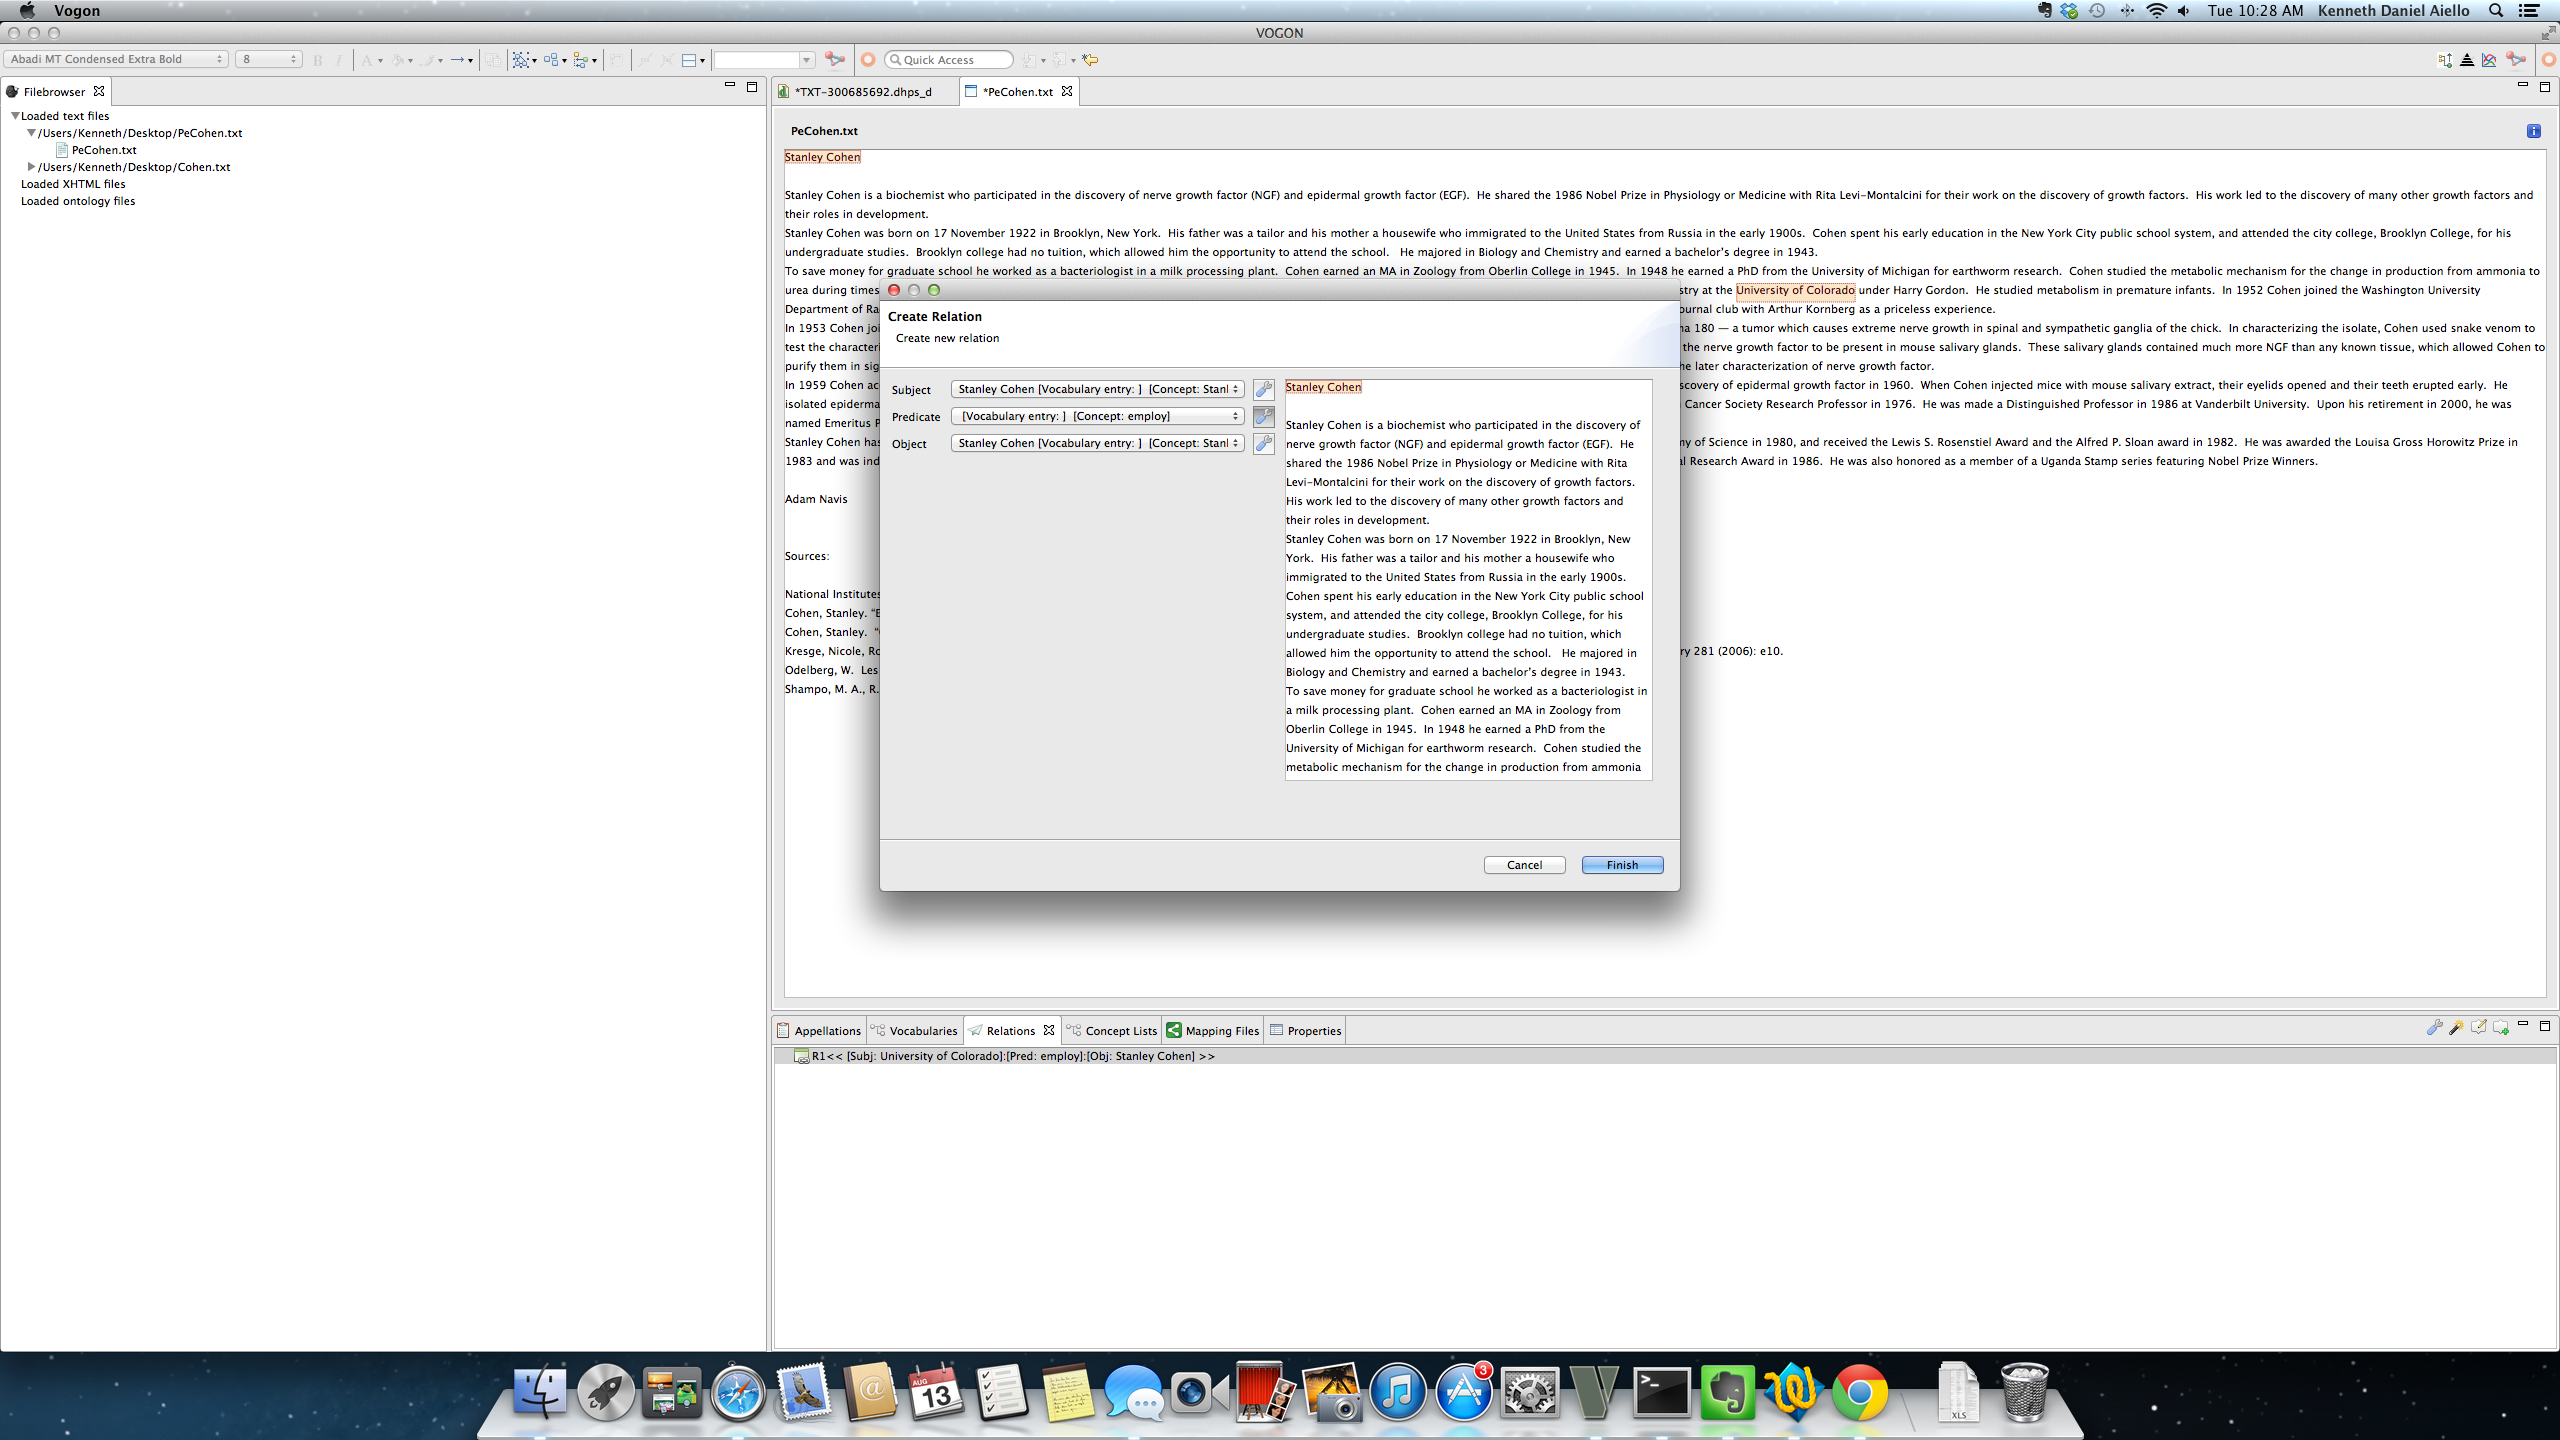
8.4.1.5. Edit Relation button: Create Relation window:: Gray and Blue Wrench
Each part of a triple represented has a Relation Triple Bar followed by a gray and blue wrench. This wrench allows the user to manually select the appellation to be used which will replace the current appellation or relation. By clicking on the wrench, the wrench will turn dark grey. The user then selects the new appellation (highlighted in orange or blue) to be used in the uploaded text window. The new term can be a word that is in a relation. After selecting the new appellation to be used, the term selected will be placed in italics and highlighted green. The function is carried out by clicking on the blue finish bar.
In this example the relation is R1 << [Subj: University of Colorado]:[Pred:employ][Obj:Stanley Cohen] >>, clicking on the wrench turns it dark gray.
After selecting the new appellation to be used, the term selected will be placed in italics and highlighted green.
Continuing with this example, the appellated word Stanley Cohen is selected and italicized and highlighted green. Notice the Relation Triple Bar is also populated with the new appellated word.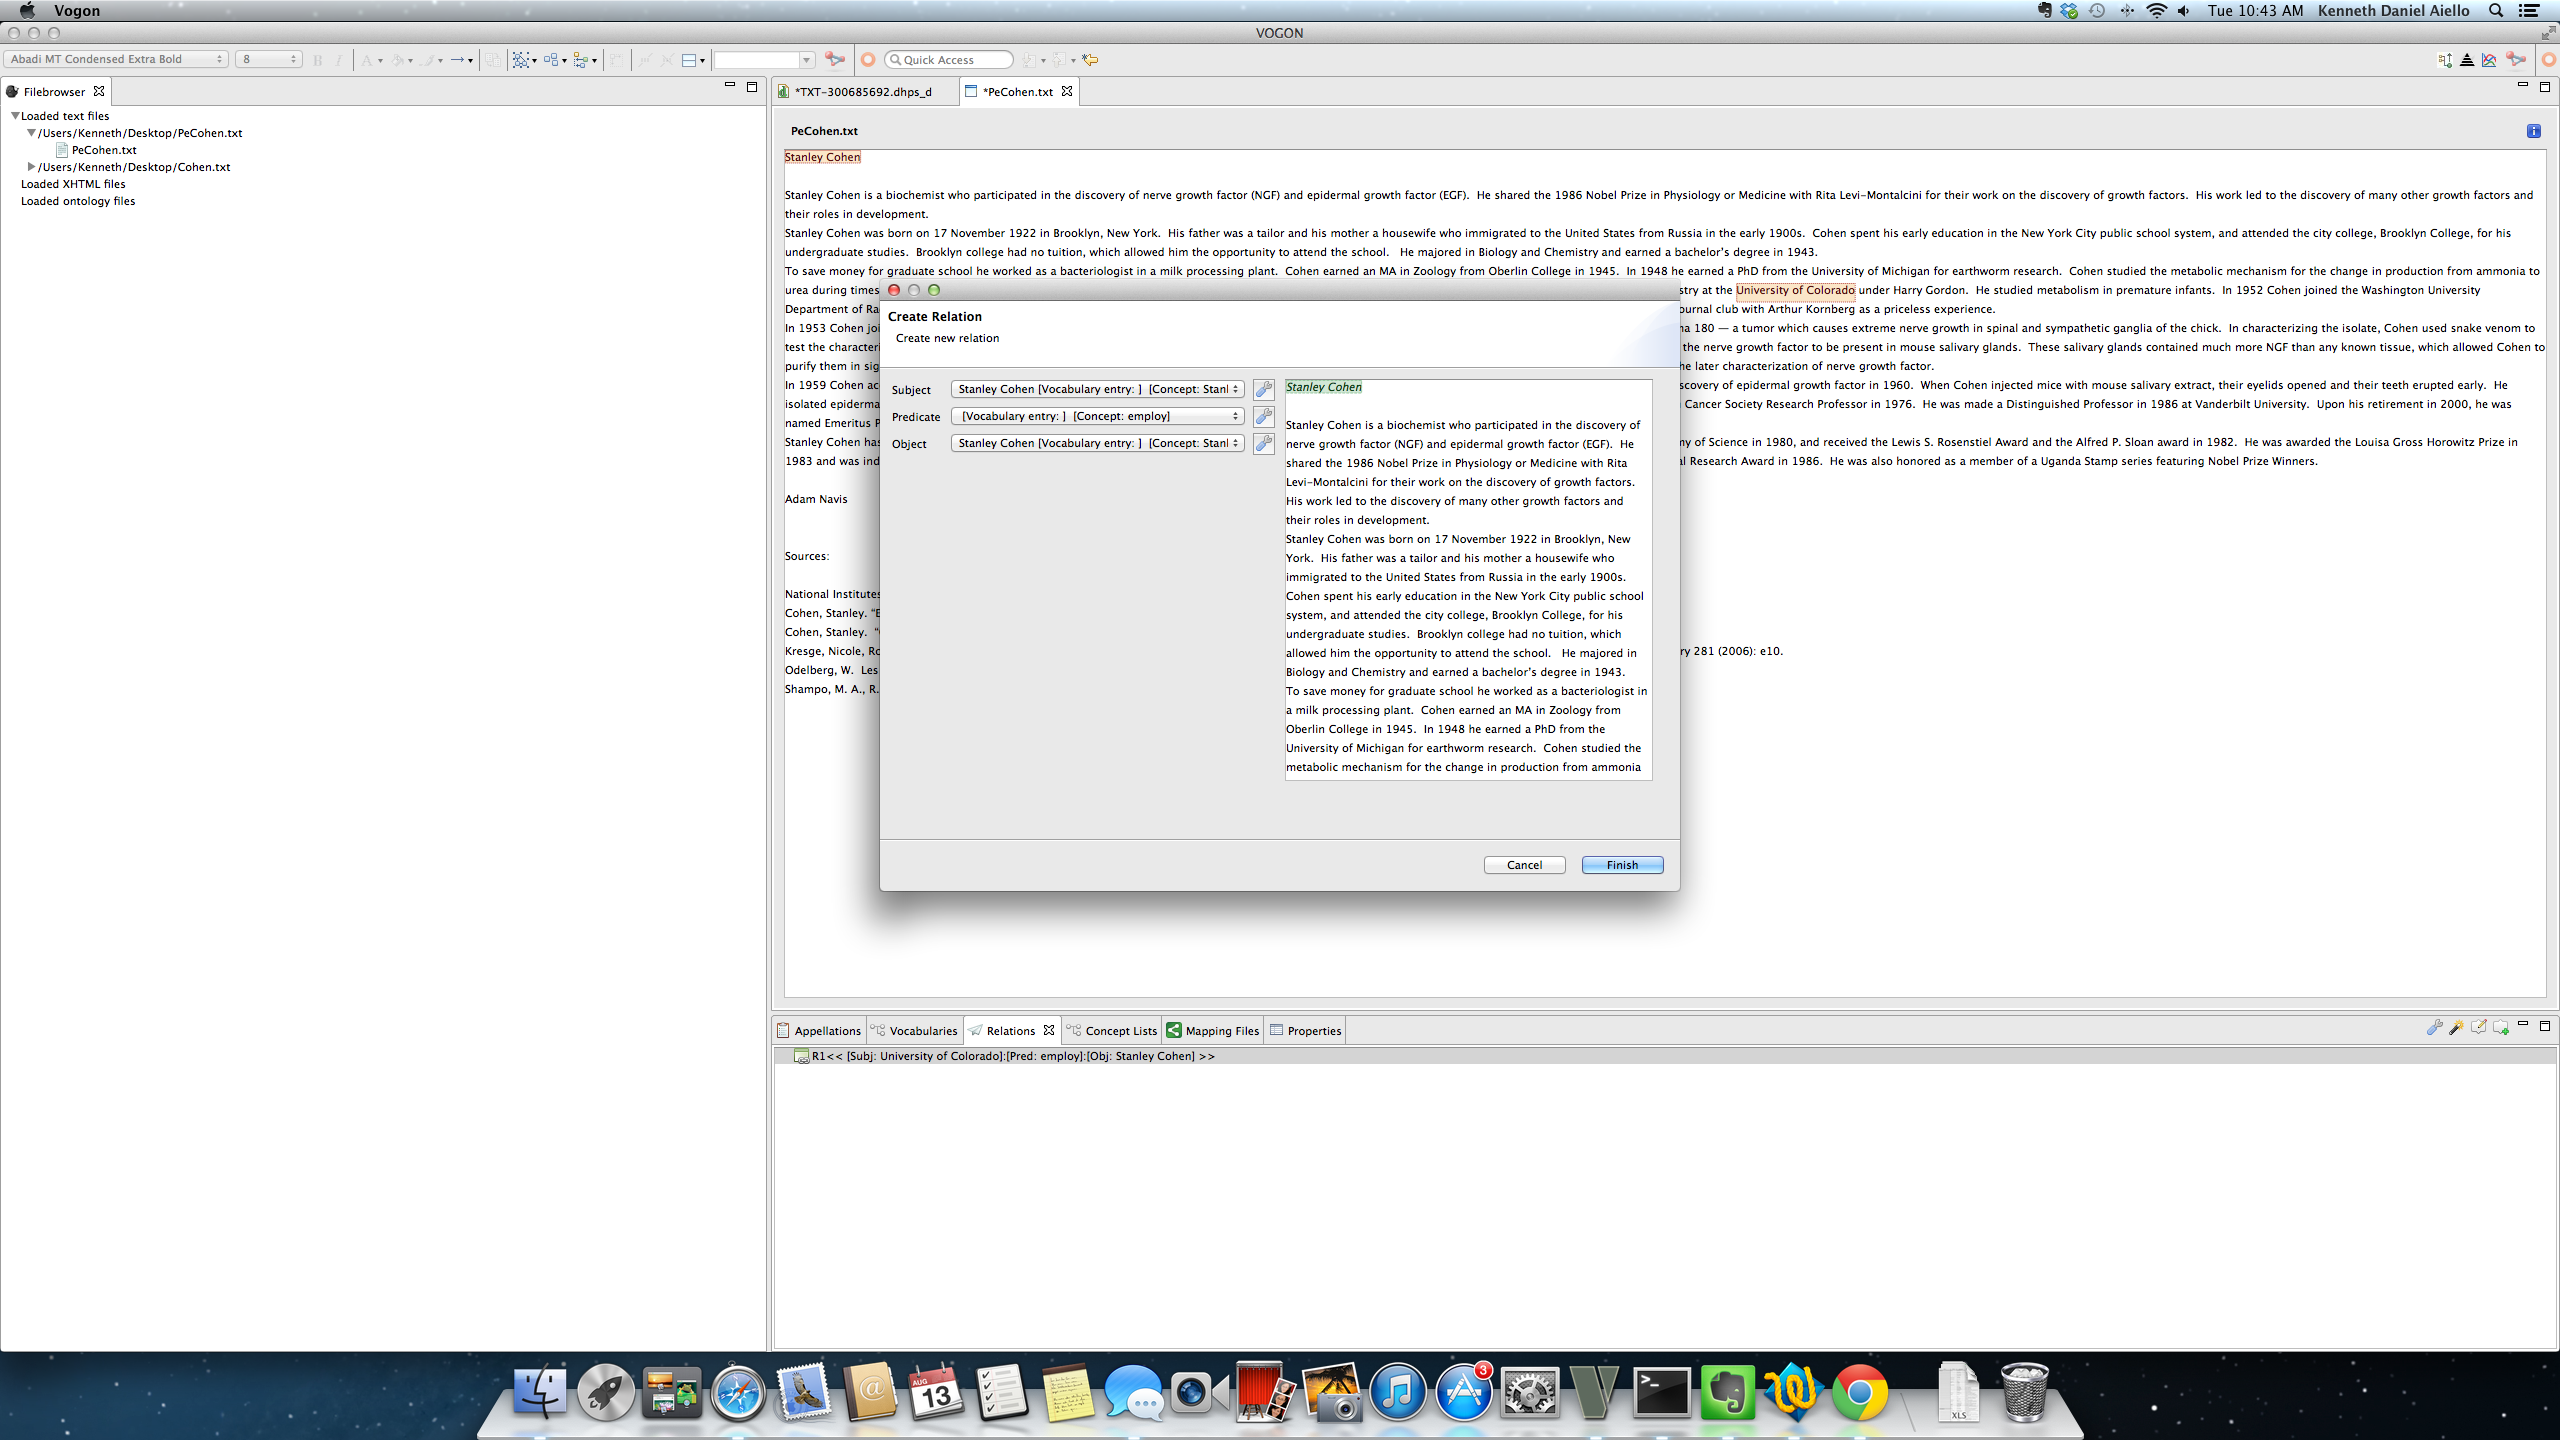
If you proceed to populate a different part of the triple the selected word from the previous part of the triple will now be highlighted in orange.

8.4.1.6. bubble with green plus = Add Relation
By clicking on this Add Relation button the Create New Relation window pops up unpopulated. In this window you can add, edit, or change a relations Subject, Predicate, and/or Object.

After the Create New Relation window pops up, the appellated words are in blue.
In this example the Create New Relation window has been opened, Stanley Cohen is highlighted in blue and can be used as the Subject, Predicate, or Object of the triple.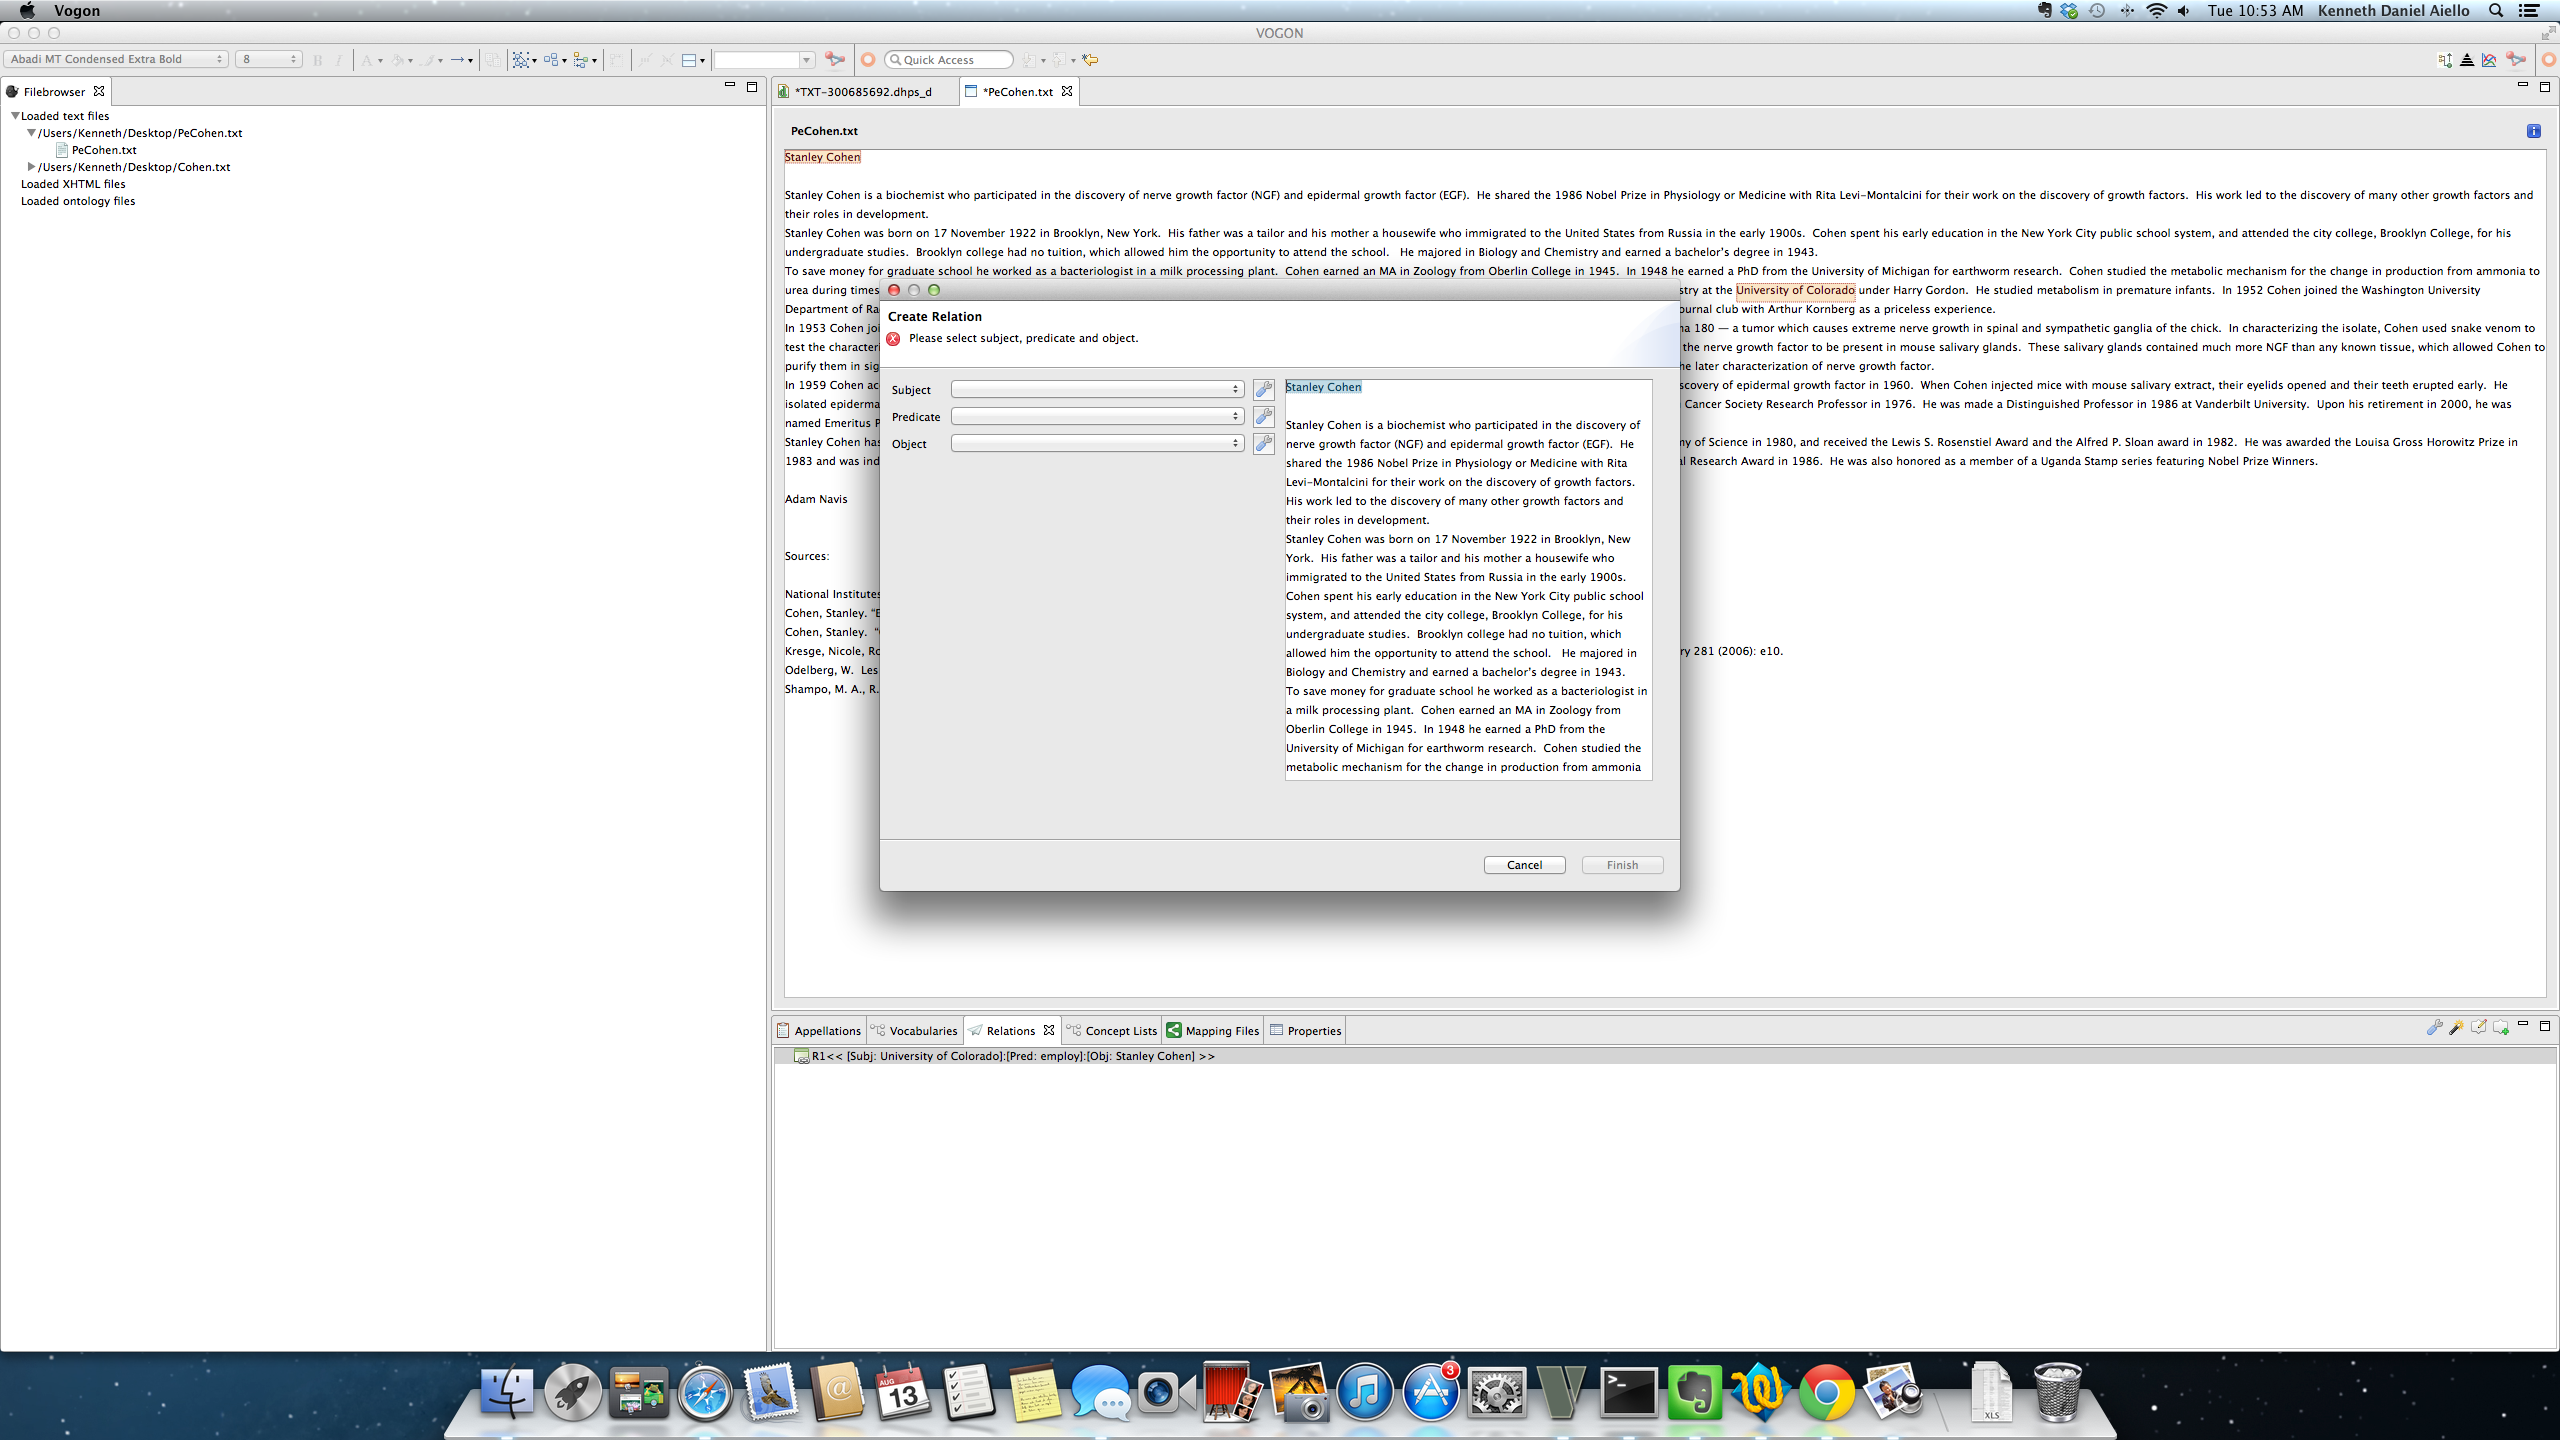
8.5. Creating Relations: Text Editor
Relationships in the Text Editor can only be created by appellated words. The words must be appellated before starting the process of creating a relation. Appellated words will be highlighed in green in the Text Editor Main Window. Open the Create New Relation Window by clicking on the Add Relation button in the Relations tab.
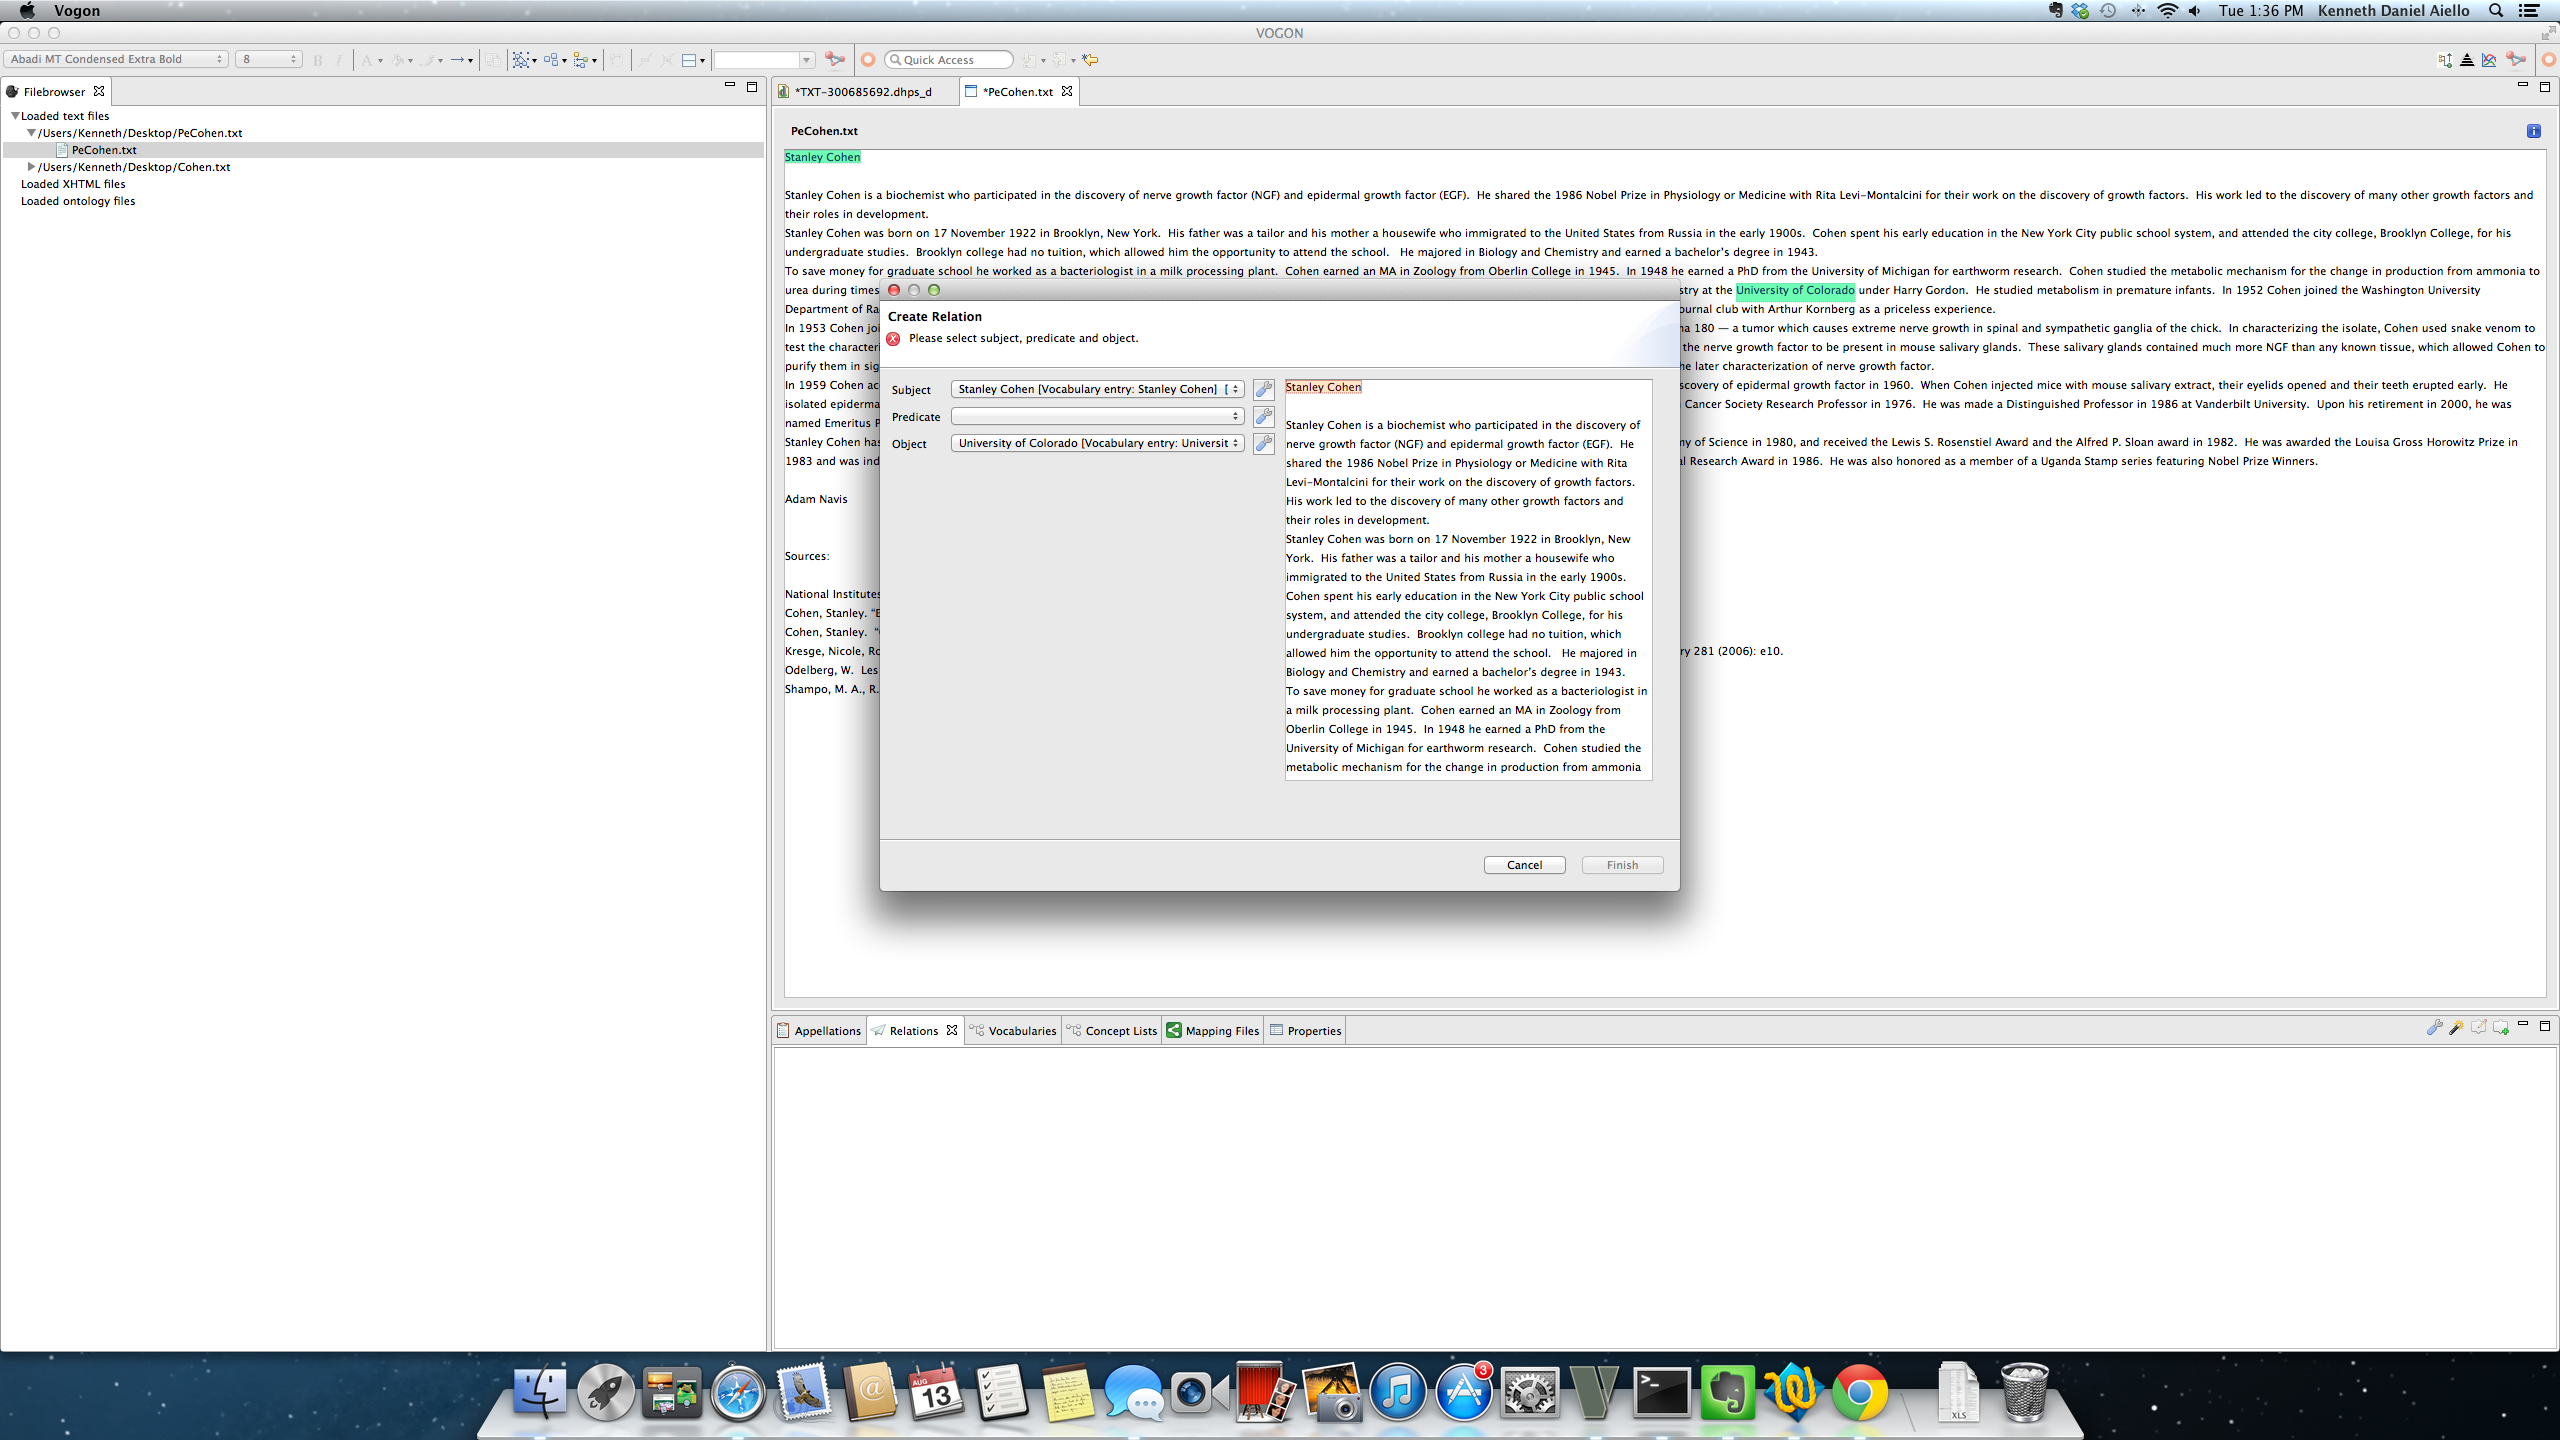
After the Create Relation Window opens select the Subject, Predicate, and Object of the relation. You can populate the parts of the triple using either the Relation Triple Bar or the Gray Wrench. You can only populate the Subject, Predicate, and Object of the relation with words that have been already appellated. In the Create New Relation Window appellated words are highlighted in blue. After you place an appellated text in the Relation Triple Bar it will now be highlighted in orange.
In this example Stanley Cohen is appellated but not in a relationship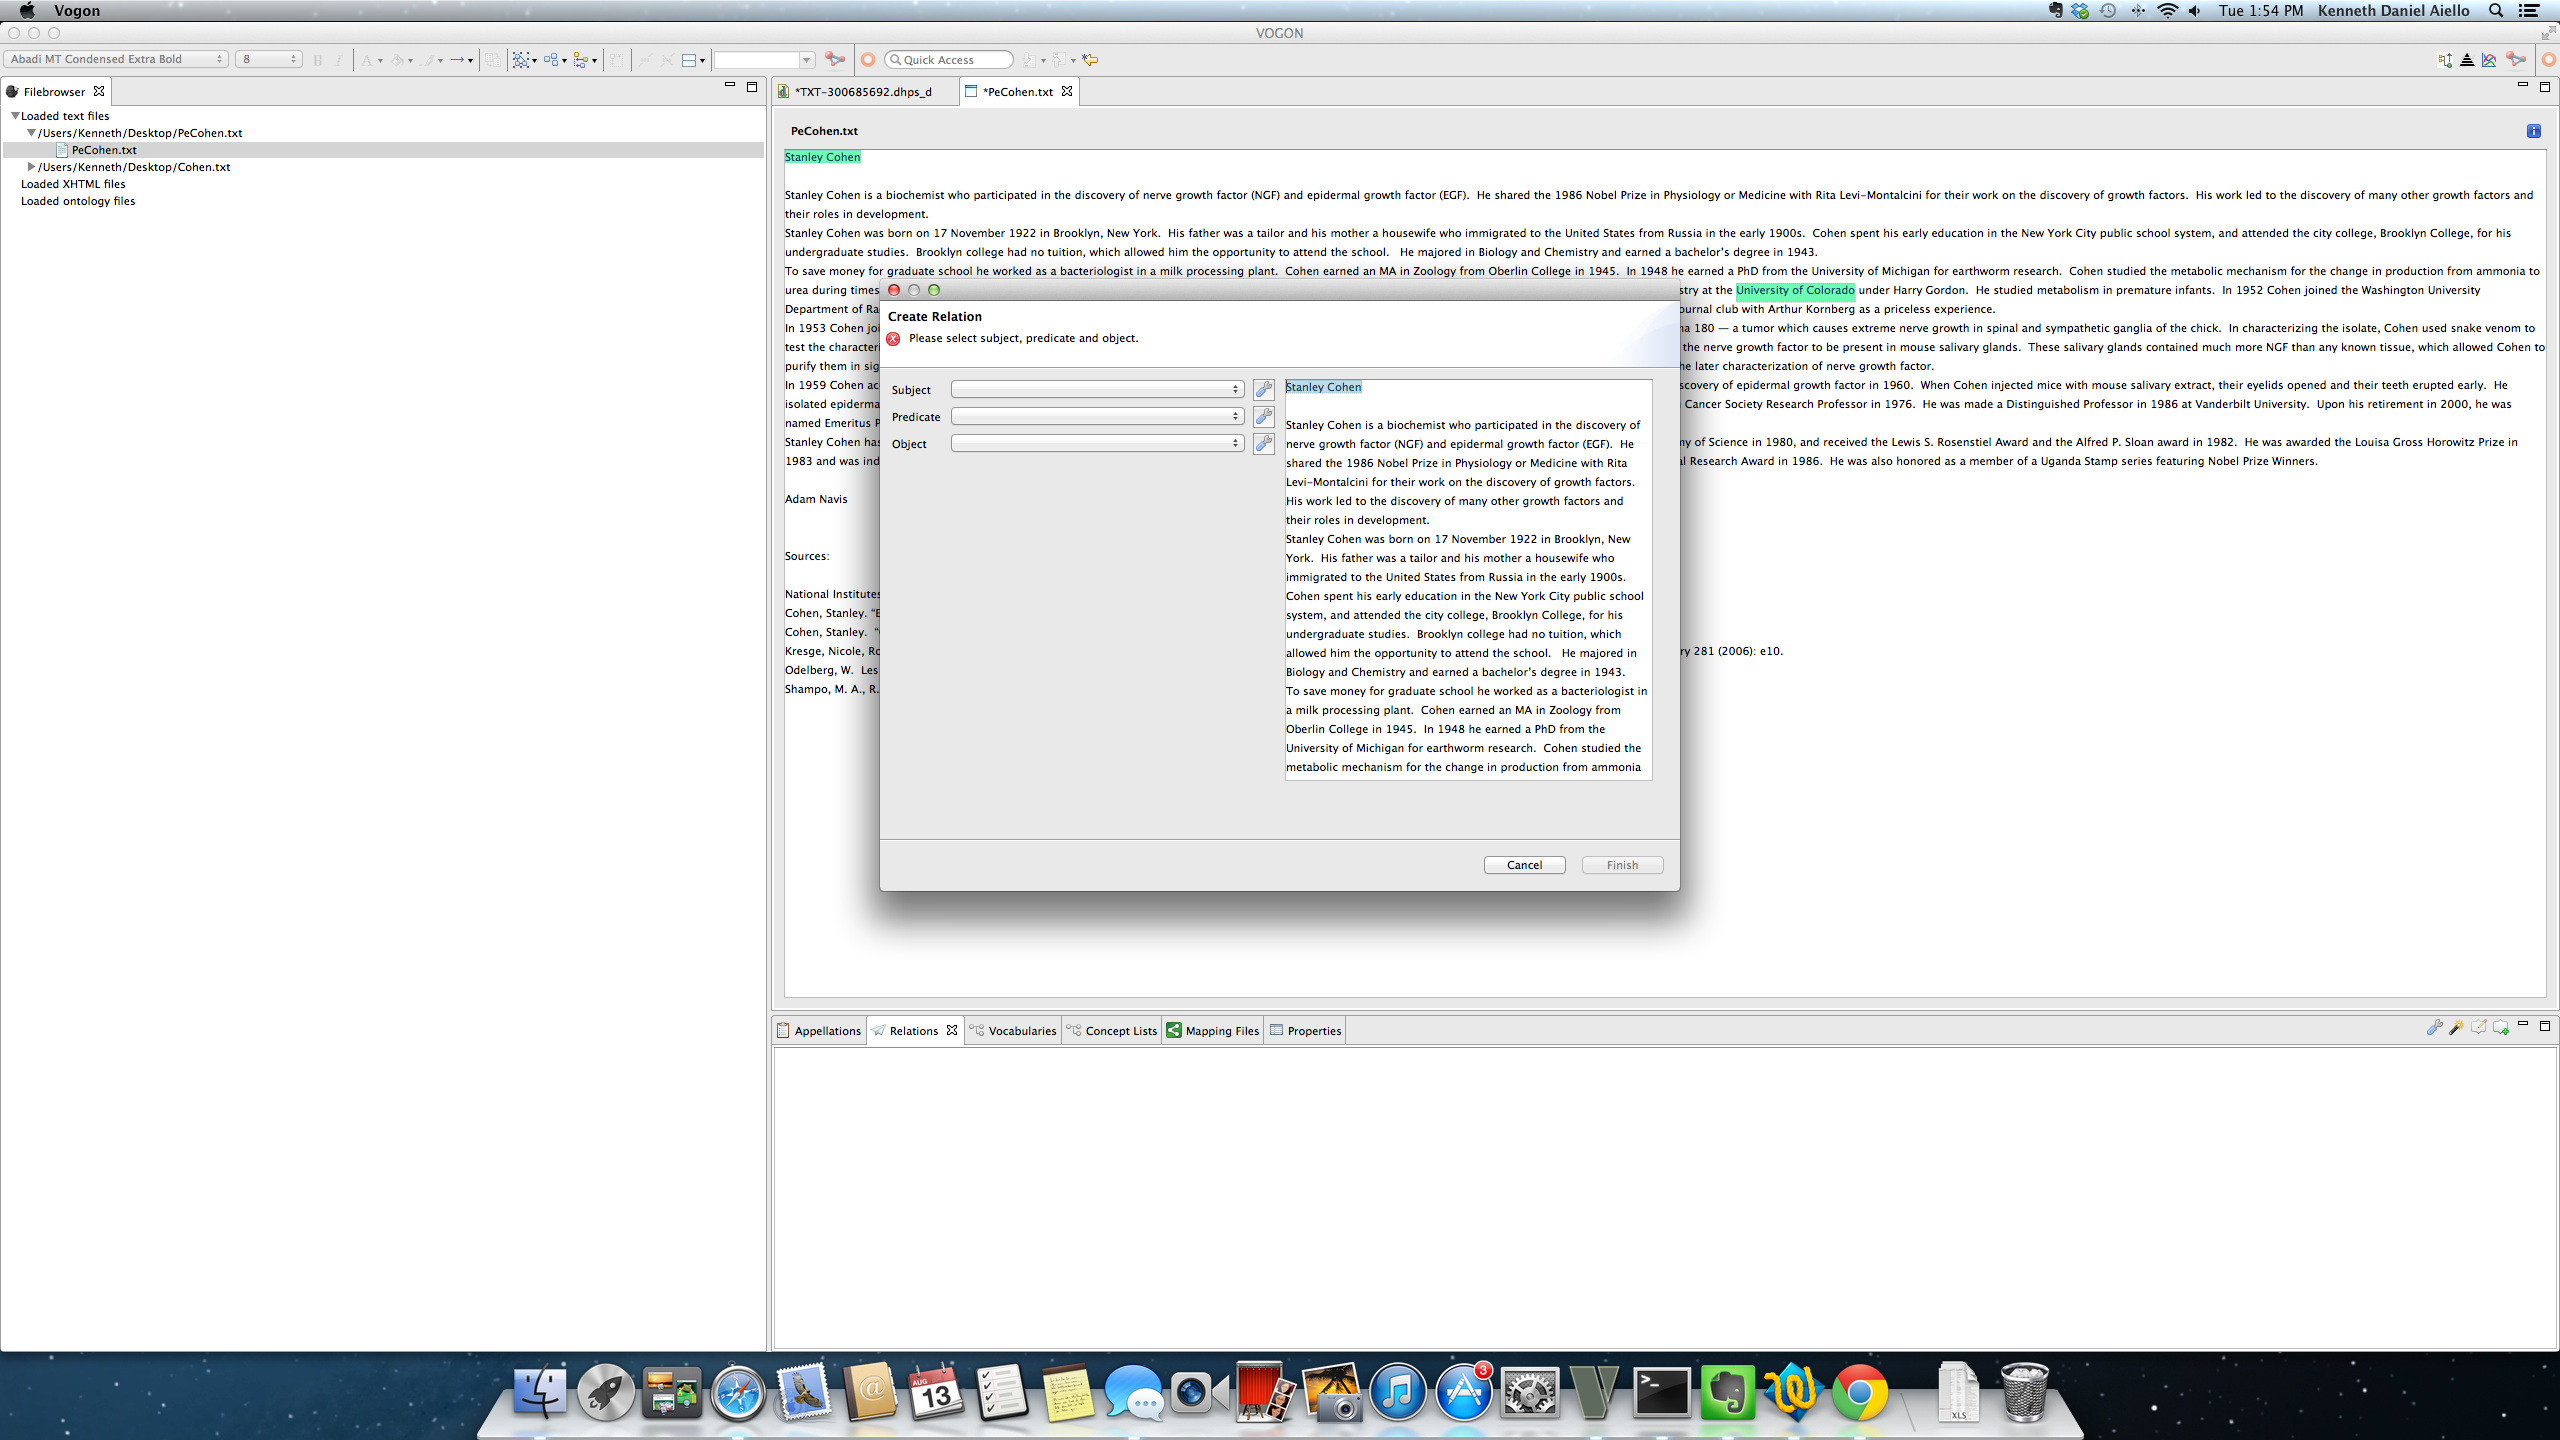
To confirm that you placed an appellated text in the Relation Triple Bar it should be highlighted in orange in the text of the Create Relation Window. If the appellated word is a baseless appellation then it will only appear in the Relation Triple Bar. The blue finish button will not be available until the Subject, Predicate, and Object of the relation have been populated.
After all three parts of the triple have been populated click on the blue finish button.
In this example, employ is a baseless appellation and not found in the text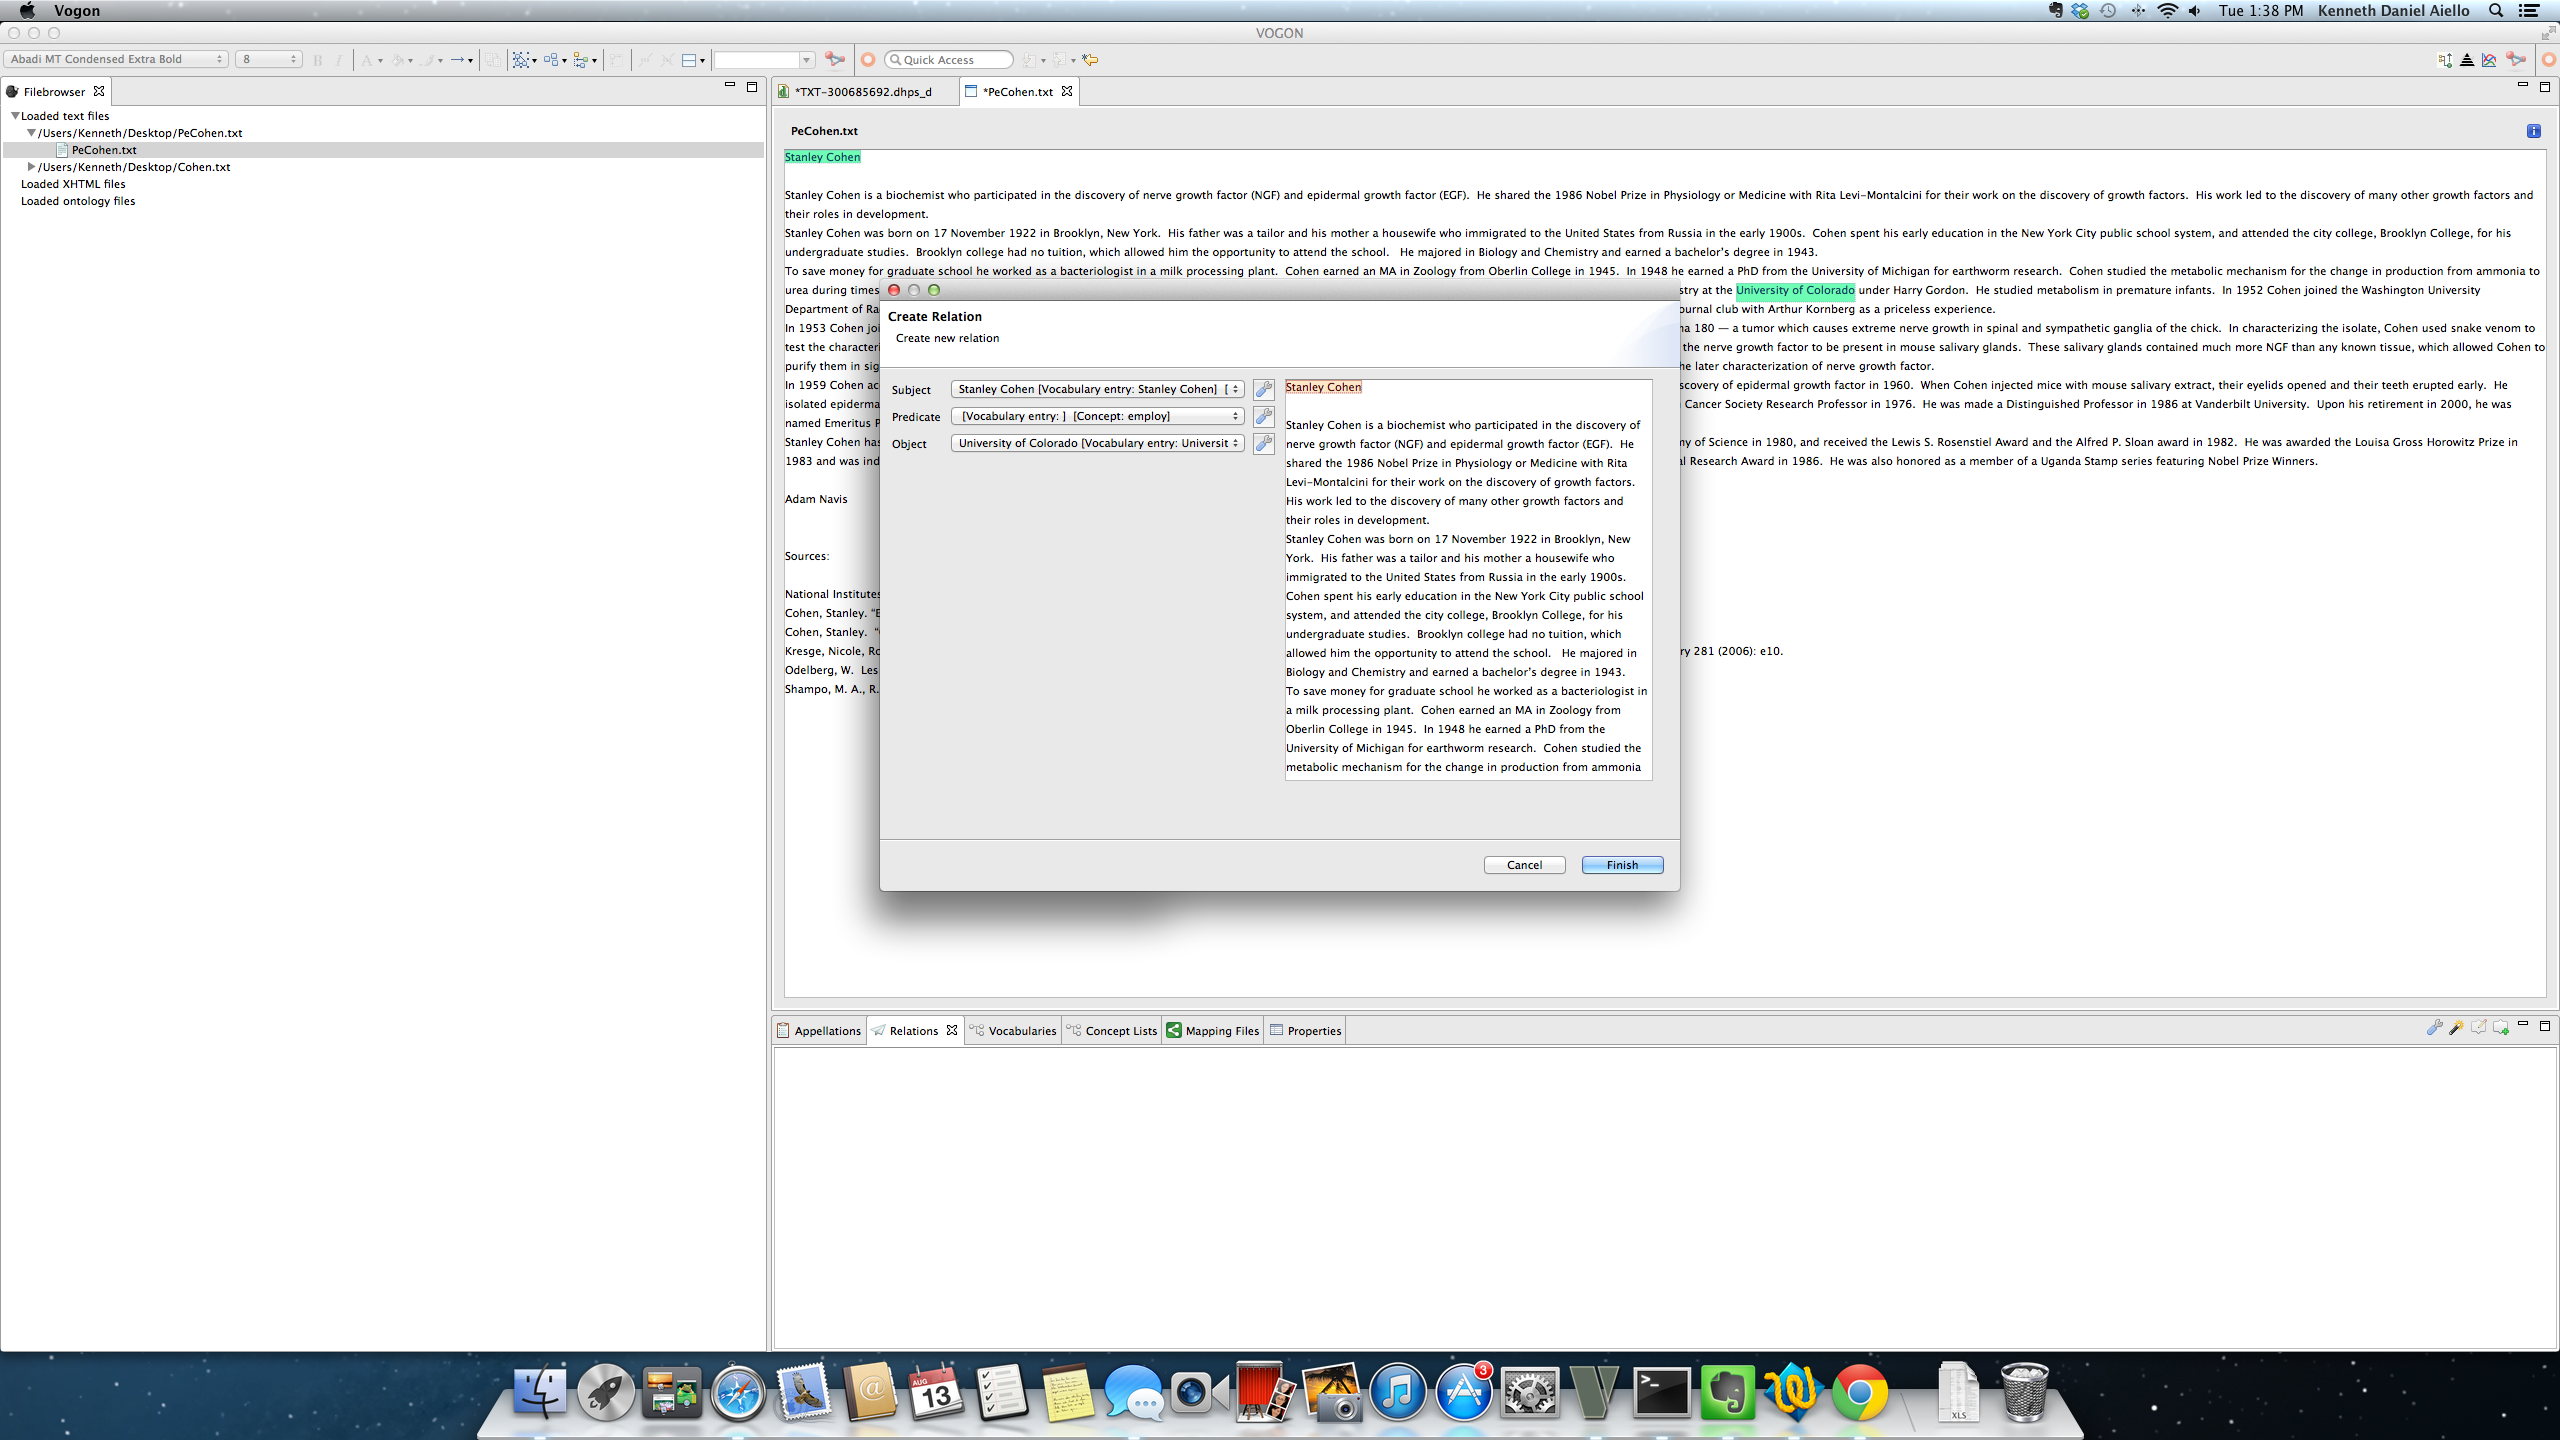
The relation will now be visible in the Text Editor via the text in the relation now highlighted in orange. The relation will also be visible in the Relations Tab, and the Graphical Editor.
8.6. Creating Relations: Graphical Editor
Relations in the Graphical Editor can only be created from appellated words. Unlike the text editor, words can be appellated during the process of creating a relation. However, in order to appellate a term a valid interpretation must already be in the user’s Concept List. If there is not a valid interpretation or the term is not in the user’s concept list an appellation cannot be created. If you have already appellated words they will be in orange boxes in the Graphical Editor Main Window. In the Graphical Editor relationships can be created via the Palette, Releasing the Gloved Cursor in an Open Area, the Relation Tab, or by Hovering. The Relation tab will simulataneously update as the parts of the relation are populated in the Graphical Editor.
8.6.1. Creating Relations: Graphical Editor:: Via the Palette
Creating a relation in the Graphical Editor via the Palette gives the user the choice of where the relation will be graphically represented in the Graphical Editor Main Window. In the Palette find the Create New Relation button symbolized by the window with the green bar on top and the two link chain (the same image in the Relation tab. Click on the Create new Relation button.
Selecting the Create New Relation button highlights the button in orange. The Relation Tab will still be empty.
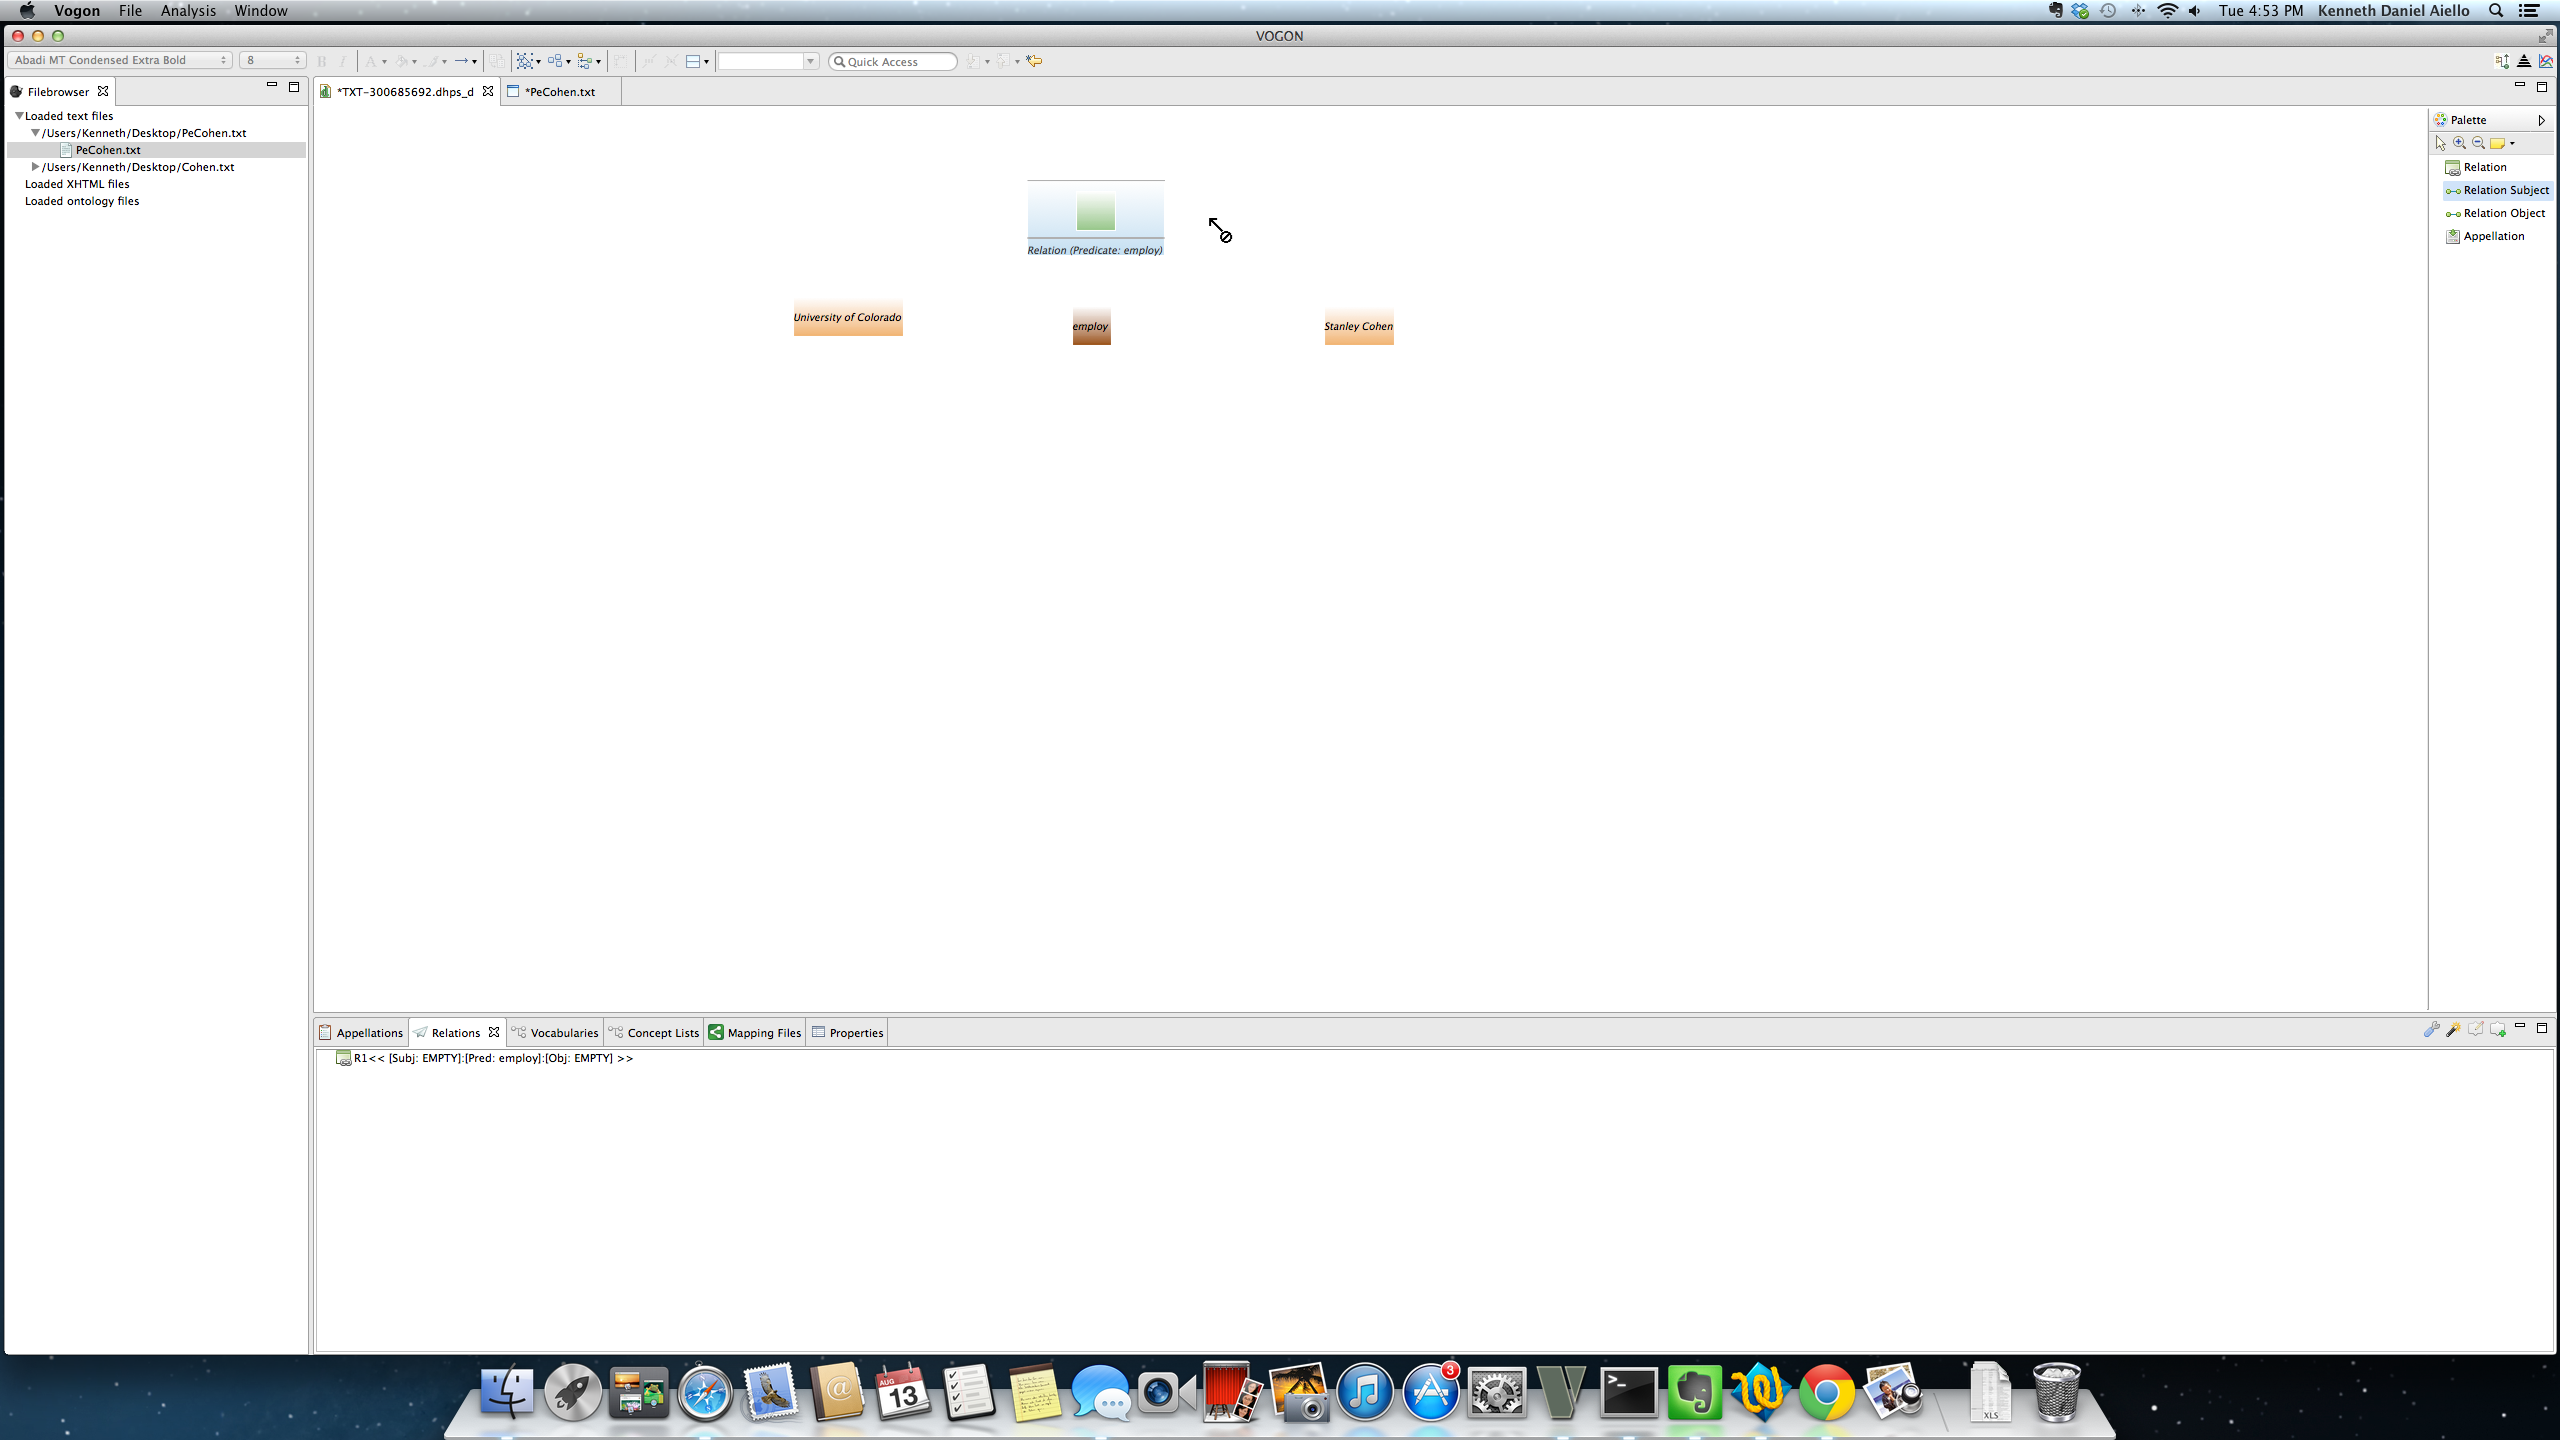
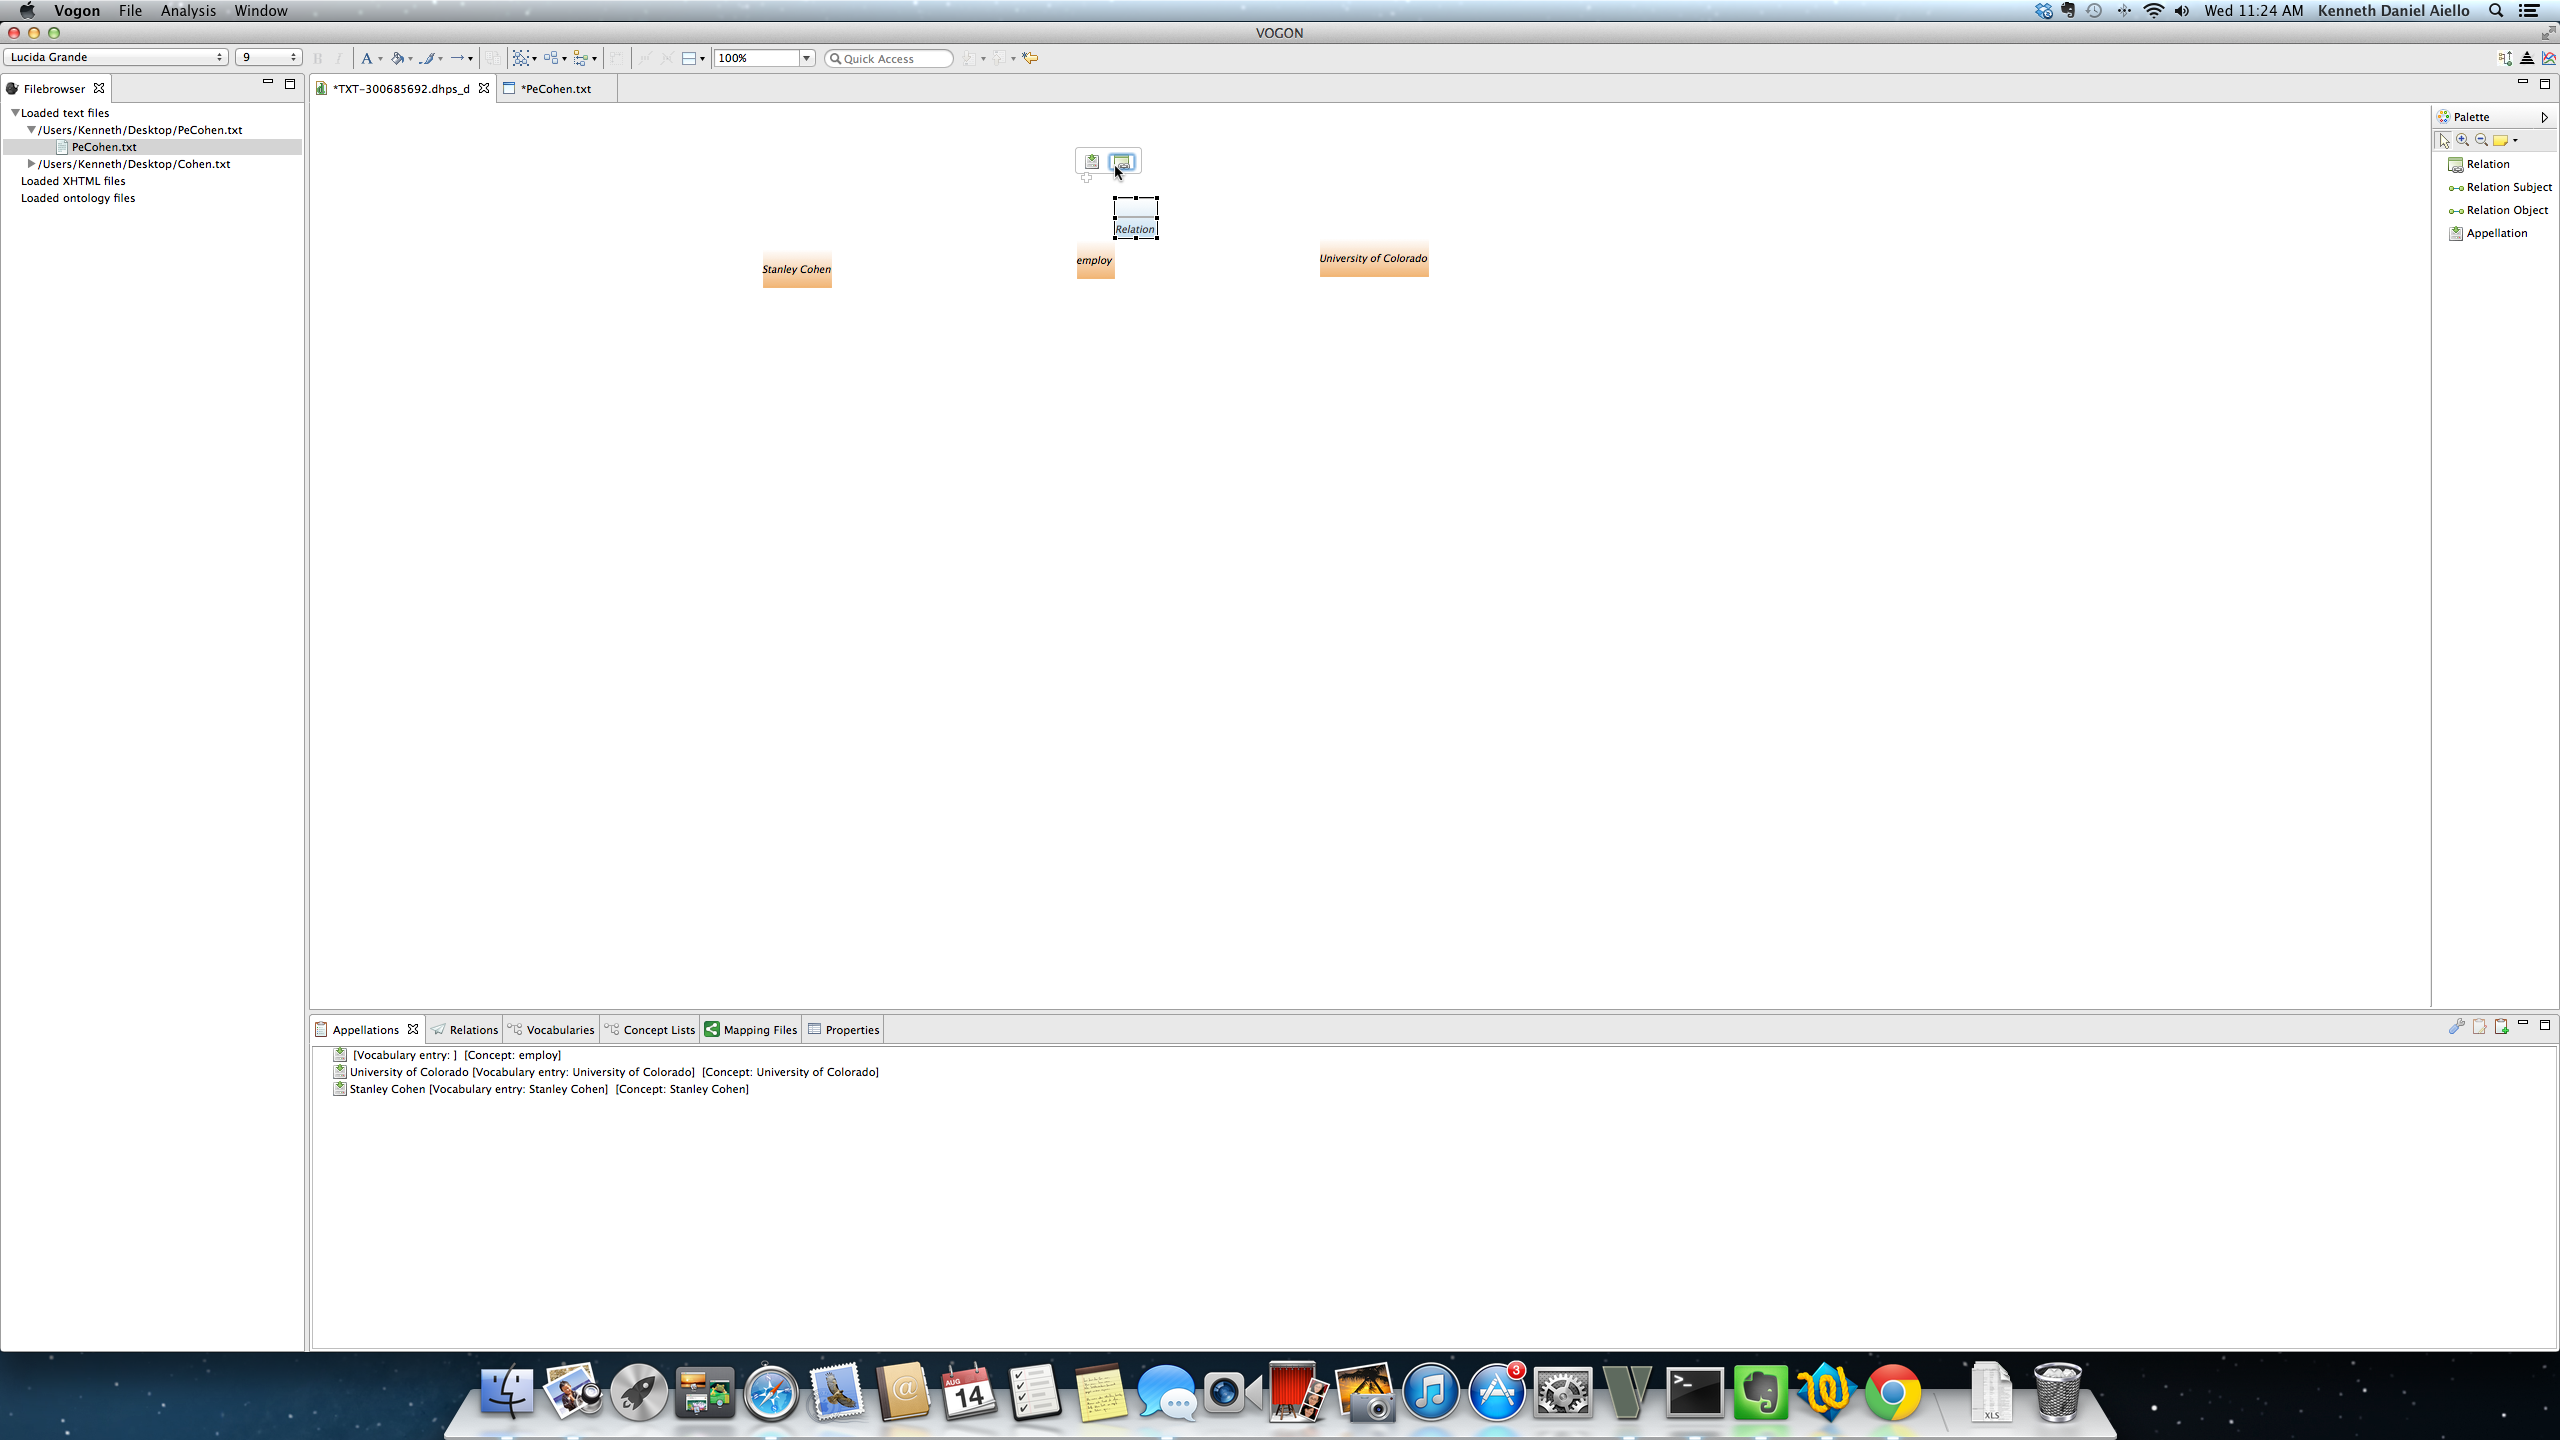
In this example, three words have been previously appellated and are in orange boxes, Univrsity of Colorado, employ, Stanley Cohen.
Clicking on the Create New Relation button highlights the button in blue and your cursor will now have a gray rectangle and a black box with a square attached to it. The Relation Tab will still be empty.
In this example the screenshot the cursor is above the appellated word employ orange box.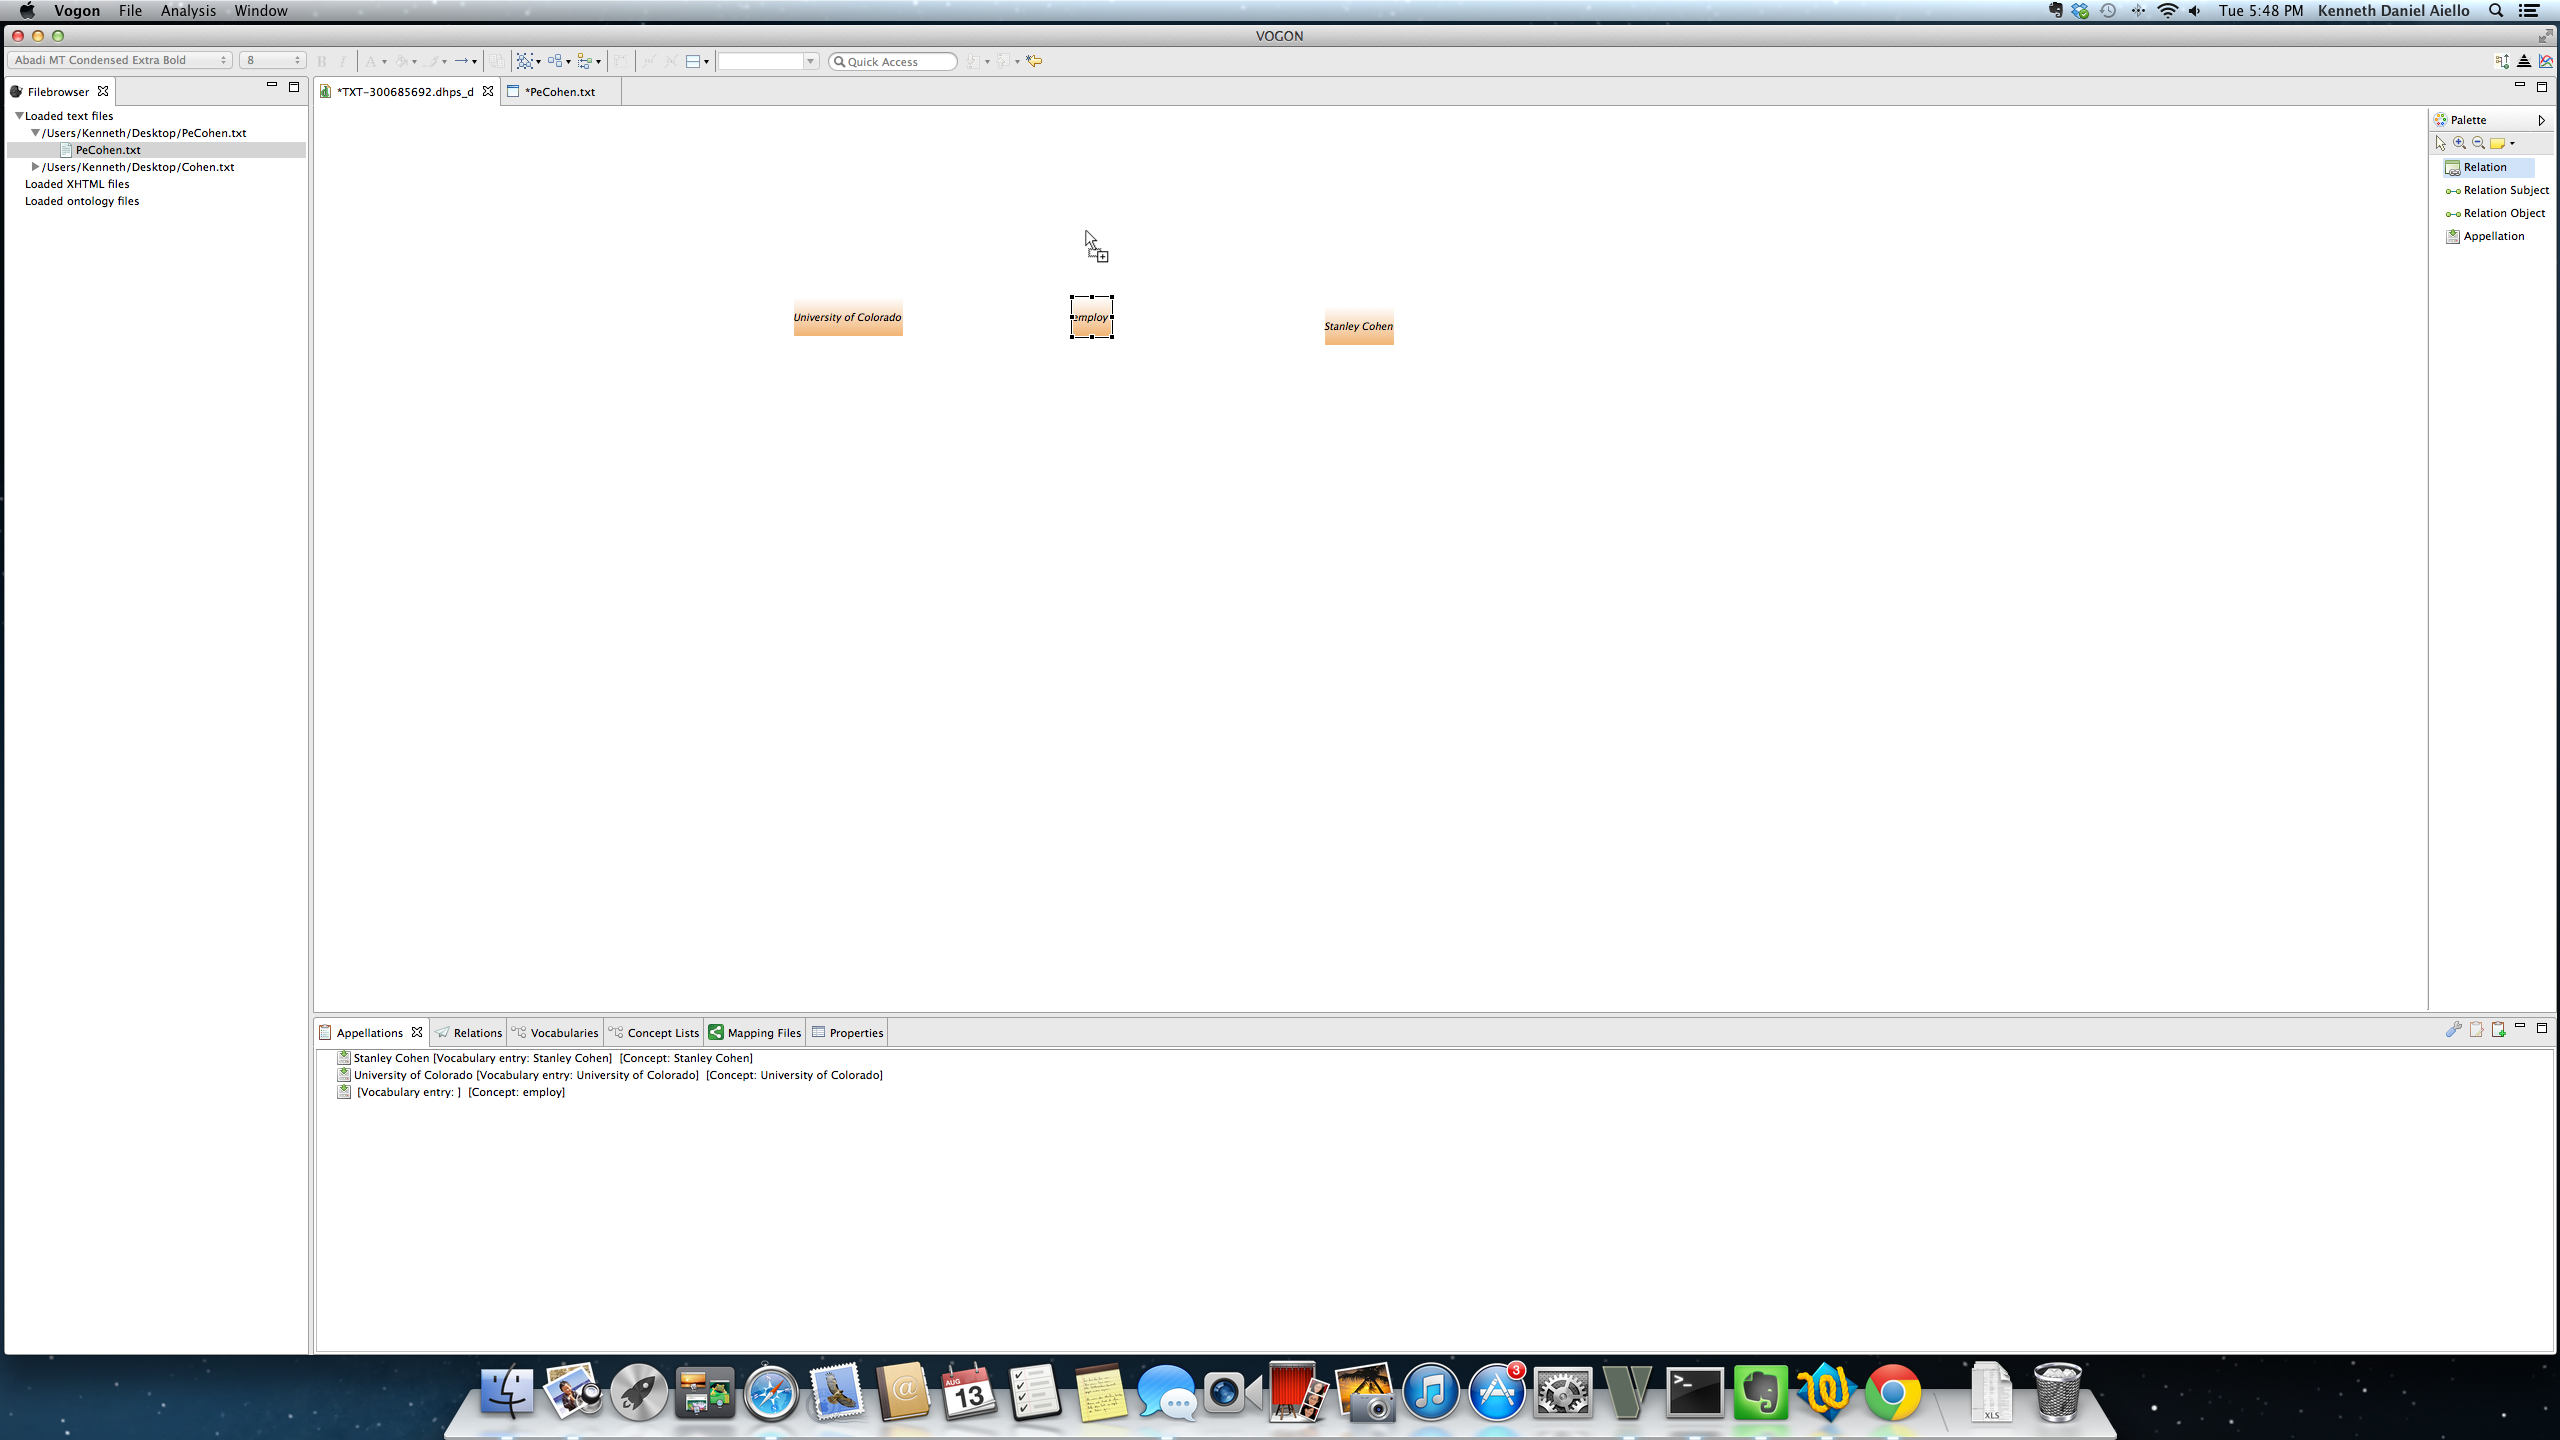
Now click on the exact location (open white space in the Graphical Editor Main Window) of where you want to place a new large box. This new box will become the Relation Event Compartment box or visual represenation of the predicate for your new relationship in the Graphical Editor Main Window. After choosing and clicking on the location of the predicate, the Unpopulated Relation Event Compartment button will pop up in this space. The Relation Tab will become populated with R1 << [Subj: EMPTY ][Obj: EMPTY ] >> . This tells the user that both the subject and object for the current relation are not populated.
In this example the location for the Unpopulated Relation Event Compartment button was above the appellated word employ orange box.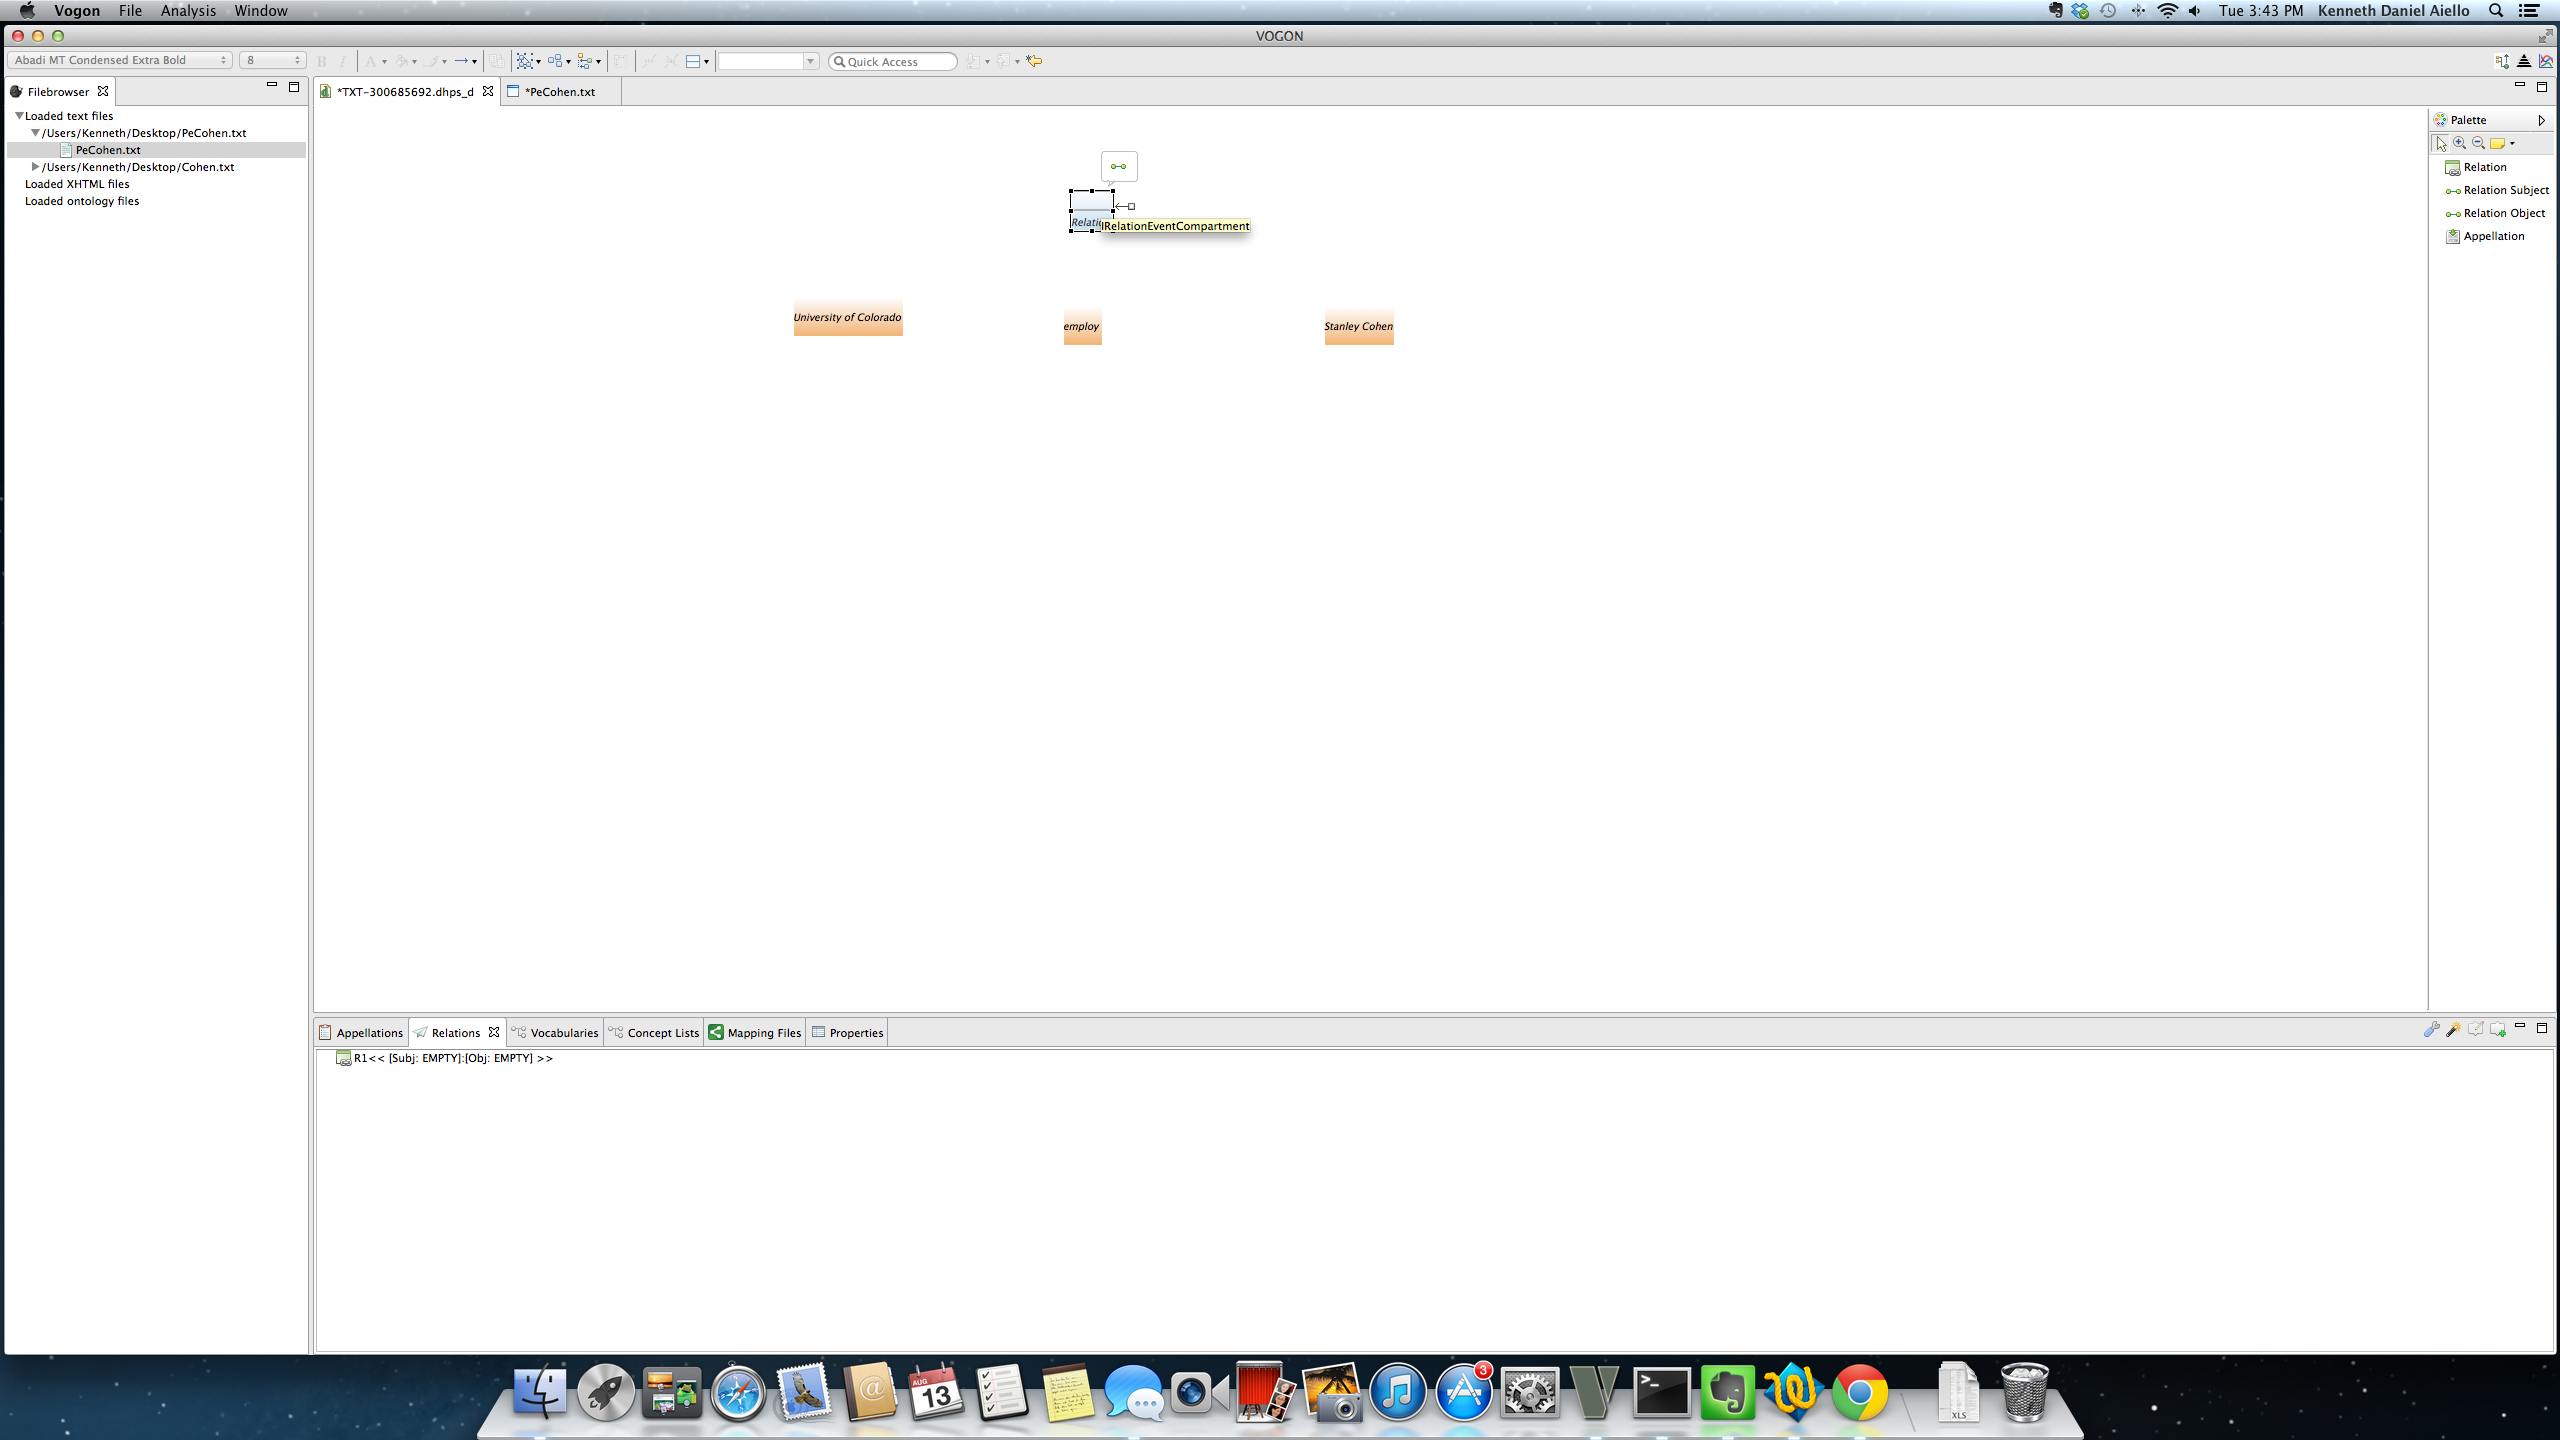
Click or hover on the Unpopulated Relation Event Compartment button and the IRelation button or bubble with two green dots connected to it will pop up.
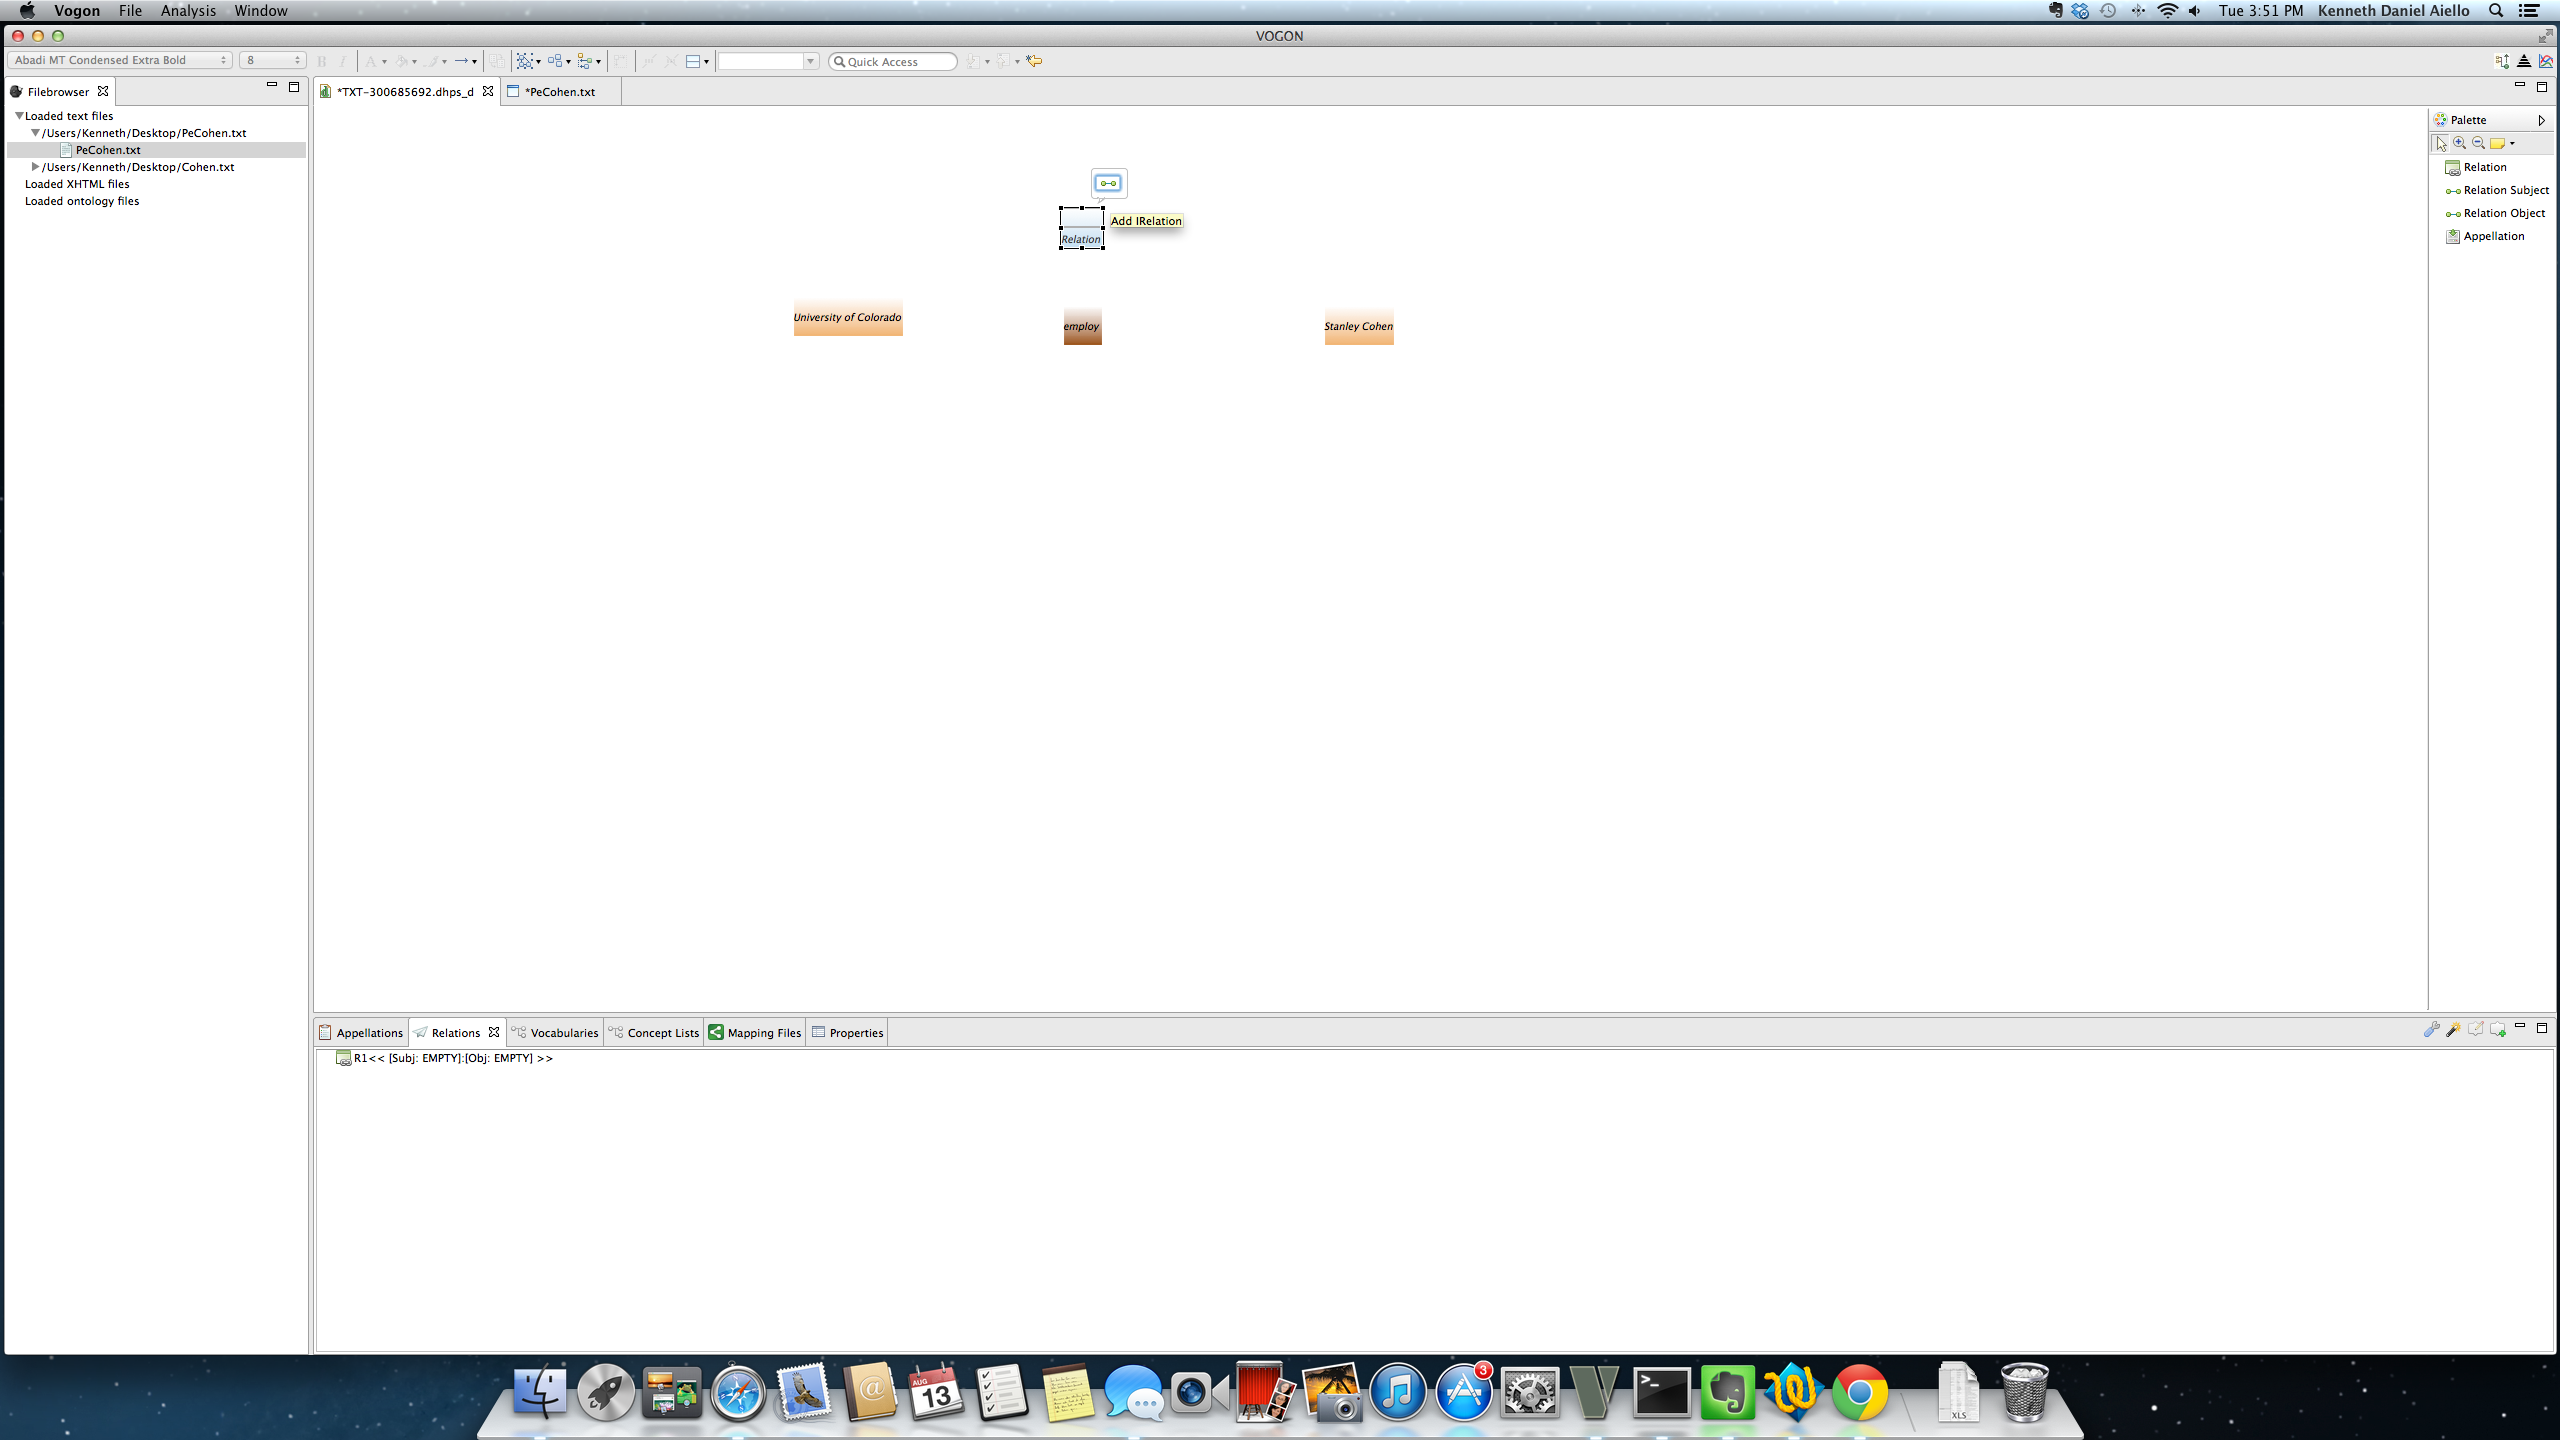
Click on the IRelation button and the Graphical Editor Create Relation: Create New Relation Window will pop up.
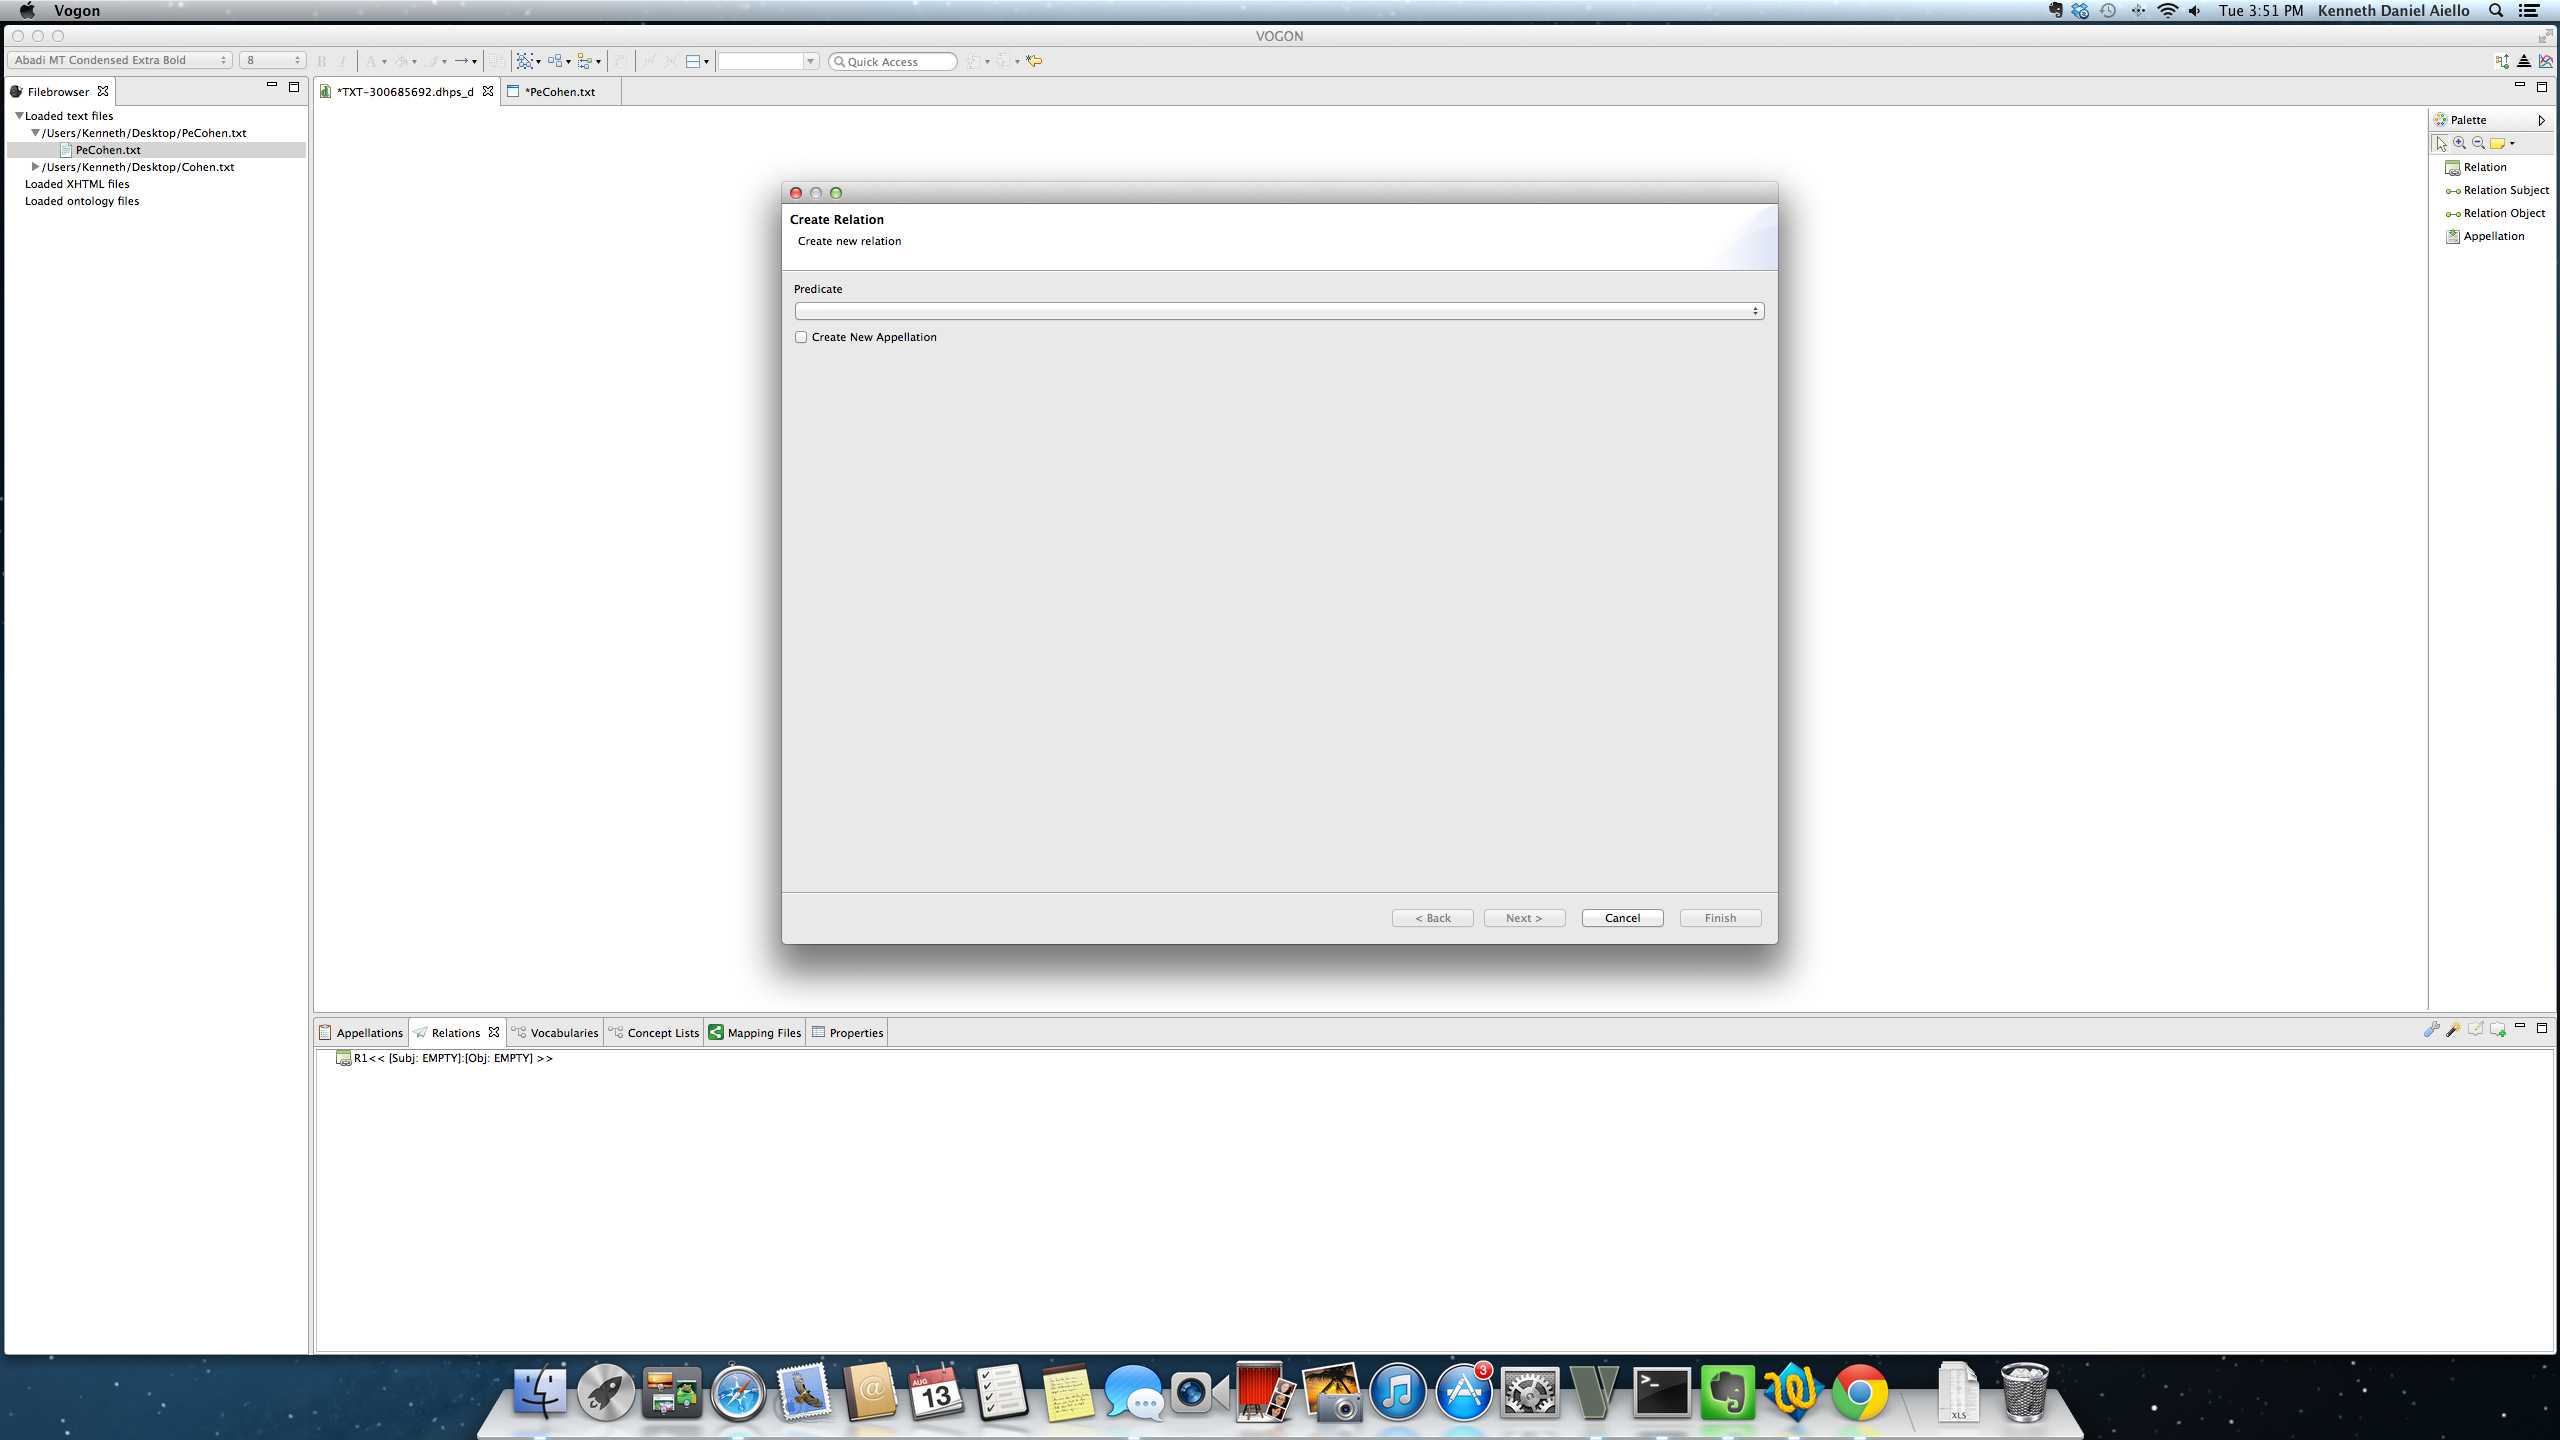
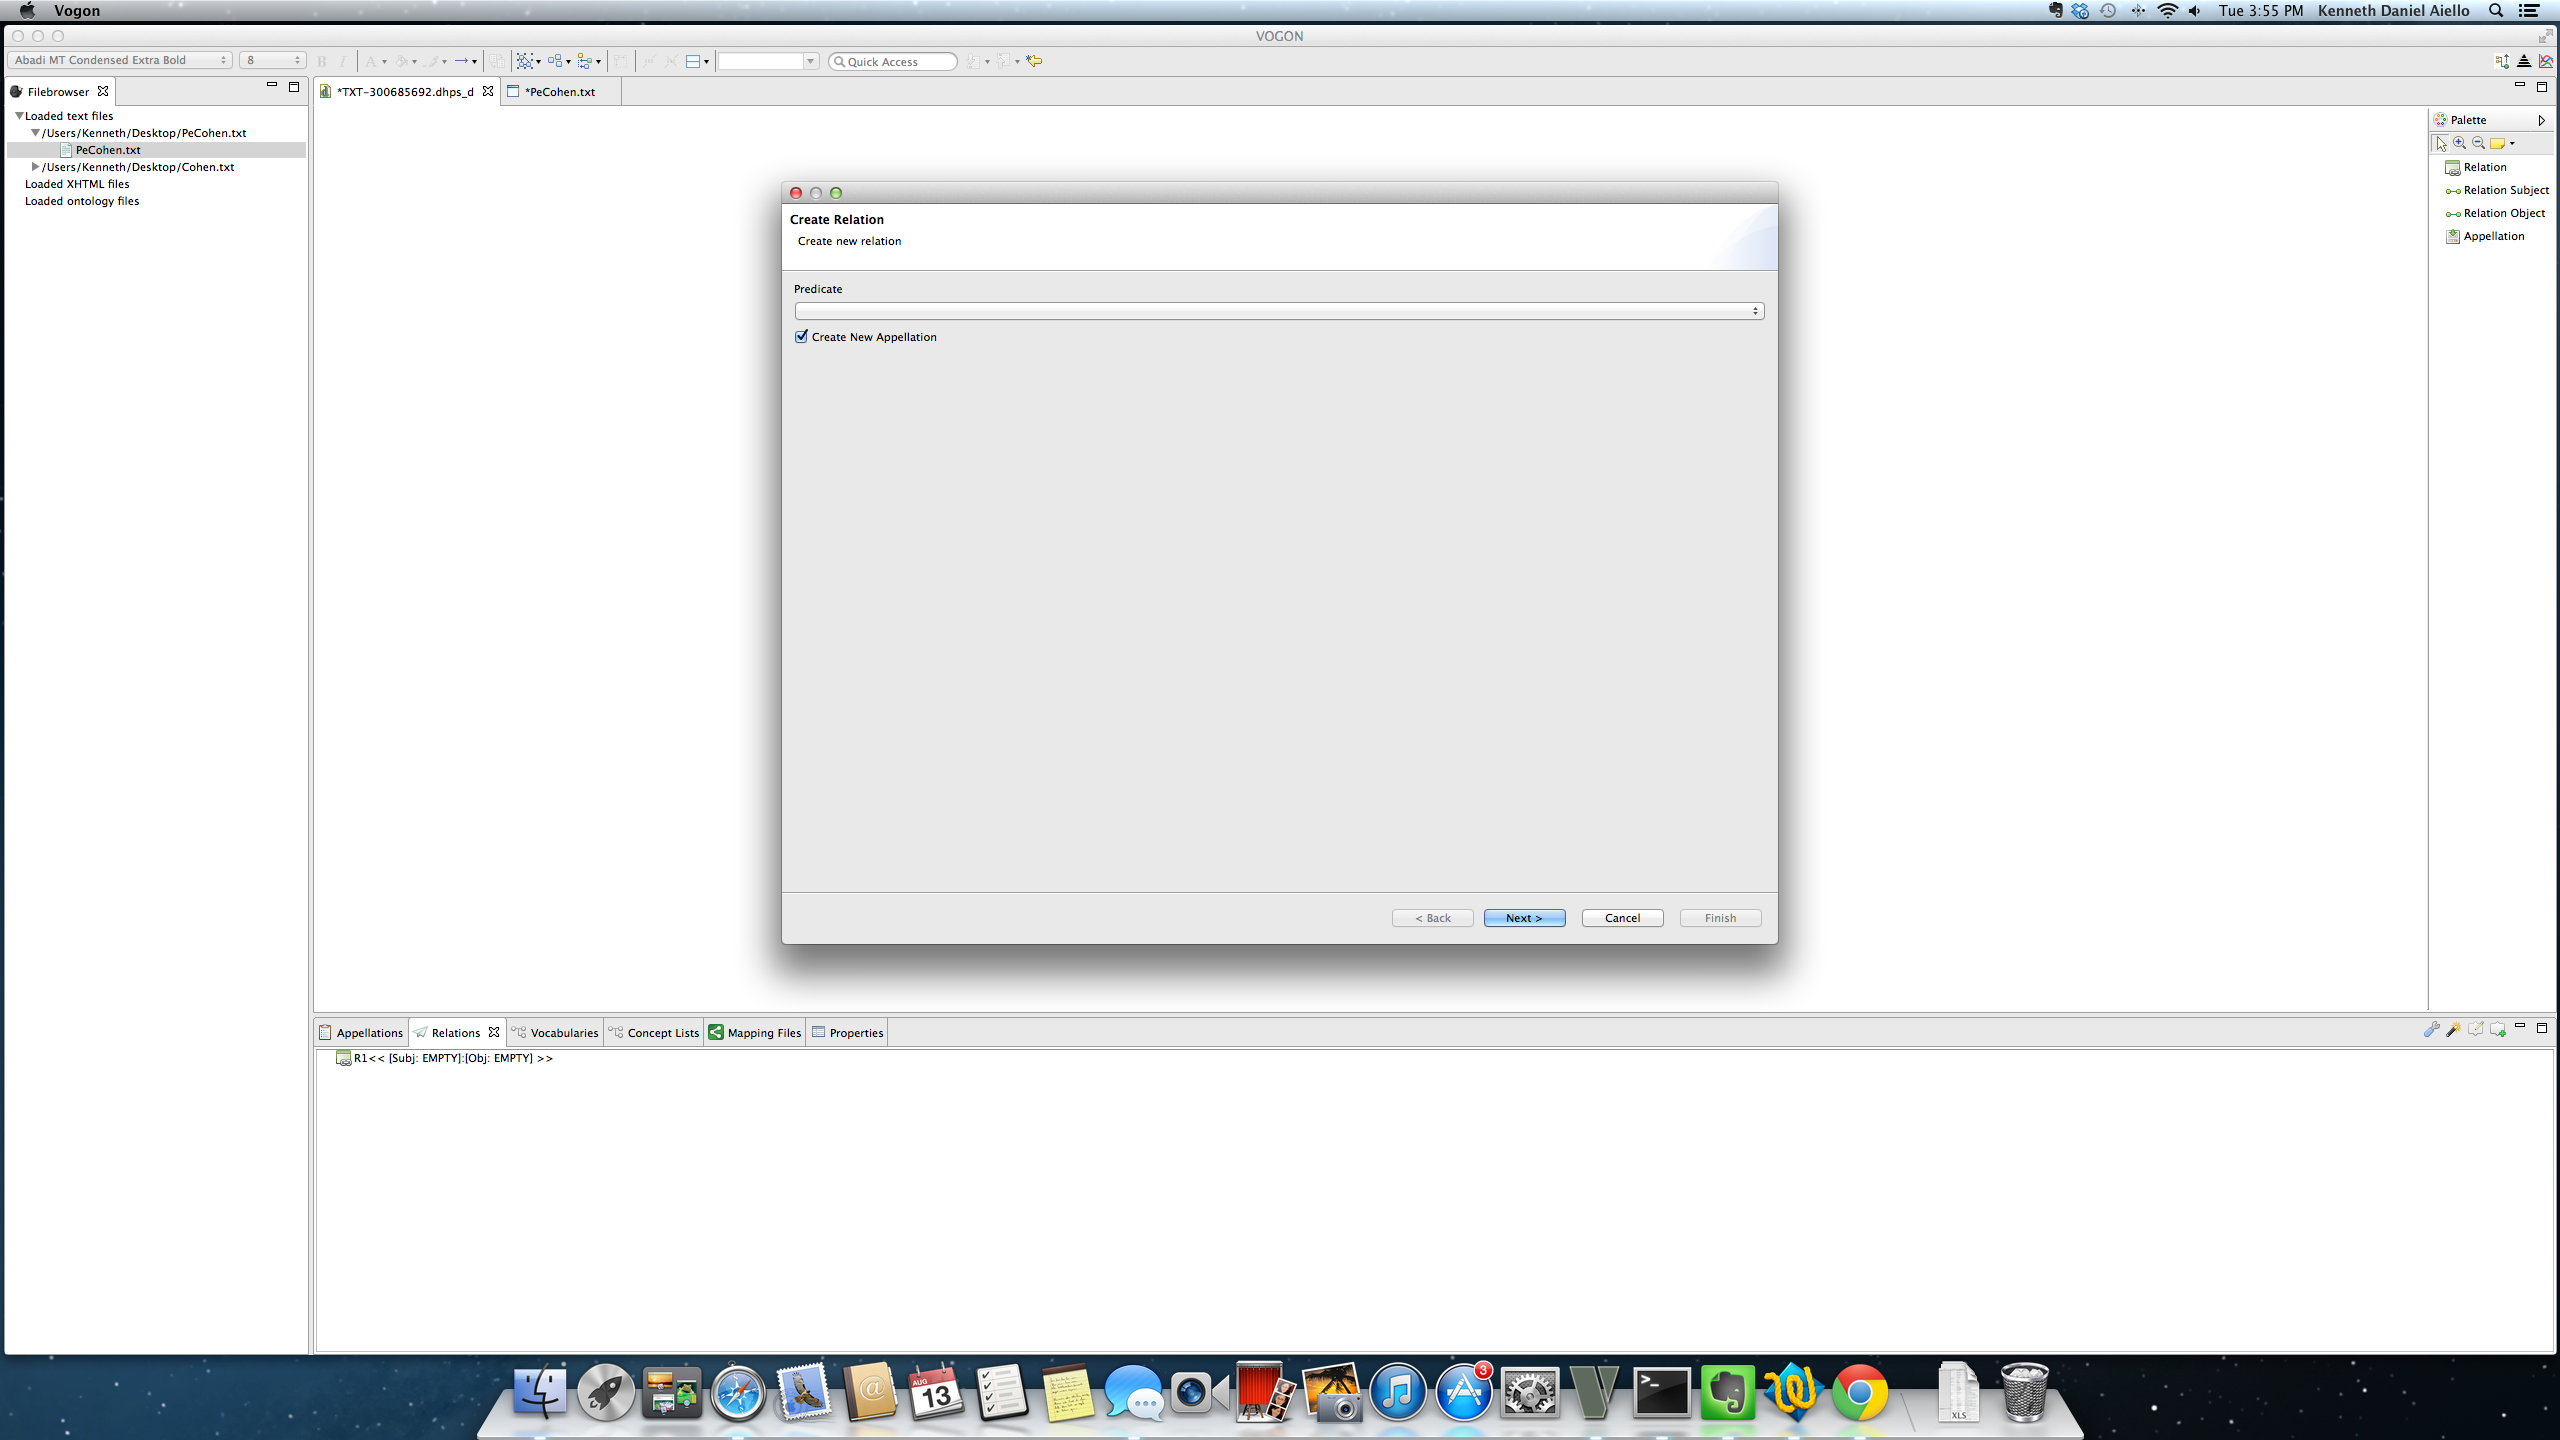
Create A New Appellation
To create a relationship in the Graphical Editor you do not have to have the words already appellated before you start creating a relation. You can create a new appellation by checking the Create New Appelation box. However, in order to appellate a term a valid interpretation must already be in the user’s Concept List. If there is not a valid interpretation or the term is not in the user’s concept list an appellation cannot be created. Upon checking the box you need to select the blue Next > button.
After clicking on the Next> button the Add New Appellation window will pop up. Whatever you populate in this window will become a populated Relation Event Compartment box.
In this example, Brooklyn College has already been added to the user’s Concept List. The appropriate boxes have been correctly populated to appellate the word Brooklyn College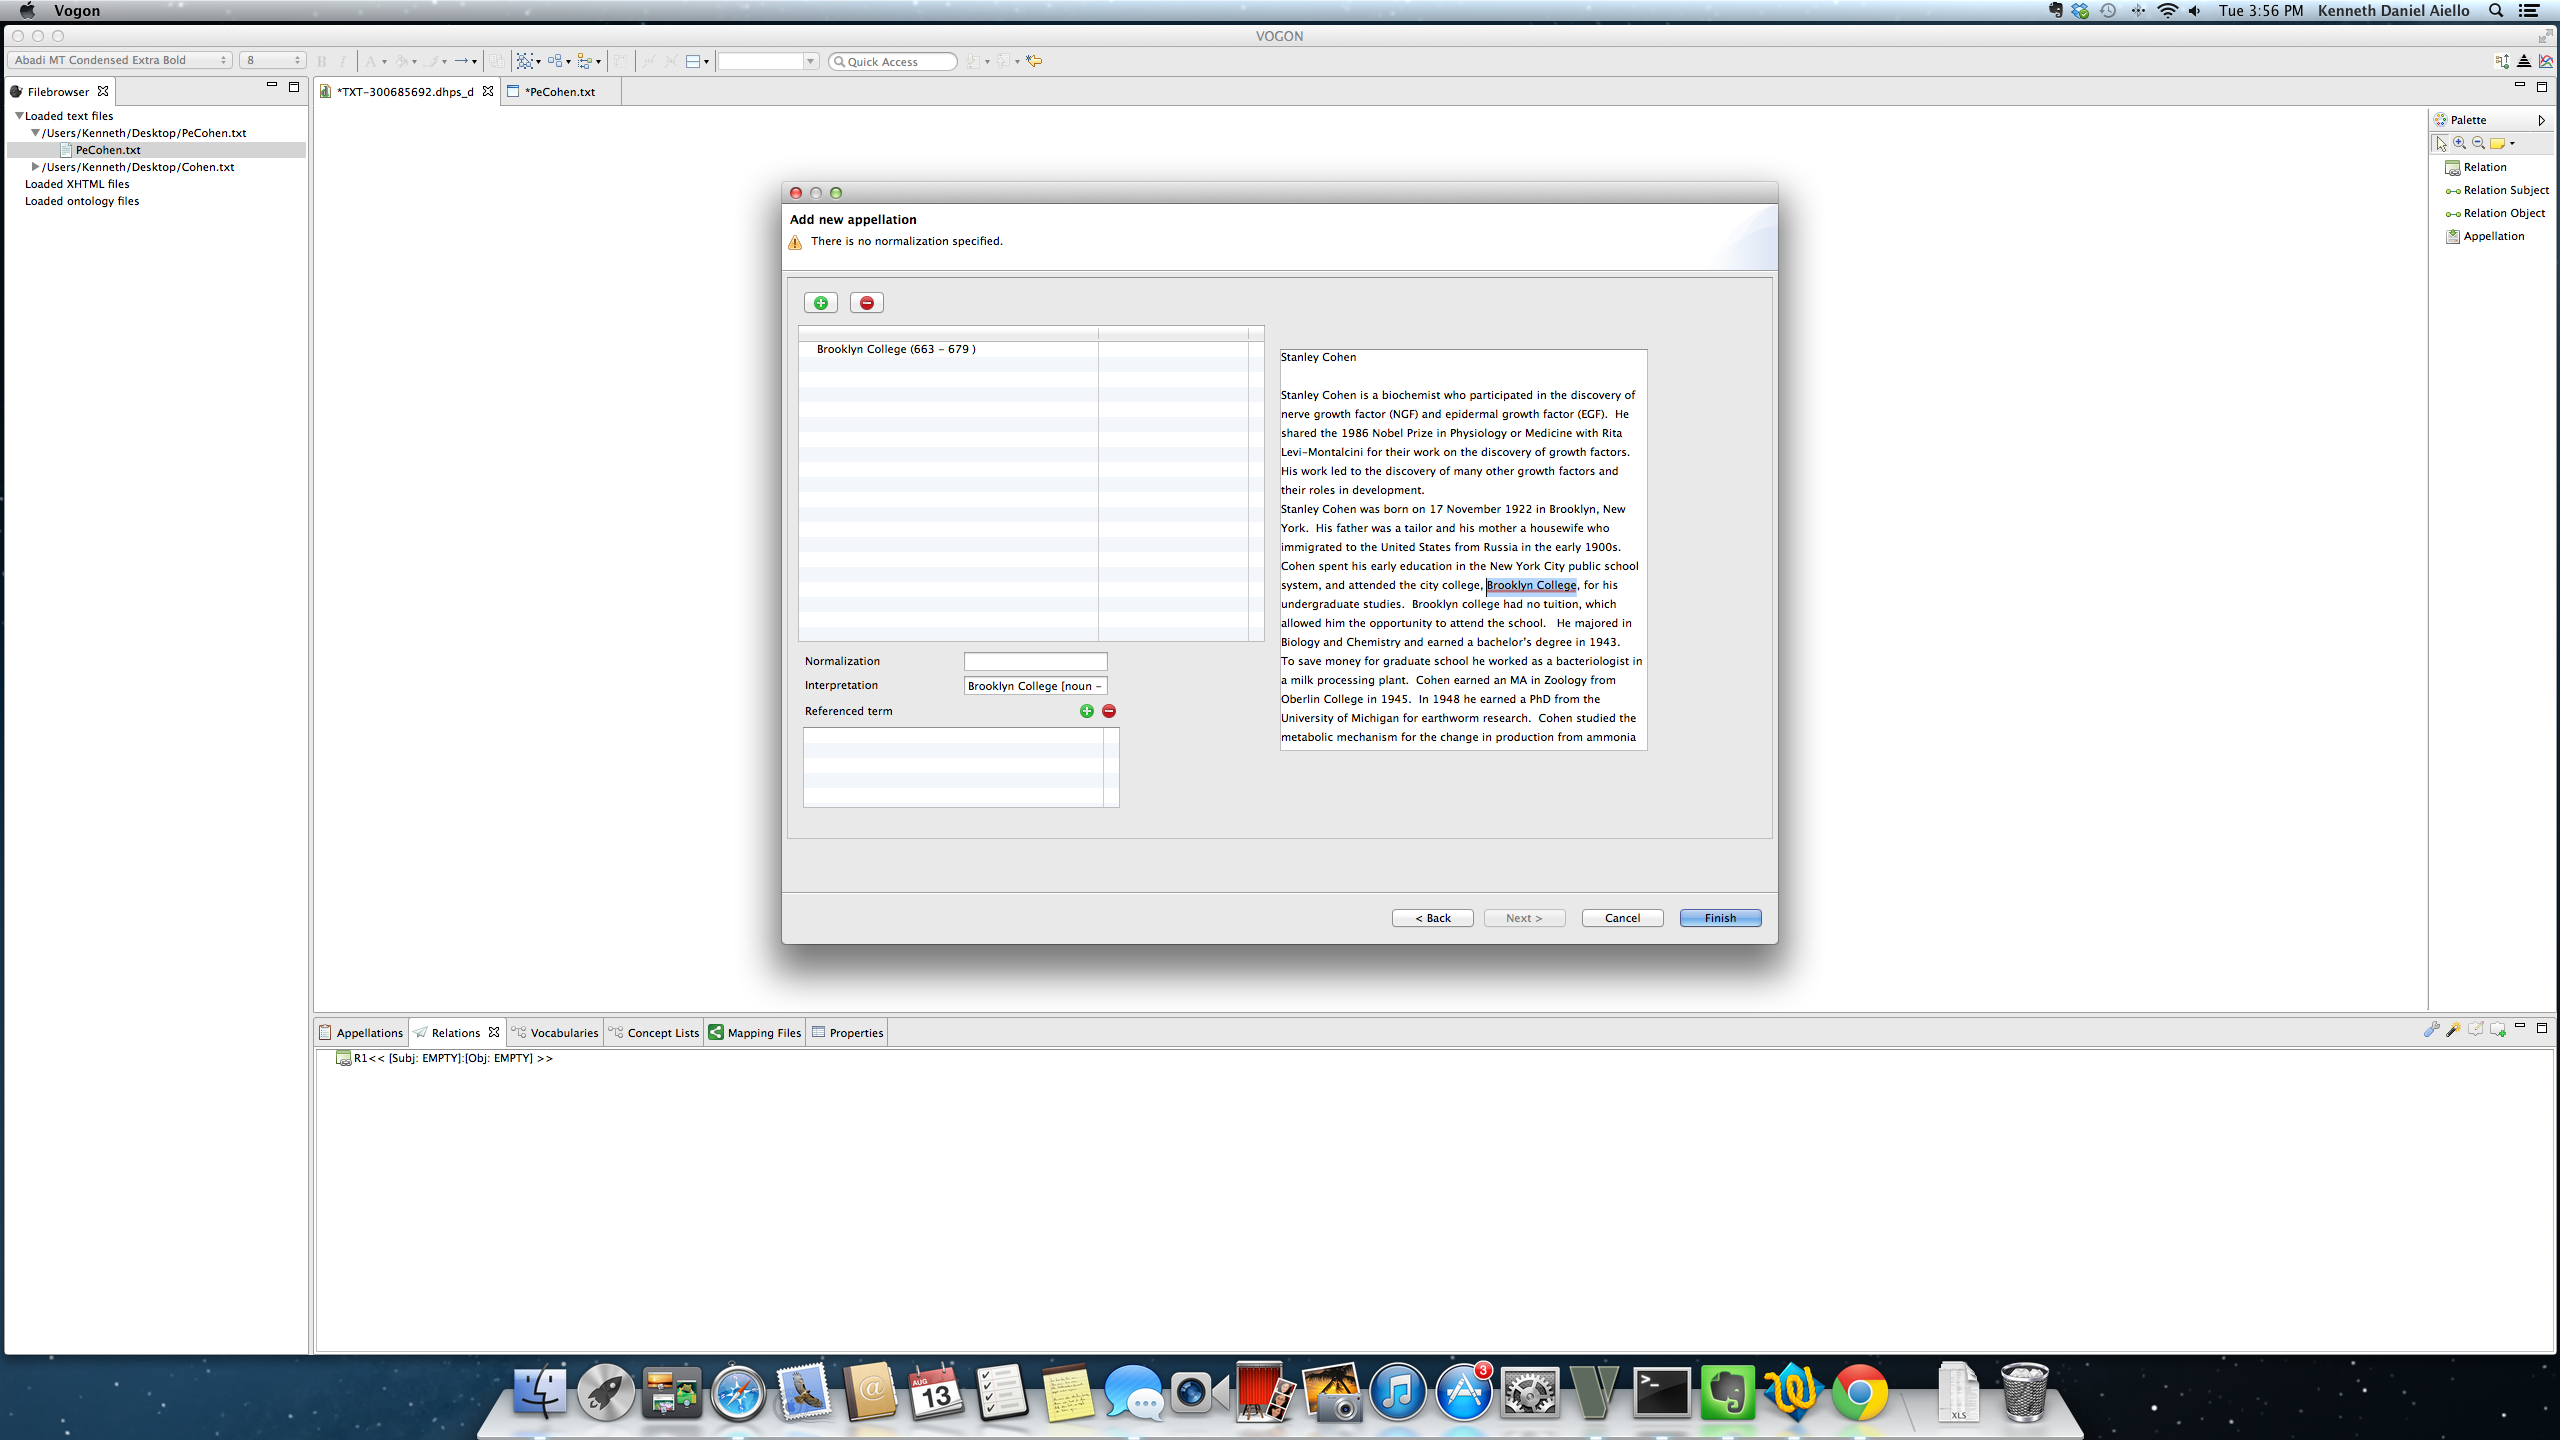
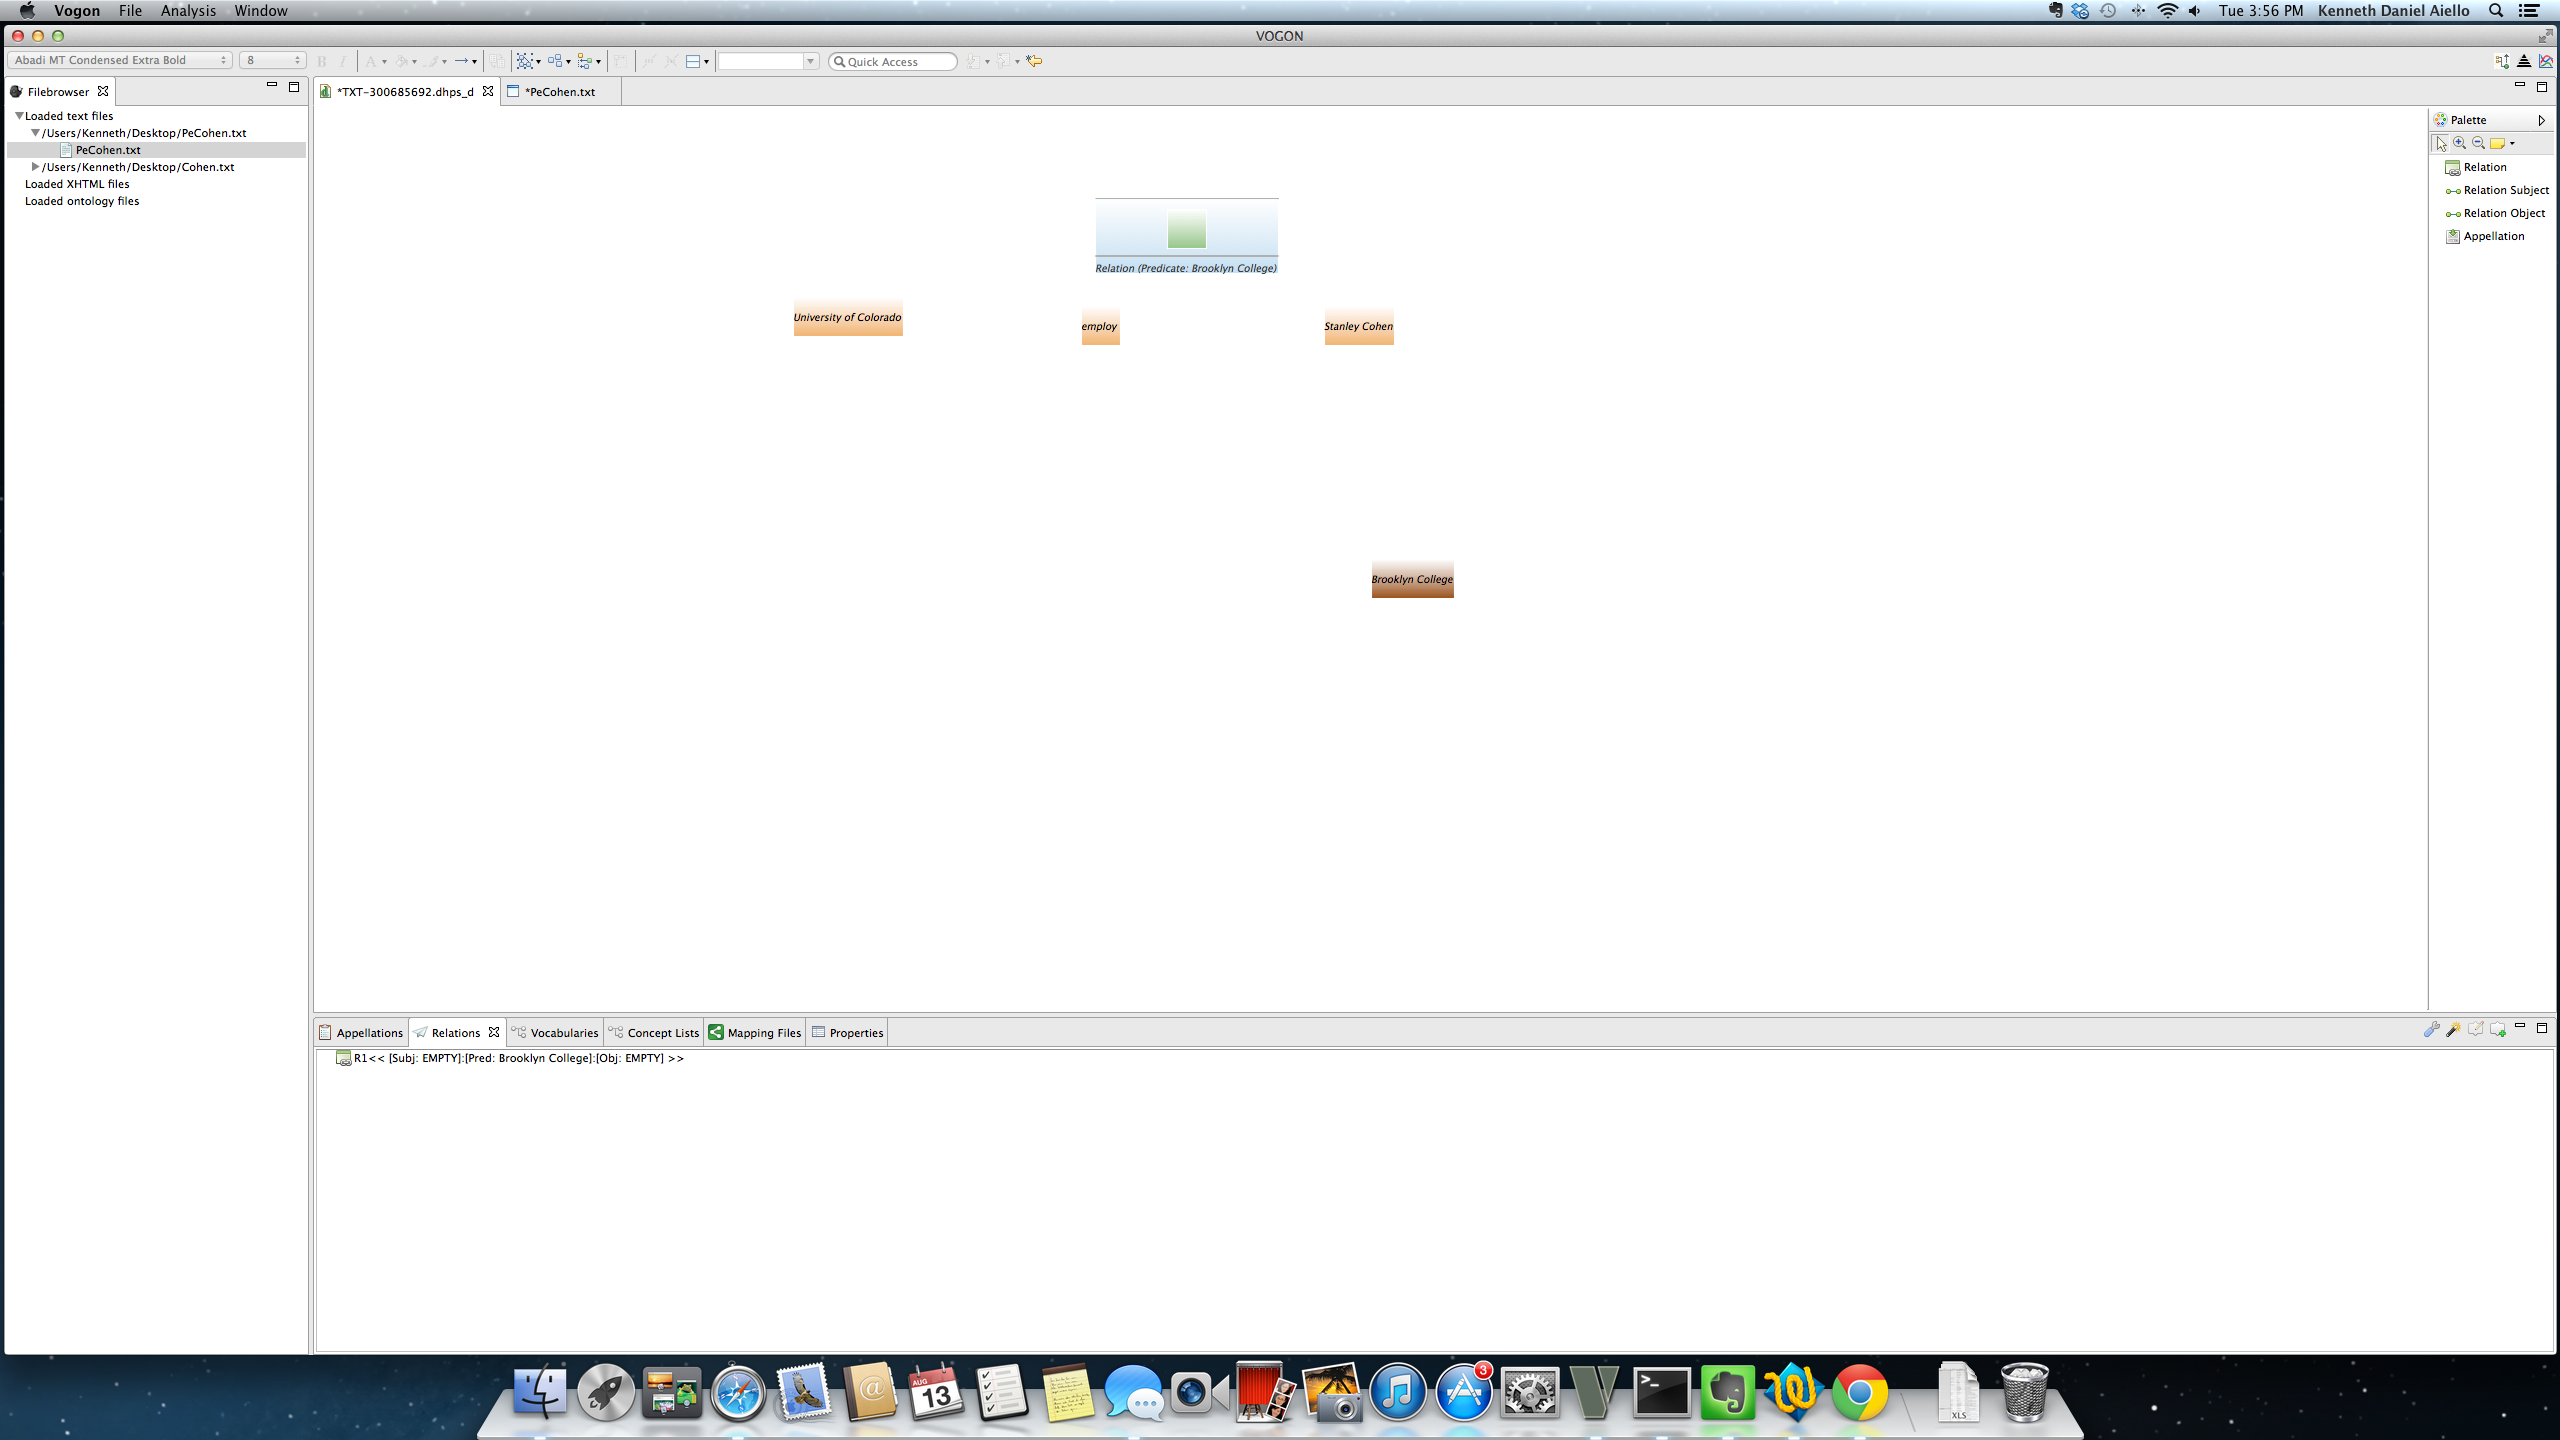
After you click finish two new boxes will appear in the Graphical Editor Main Window and the Relations tab will populate with the predicate for R1. A Relation Event Compartment box will appear and the newly appellated word in a brown box will appear. The brown box indicates that the appellated word is the predicate of a relationship and is in a Relation Event Compartment box.
In this example, the Relation Event Compartment box appears above employ, the appellated word brown box appears below the box for Stanley Cohen.
The Relation Event Compartment box is populated with the predicate of the relation, Relation (Predicate: Brooklyn College)
The Relations tab has now been updated with the predicate of the relation, R1 << [Subj: EMPTY] [Pred: Brooklyn College] [Obj:EMPTY]
Continuing with the previous example. The user has not created a new appellation for Brooklyn College and has the Create New Relation window open.
Click on the Predicate Bar and select the predicate for the new relation by highlighting the term in blue. Confirm the choice of predicate by clicking on the blue highlighted term.
In this example the Predicate Bar is open and the word highlighted in blue chosen is a baseless appellation, [Vocabulary Entry: ] [Concept: employ]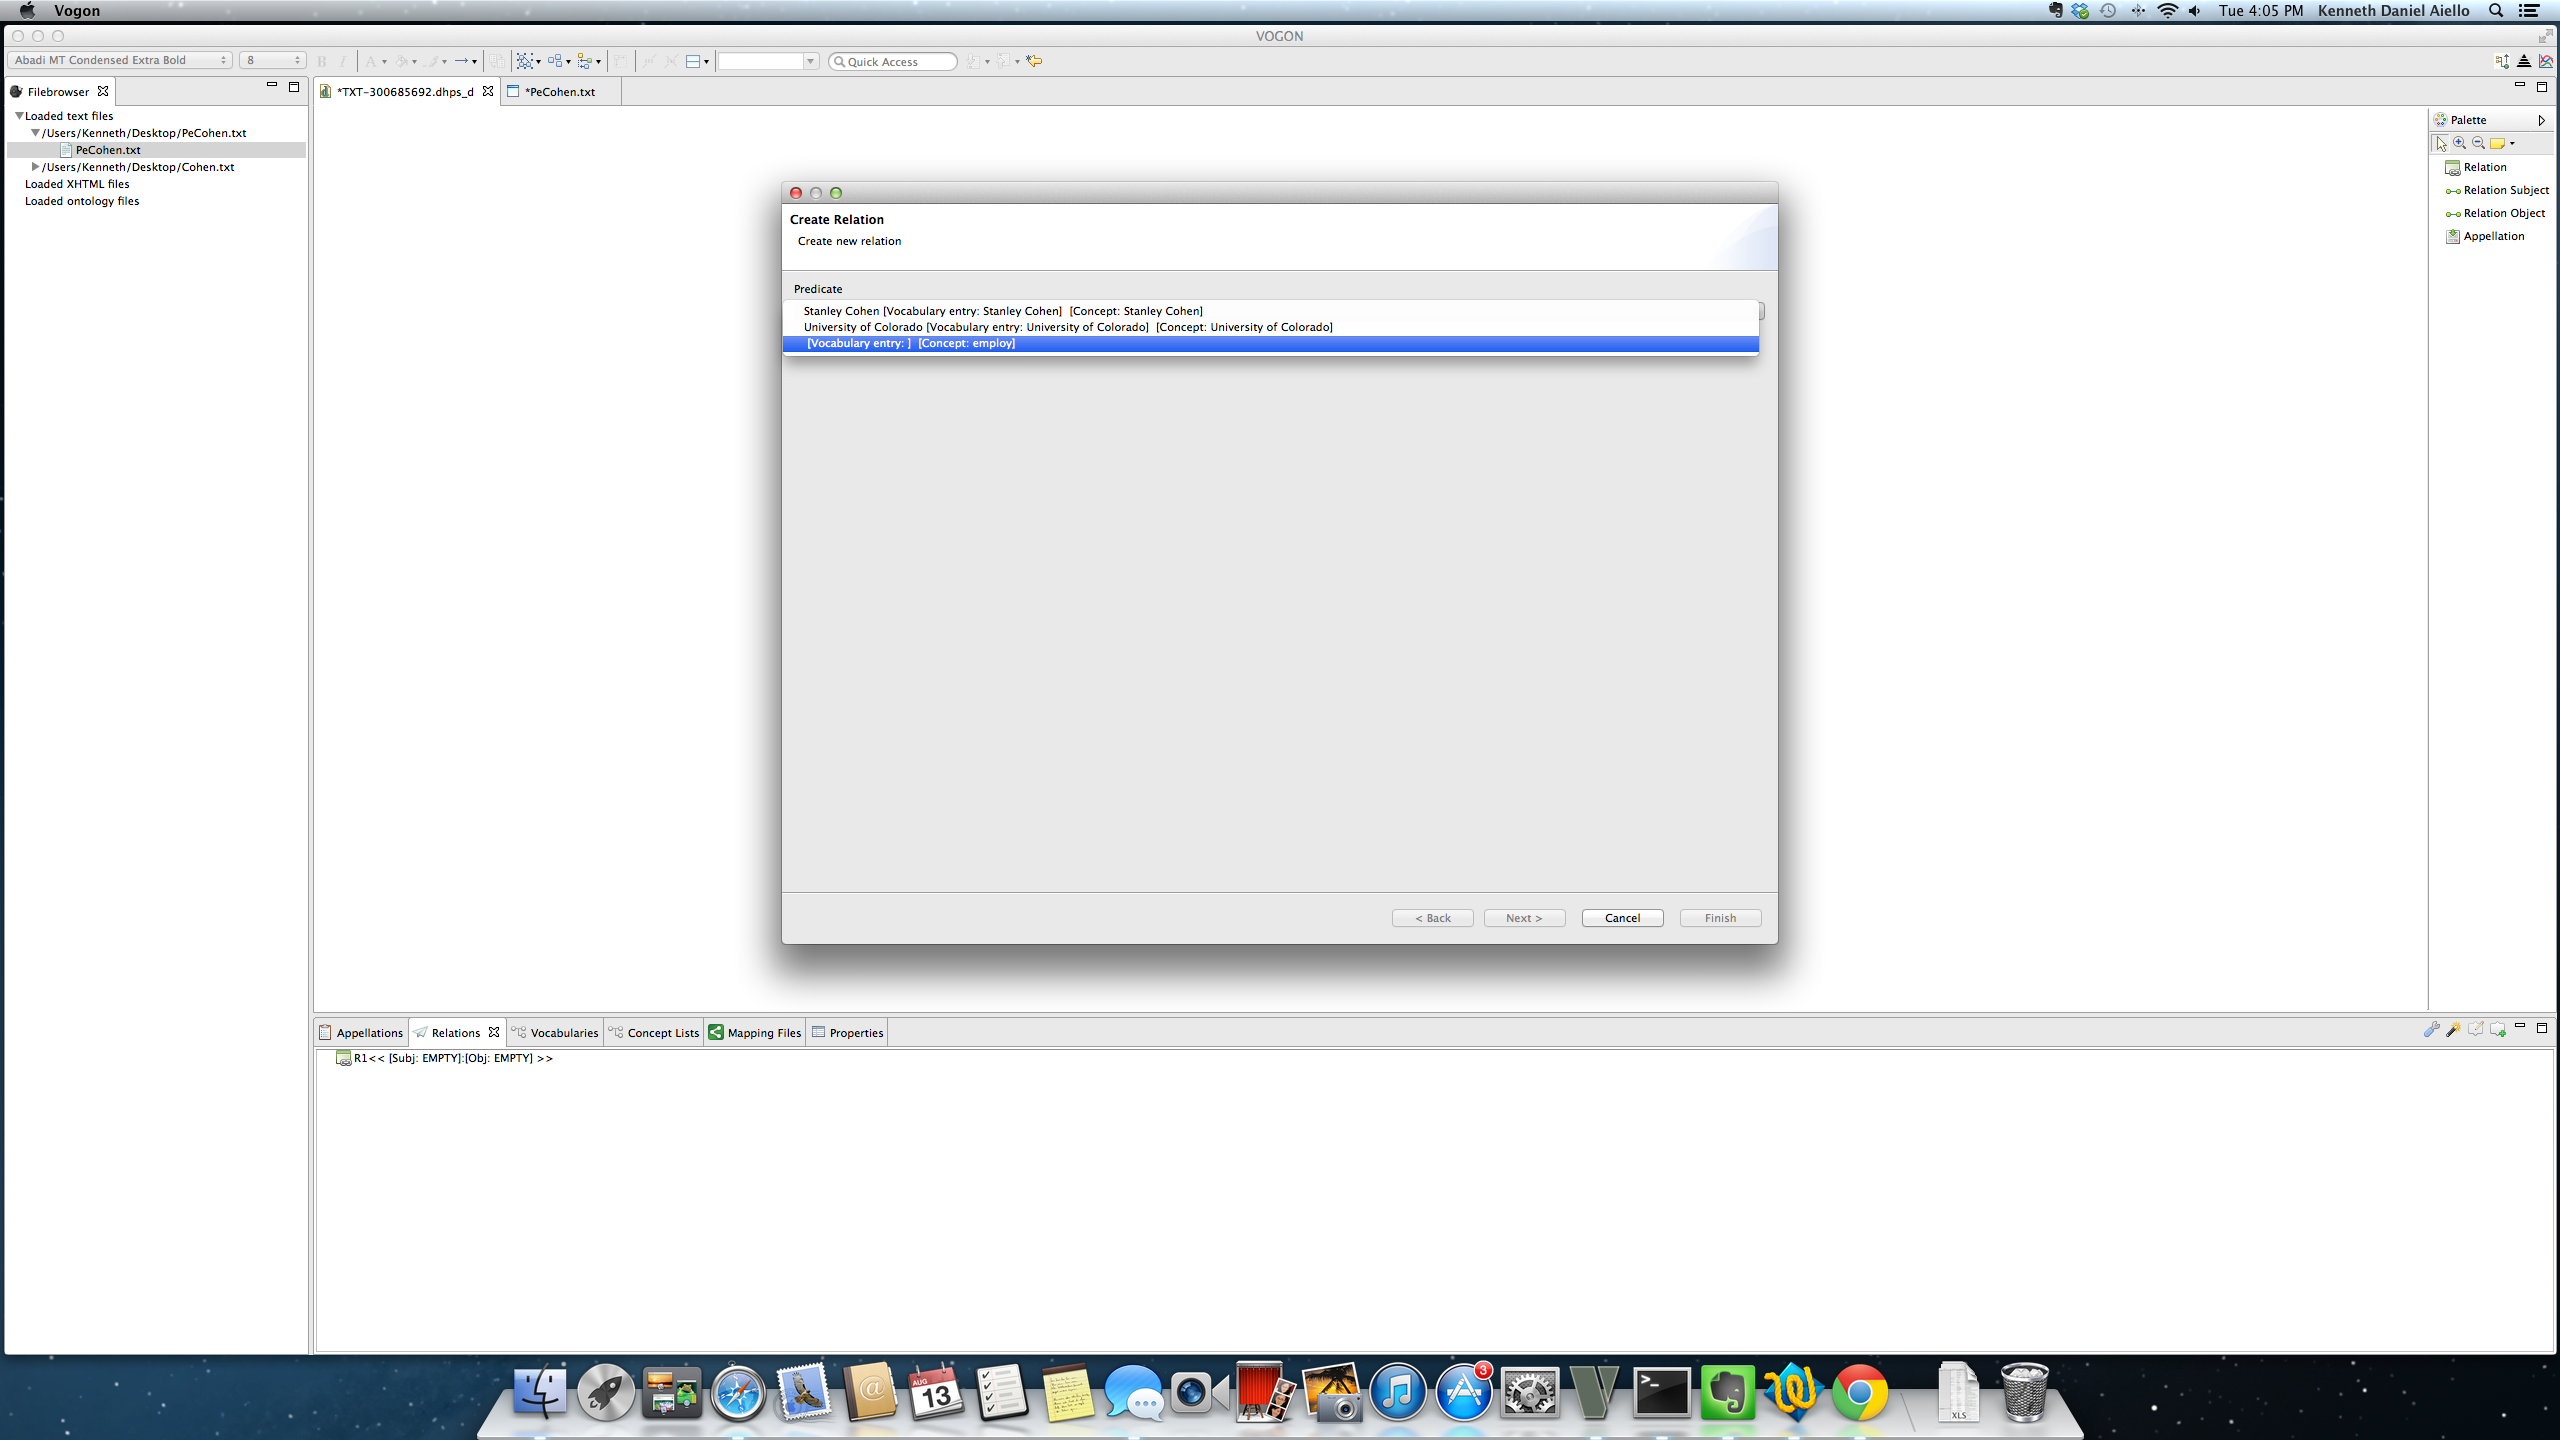
To confirm the predicate for the relation click on the blue finish button.
Continuting this, example the Predicate bar is populated with the a baseless appellation, [Vocabulary Entry: ] [Concept: employ]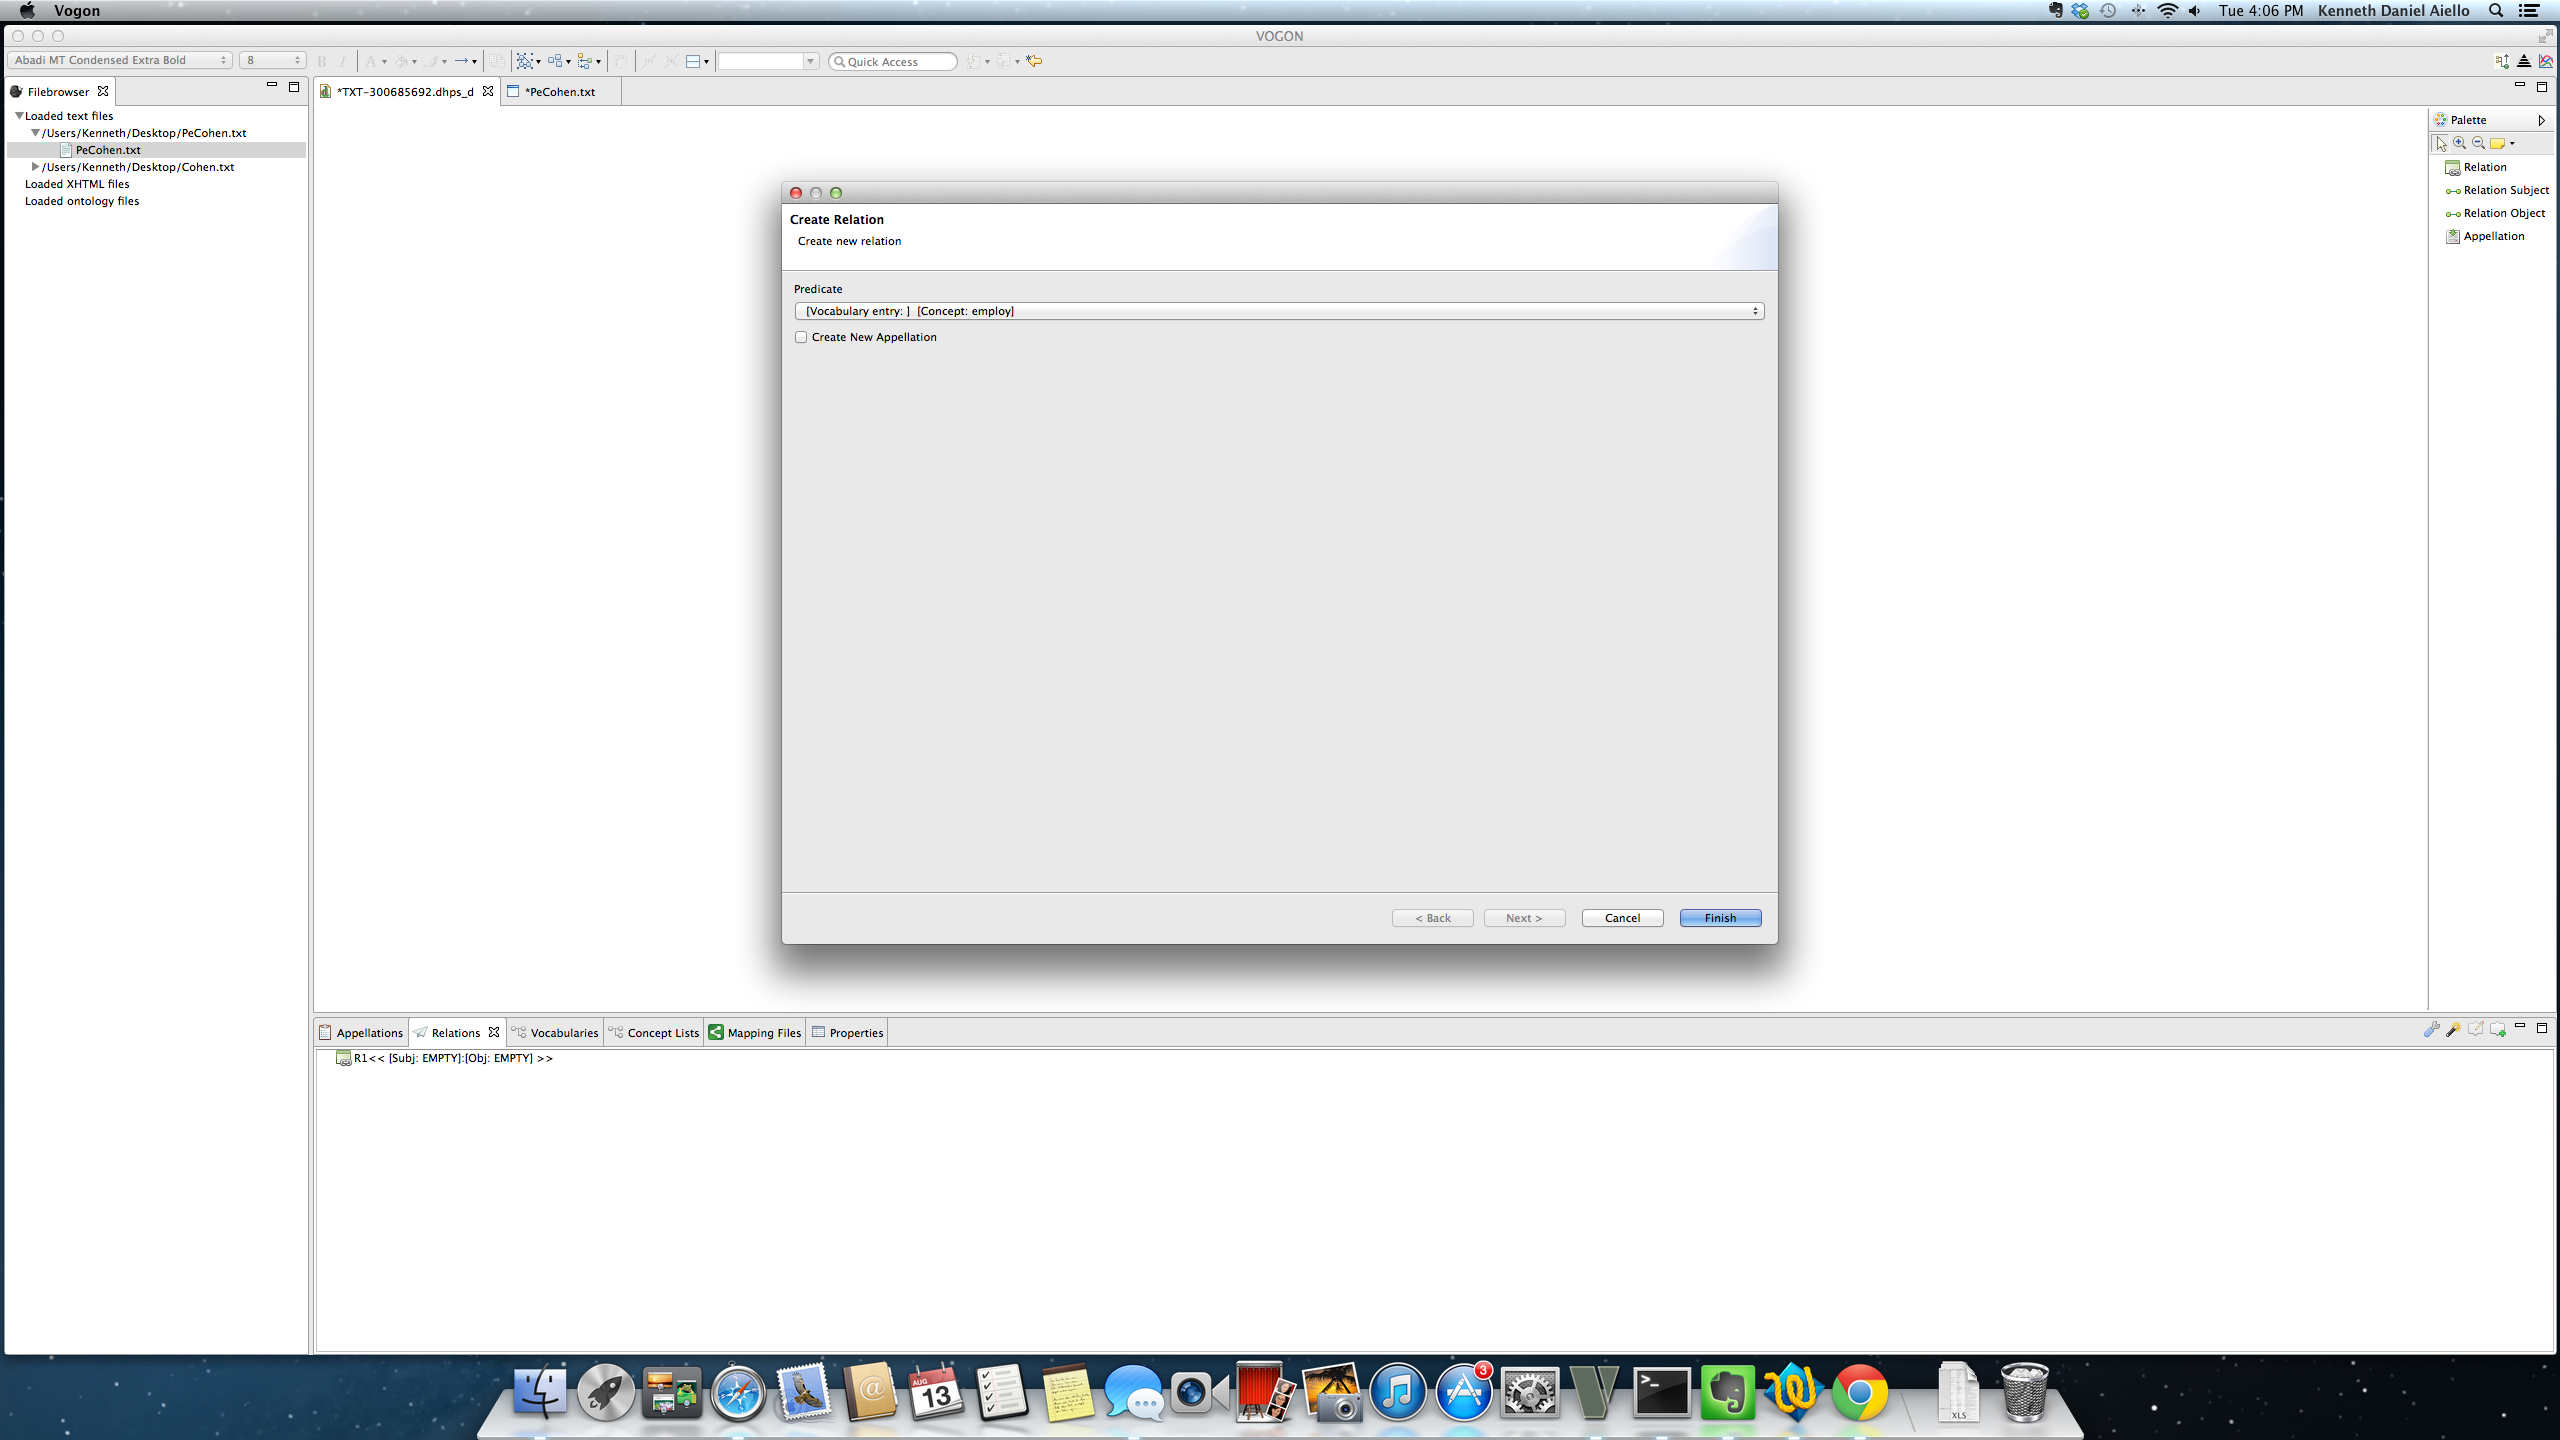
After clicking on the blue finish button a new Relation Event Compartment box will be in the Main Window. The Relation Event Compartment box will be blue, with a smaller green box inside of it, and the predicate listed underneath the green box. The Relation Event Compartment box will list the predicate after the colon in the parentheses; Relation (Predicate: _____). Also, the appellated word’s box used to create the predicate will have changed color from orange to brown.
In this example, the Relation Event Compartment box appears above employ, the appellated word employ box is now brown.
The Relation Event Compartment box is populated with the predicate of the relation, Relation (Predicate: employ)
The Relations tab has been updated with the predicate of the relation, R1 << [Subj: EMPTY] [Pred: employ] [Obj:EMPTY]

After the Relation Event Compartment box has been populated, return to the Palette and the Create New Relation:Subject or Create New Relation:Object button both symbolized by two green dots connected. To select either simply hover and the button will turn orange, to activate click on the highlighted button.
In this example the Create New Relation:Subject button was selected and is the button is now highlighted in orange.
After clicking on either Create New Relation:Subject or Create New Relation:Object button in the Palette your cursor will have changed into the Add Connector Cursor or a black arrow with a black “do not symbol” on the bottom.
Move the Add Connector Cursor anywhere within the green box inside of the Relation Event Compartment box, the “do not” symbol on the bottom of the Add Connector Cursor will have disappeared.

After the “do not symbol” has disappeared from the Add Connector Cursor, click and hold your cursor. The “do not” symbol will reappear on the bottom of the arrow end of the cursor. The entire cursor will now be connected by a dashed line to the green box inside of the Relation Event Compartment box.

Still holding the click down, drag the cursor outside of the Relation Event Compartment box. The cursor will change to a gloved hand with a finger pointing or Gloved Cursor as soon as you leave the Relation Event Compartment Box and enter the Graphical Editor Main Window.
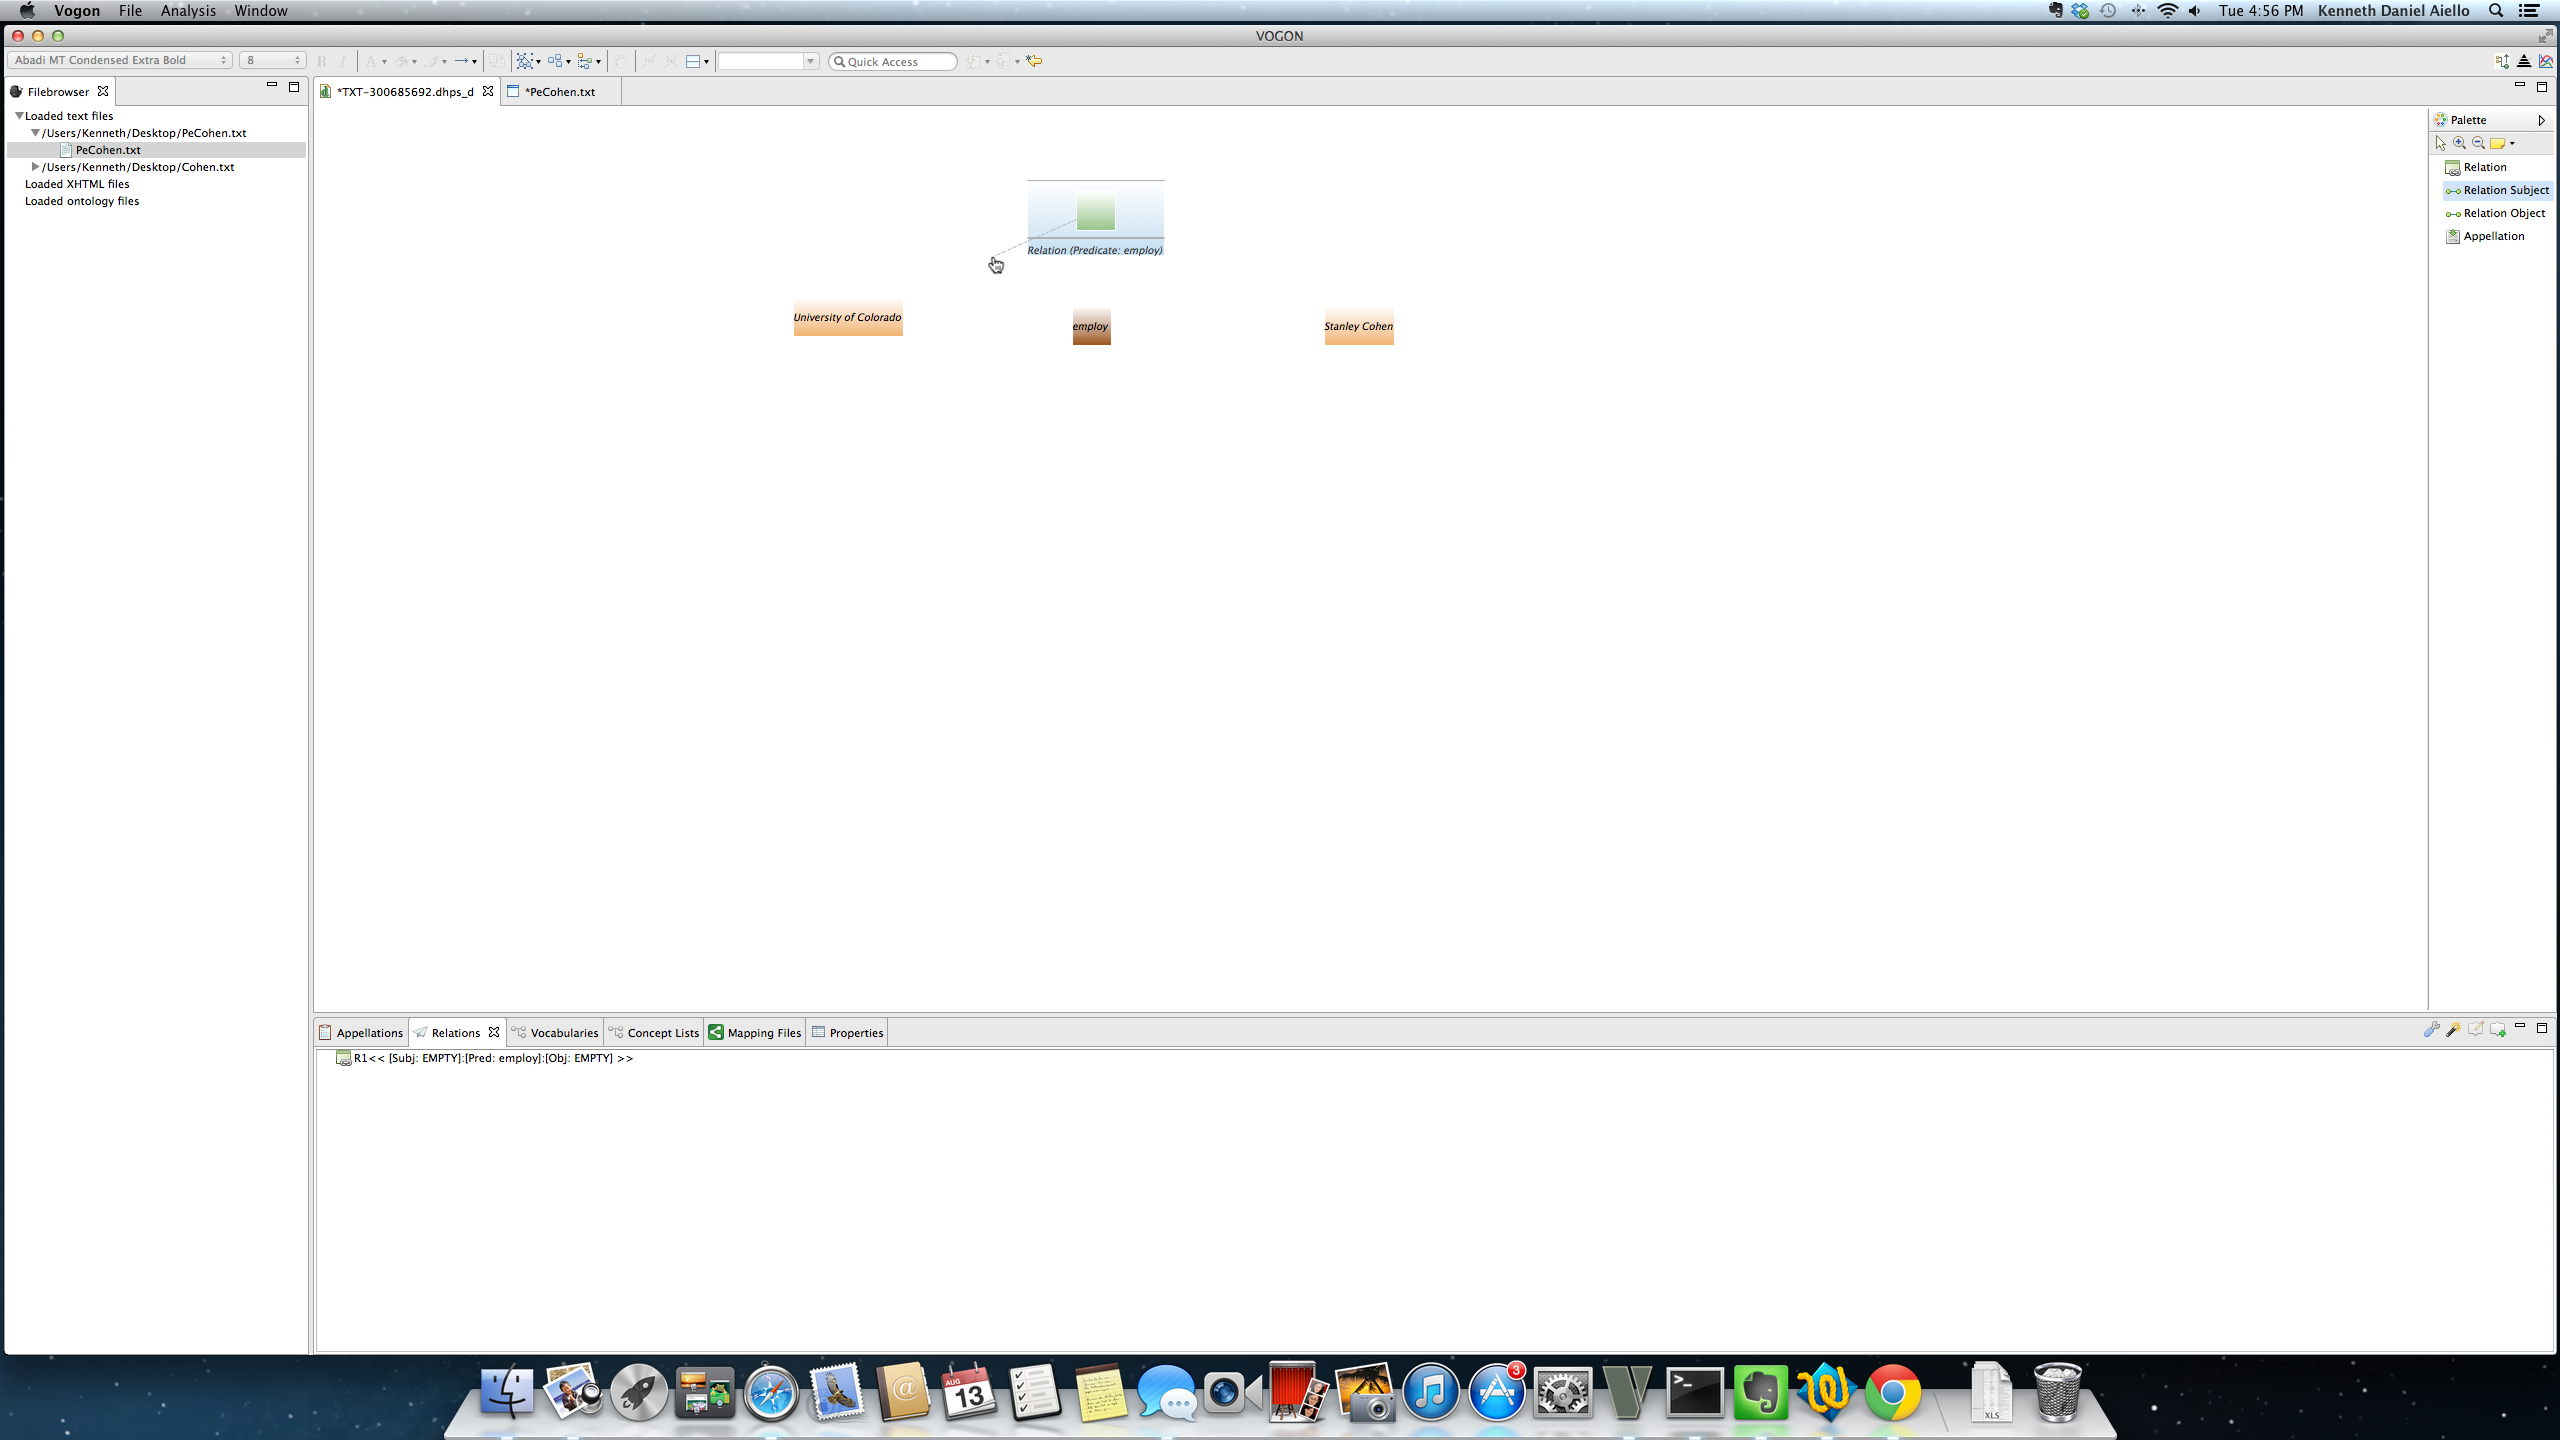
Continue holding and move the gloved hand cursor to the box that has the subject/object for your relation. The connection is established when your cursor turns into a black arrow inside of the appellated word.

Release your hold and a connector corresponding to the button you pressed earlier (subject or object) will appear. The Relations tab will update according to the button you pressed earlier (subject or object).
In this example the Create New Relation:Subject button was clicked. The subject connector extends from the Relation Event Compartment box (Predicate: employ) to the appellated word University of Colorado.
Repeat this process for either Create New Relation:Subject or Create New Relation:Object button that you did not select for the first connector. A Relation Event Compartment Button can only have one subject and one object connector. Subjects and Objects can be connected to multiple triples via subject and object connectors. The relation is complete when the Relation Event Compartment box has both a subject and object connector extending to two appellated words, and the Relation tab does not show any part of the triple as empty.
In this example the Create New Relation:Object button was not clicked. Repeating the process and selecting Stanley Cohen as the object. This completes the relation and the relation is represented in the relation tab as:
<< [Subj: University of Colorado] [Pred: employ] [Obj:Stanley Cohen]
8.6.2. Relation Tab nomenclature
In the Relation tab labels are created for a relation according to the number of triples and the location of a triple in the relation. In any given Workspace a user can have an infinite number of R1’s and R2’s
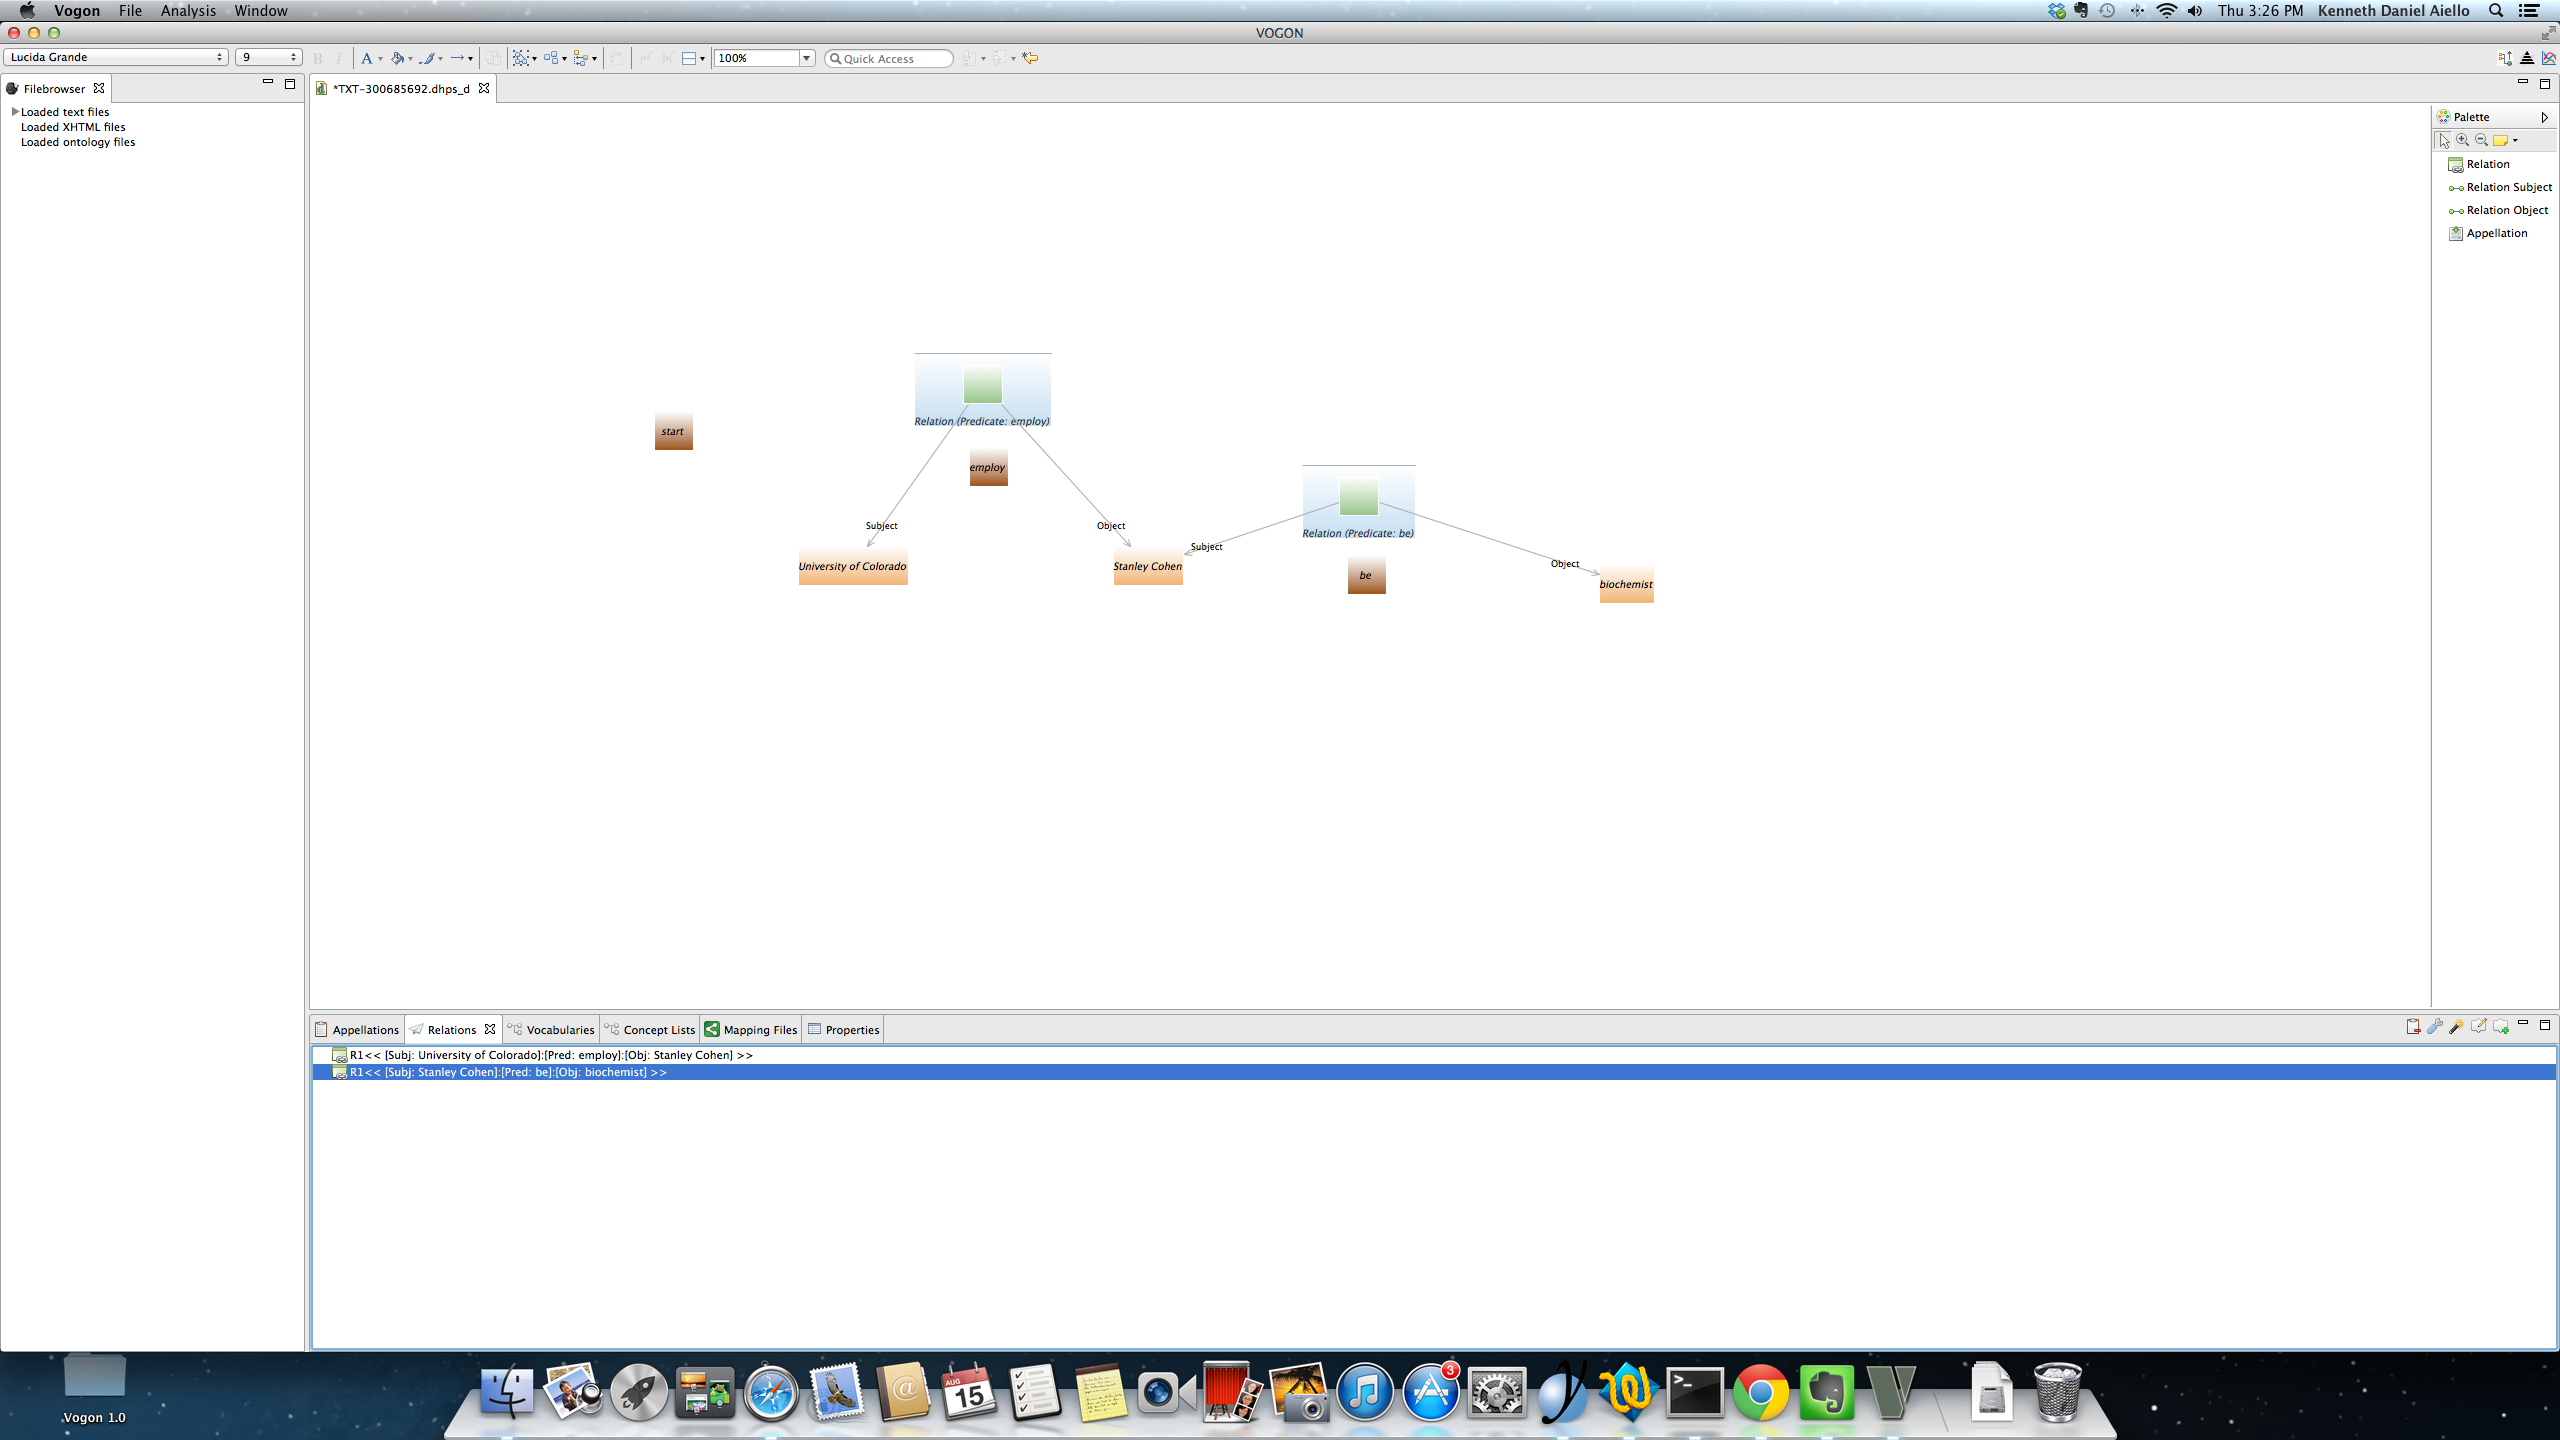
In this example there are two separate relations that have been annotated. Apellated words can be used as Subjects and Objects in multiple triples.
- The appellated word Stanley Cohen is a Subject in the triple University of Colorado employ Stanley Cohen;
- This relation is represented in the Relation Tab as R1<< [Subj: University of Colorado] [Pred: employ] [Obj:Stanley Cohen]
- ... and the Object in the triple Stanley Cohen be a biochemist.
This relation is represented in the Relaton Tab as R1<< [Subj: Stanley Cohen] [Pred: be] [Obj:biochemis]
8.6.3. Releasing Gloved Cursor in an open area in the Graphical Editor Main Window
The Graphical Editor allows more freedom than the text editor in creating appellations and relations. By releasing a hold when the gloved cursor is present (after you have created a Relation Event Compartment box) you can create an appellation that is connected to the orgin Relation Compartment Event you are annotating, create a new Relation Compartment Event from the origin Relation Compartment Event, or connect the origin Relation Compartment Event to an existing appellated word.
In this example, the Relation Event Compartment box has been created, and the user selected to create a Create New Relation:Subject. After clicking and holding the cursor inside the Relation Event Compartment box and then dragging the cursor outside of the box the cursor has turned into the Gloved Cursor.
Relasing the click in an open area in the Graphical Editor Main Window pops up the Glove Cursor Subwindow.
In the Glove Cursor Subwindow the user can select from three options:
- Create Undefined to new Element: IAppellation Event
- Create Undefined to new Element: IRelation Event
- Create Undefined to existing element
The connector to the new IAppellation Event, IRelation Event, or existing element will be the same as the one selected from the origin Relation Compartment Event (e.g. subject or object).
IIn this example, the Relation Event Compartment box has been created, and the user selected to create a Create New Relation:Subject. After clicking and holding the cursor inside the Relation Event Compartment box and then dragging the cursor outside of the box the cursor turned into the Gloved Cursor. The user then released the hold on the click and the Gloved Cursor Subwindow popped up.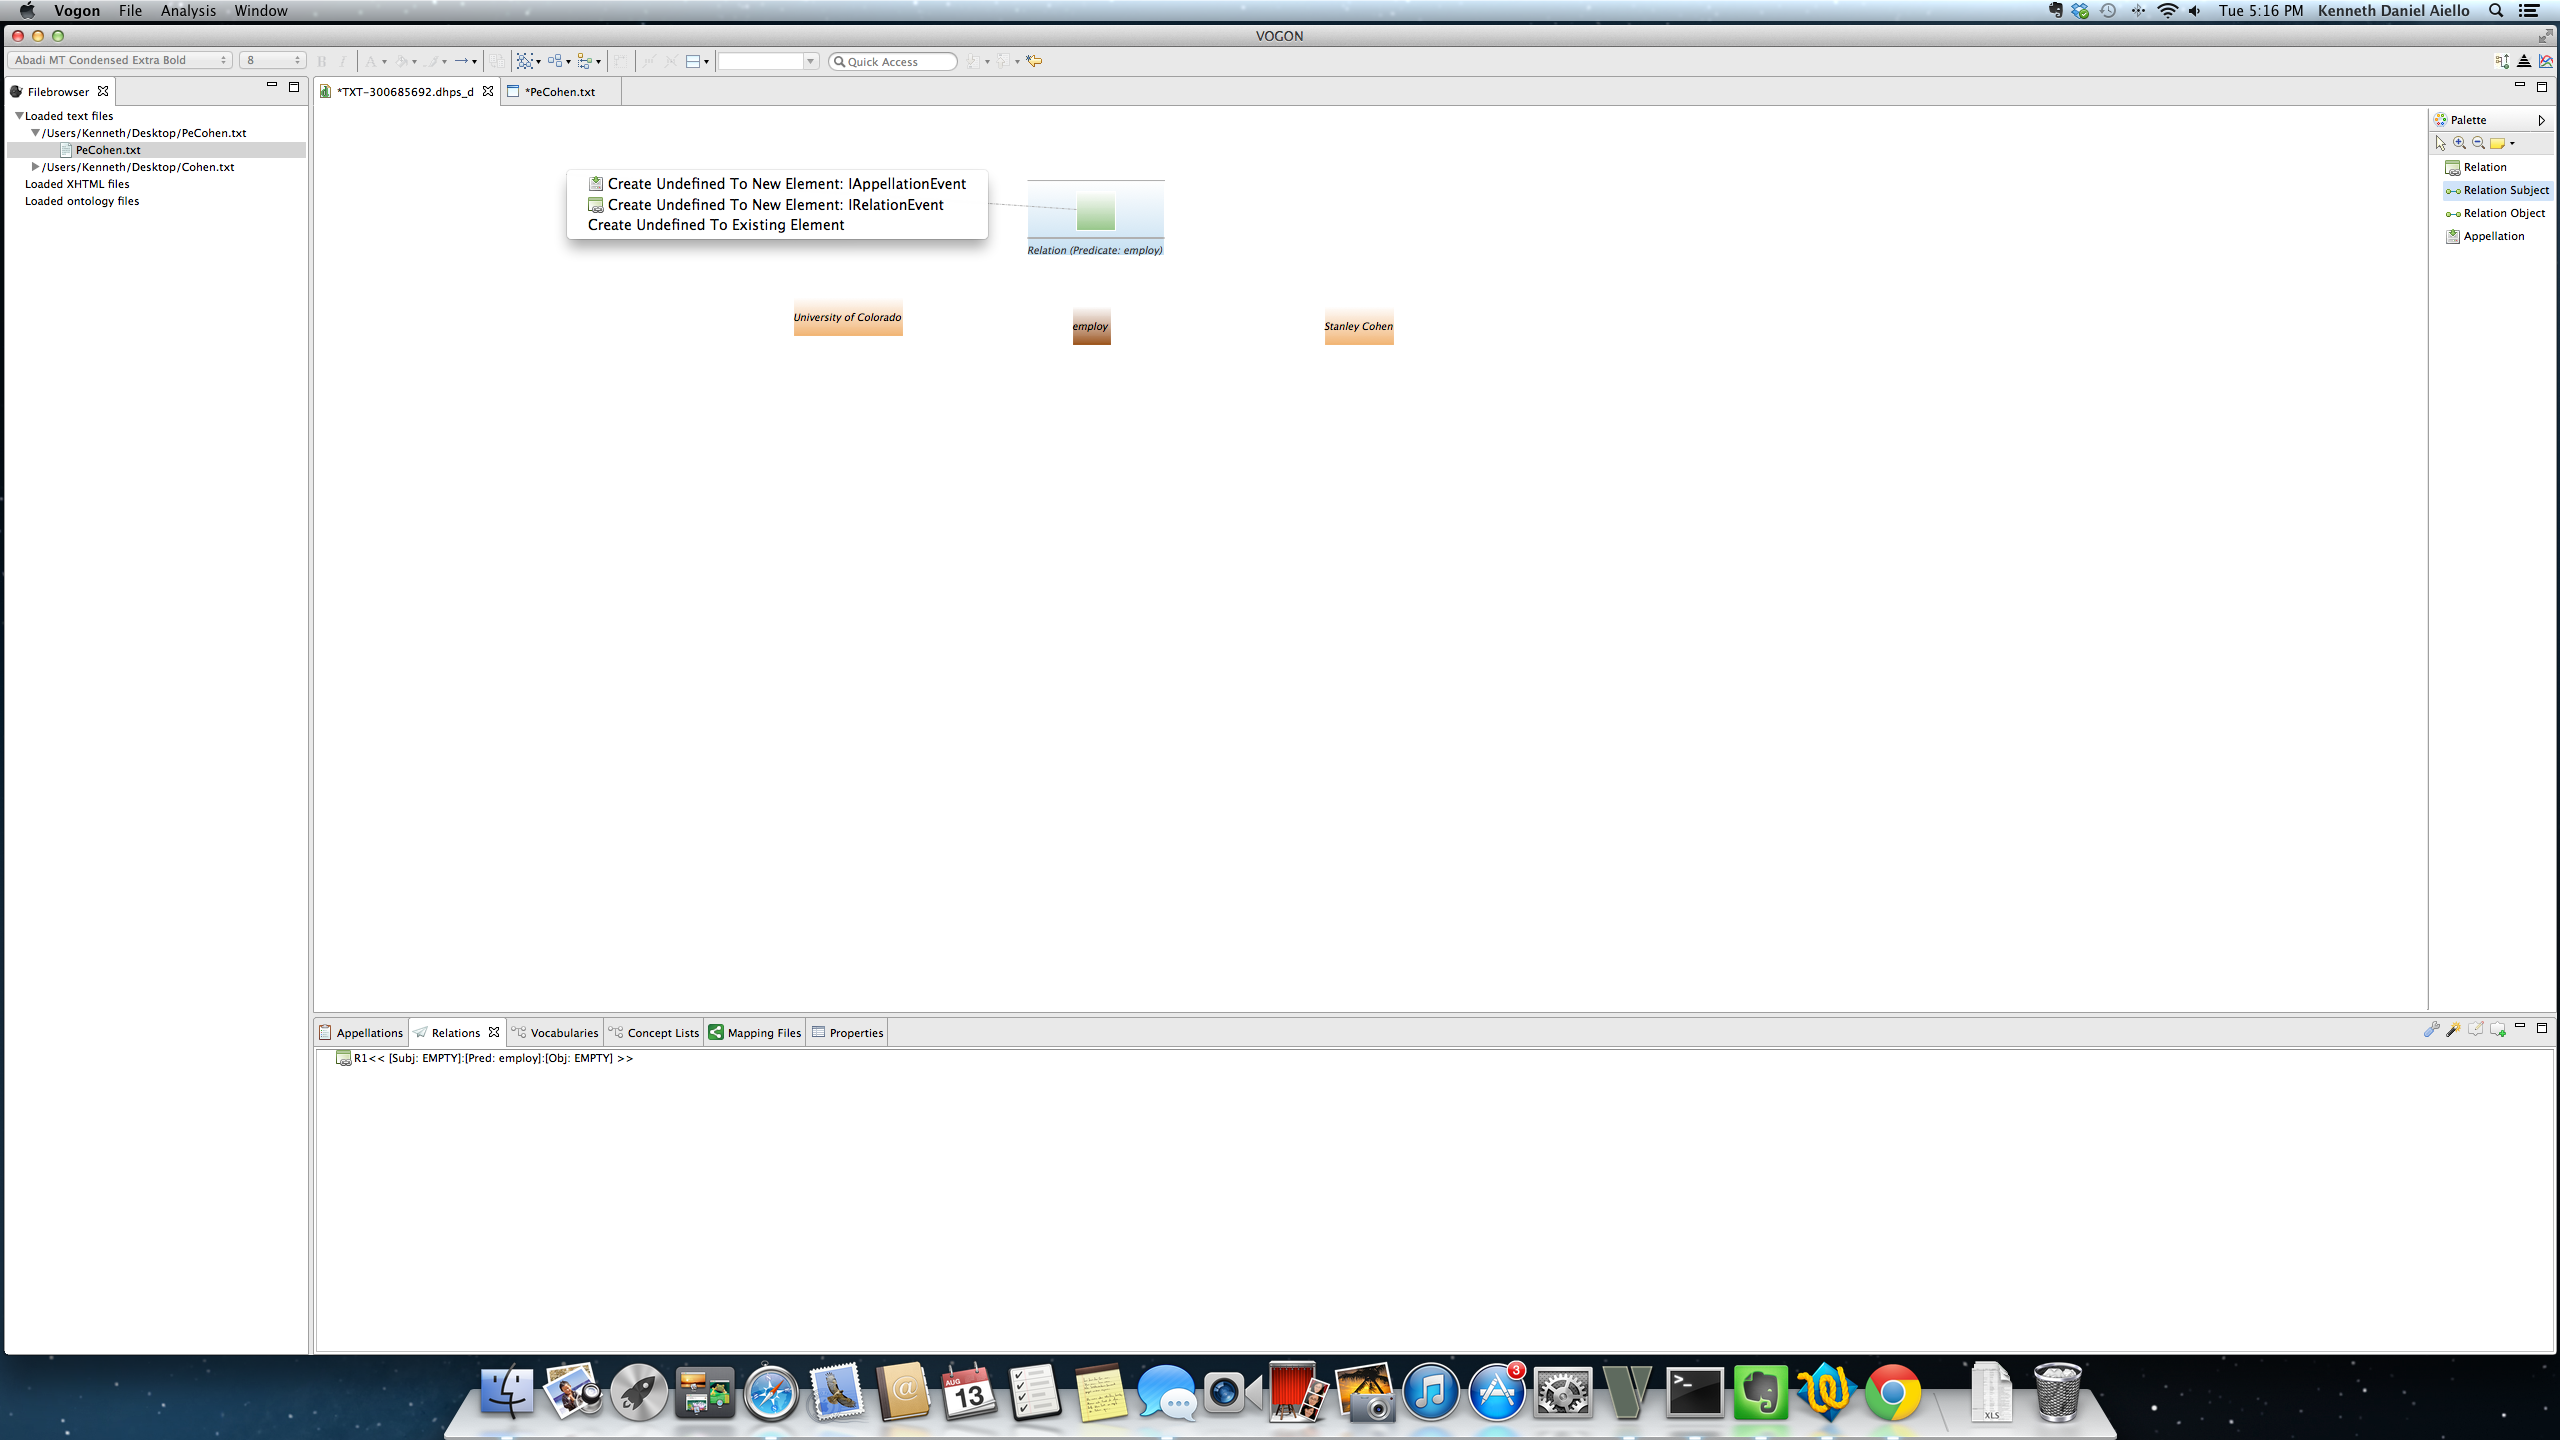
8.6.3.1. Glove Cursor Subwindow: Create Undefined to new Element: IAppellation Event
By selecting and clicking on this option the Add New Appellation Window will pop up. Here the user can appellate a term not yet appellated. However, in order to appellate a term a valid interpretation must already be in the user’s Concept List. The term appellated will be connected to the Relation Event Compartment box by the original connector button selected. The Relation tab will fill accordingly.
In this example the word milk was created by the Glove Cursor Subwindow by clicking on the Create Undefined to new Element: IAppellation Event, and then appellated the word milk.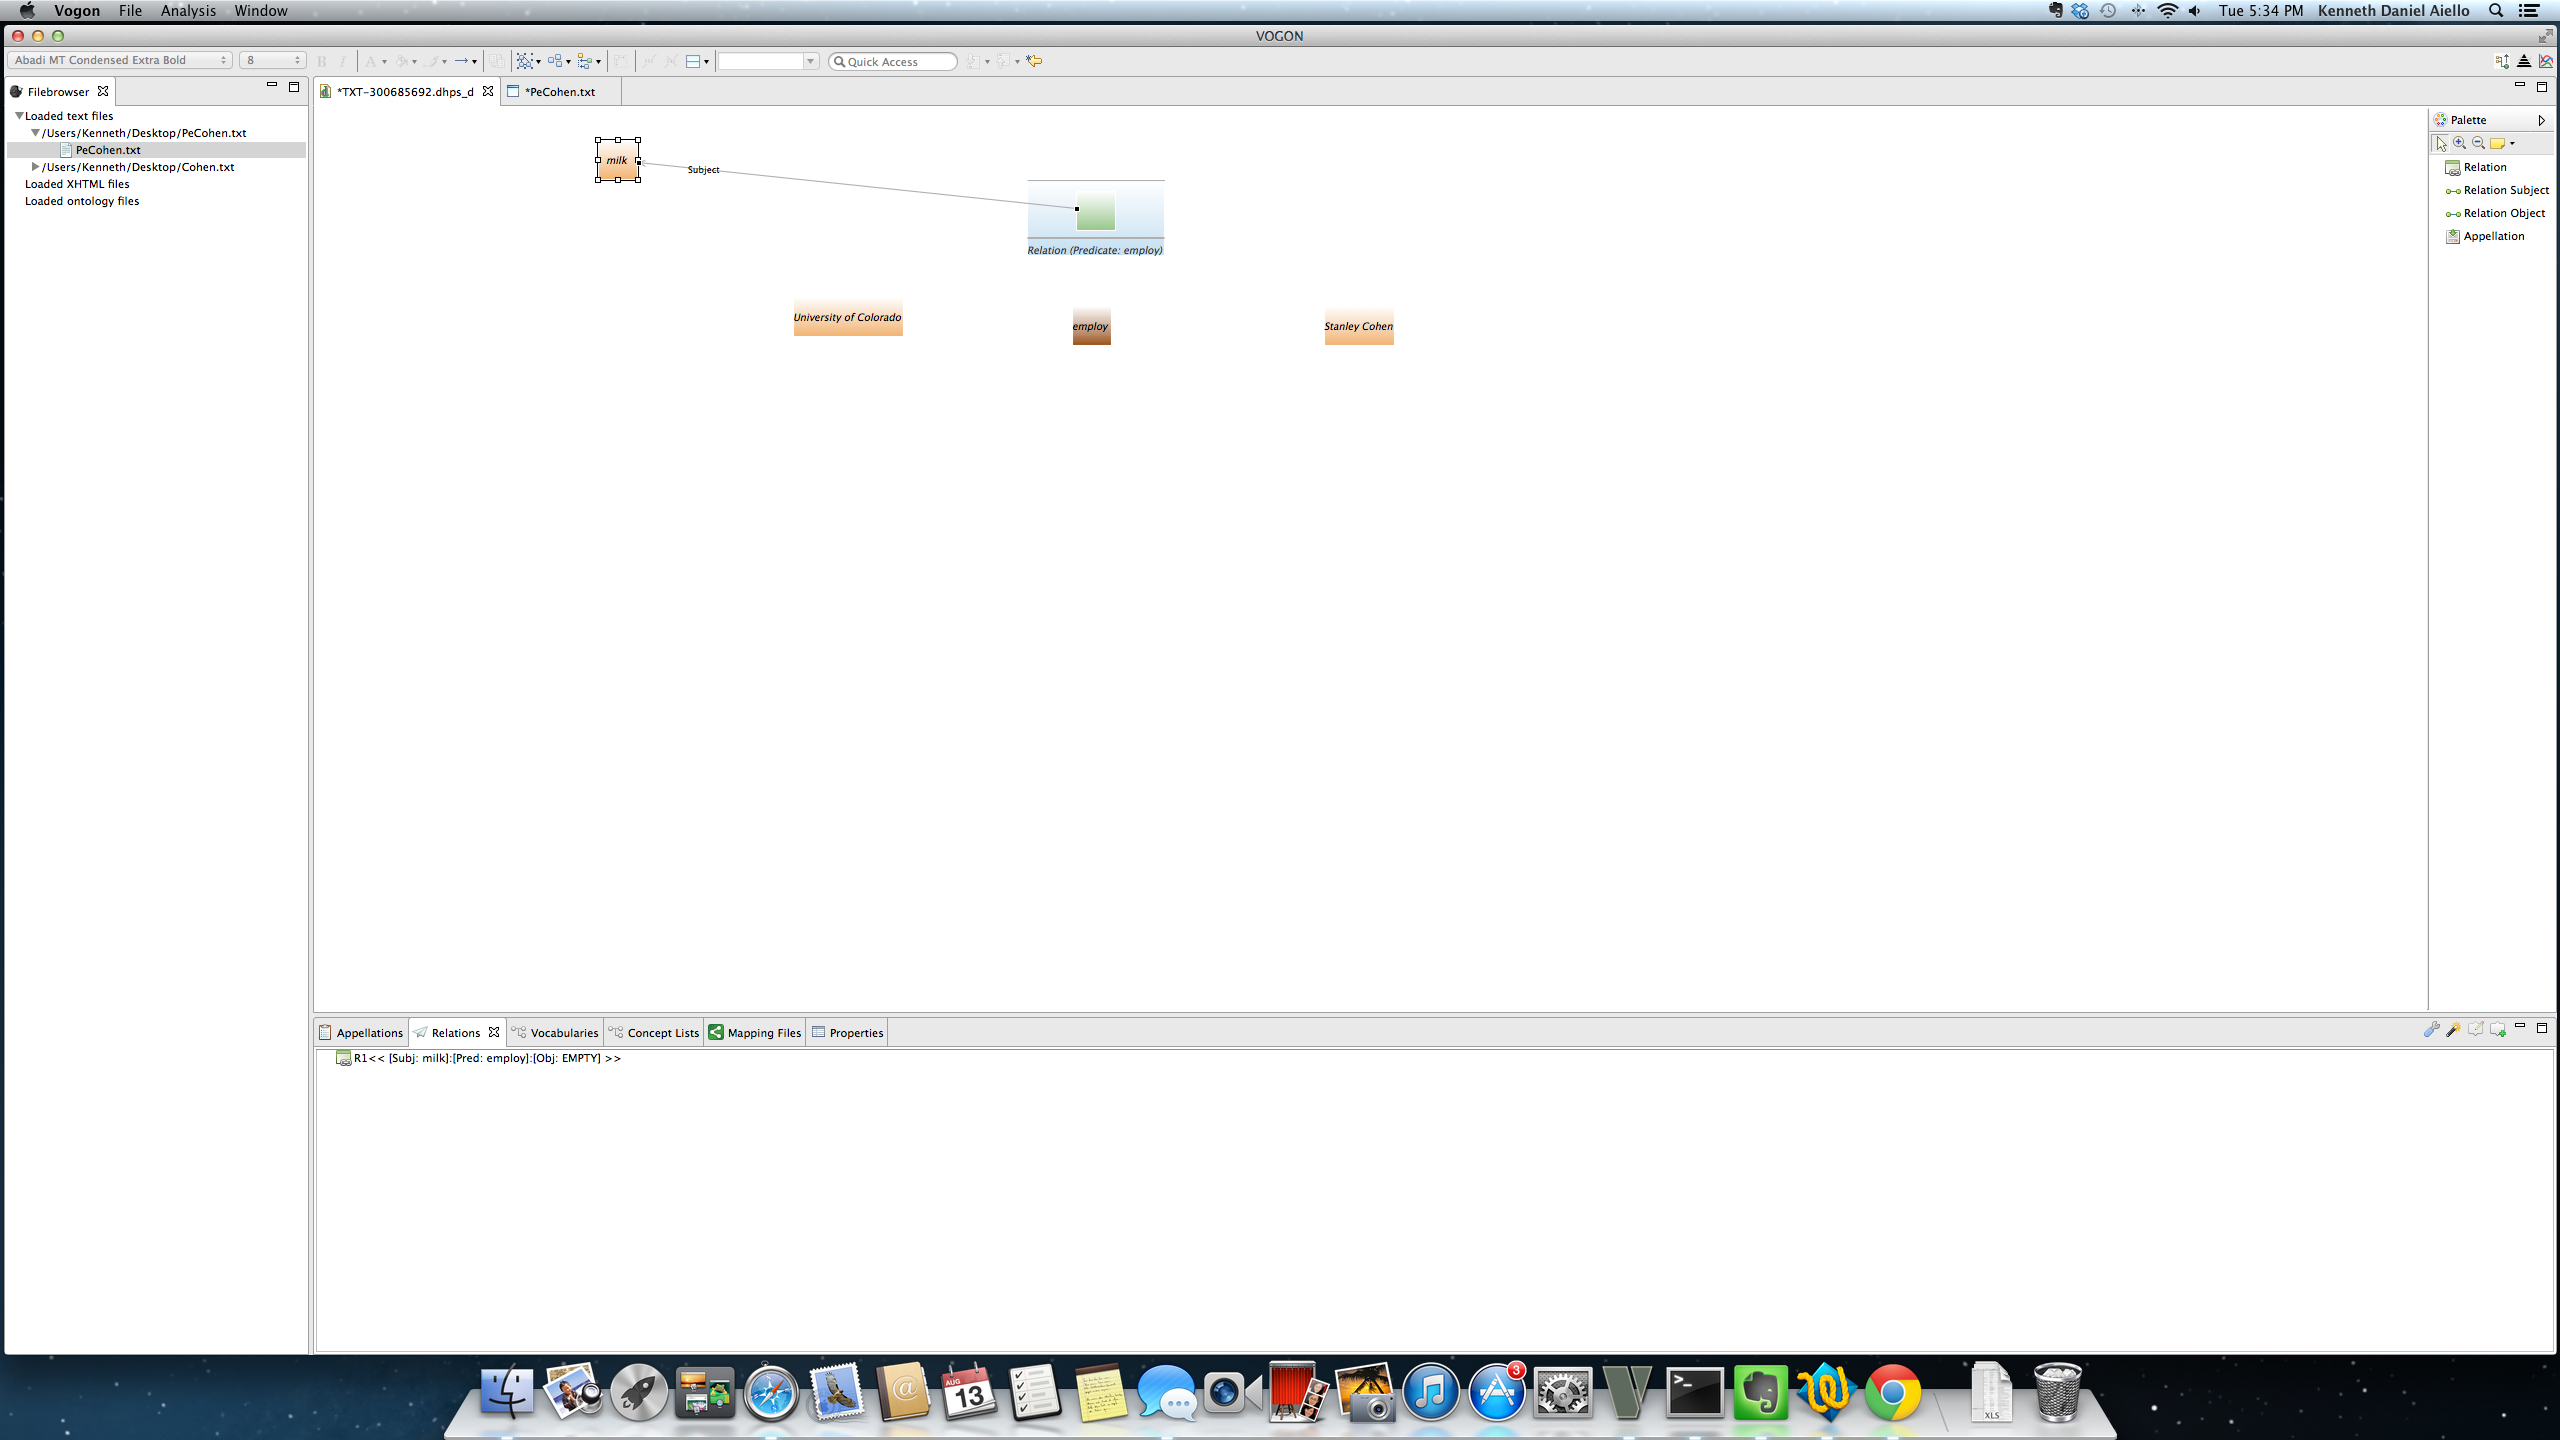
8.6.3.2. Glove Cursor Subwindow: Create Undefined to new Element: IRelation Event or Nested Triple
By selecting and clicking on this option the Add New Appellation Window pops ups. Here the user can create a Nested Triple or a new Relation Event Compartment box to be connected to the origin Relation Event Compartment box. The new Relation Event Compartment box will be connected to the origin Relation Event Compartment box by the original connector button selected. The Relation tab will fill accordingly.
In this example the new Relation Event Compartment box was created by clicking on Create New Relation:Subject button.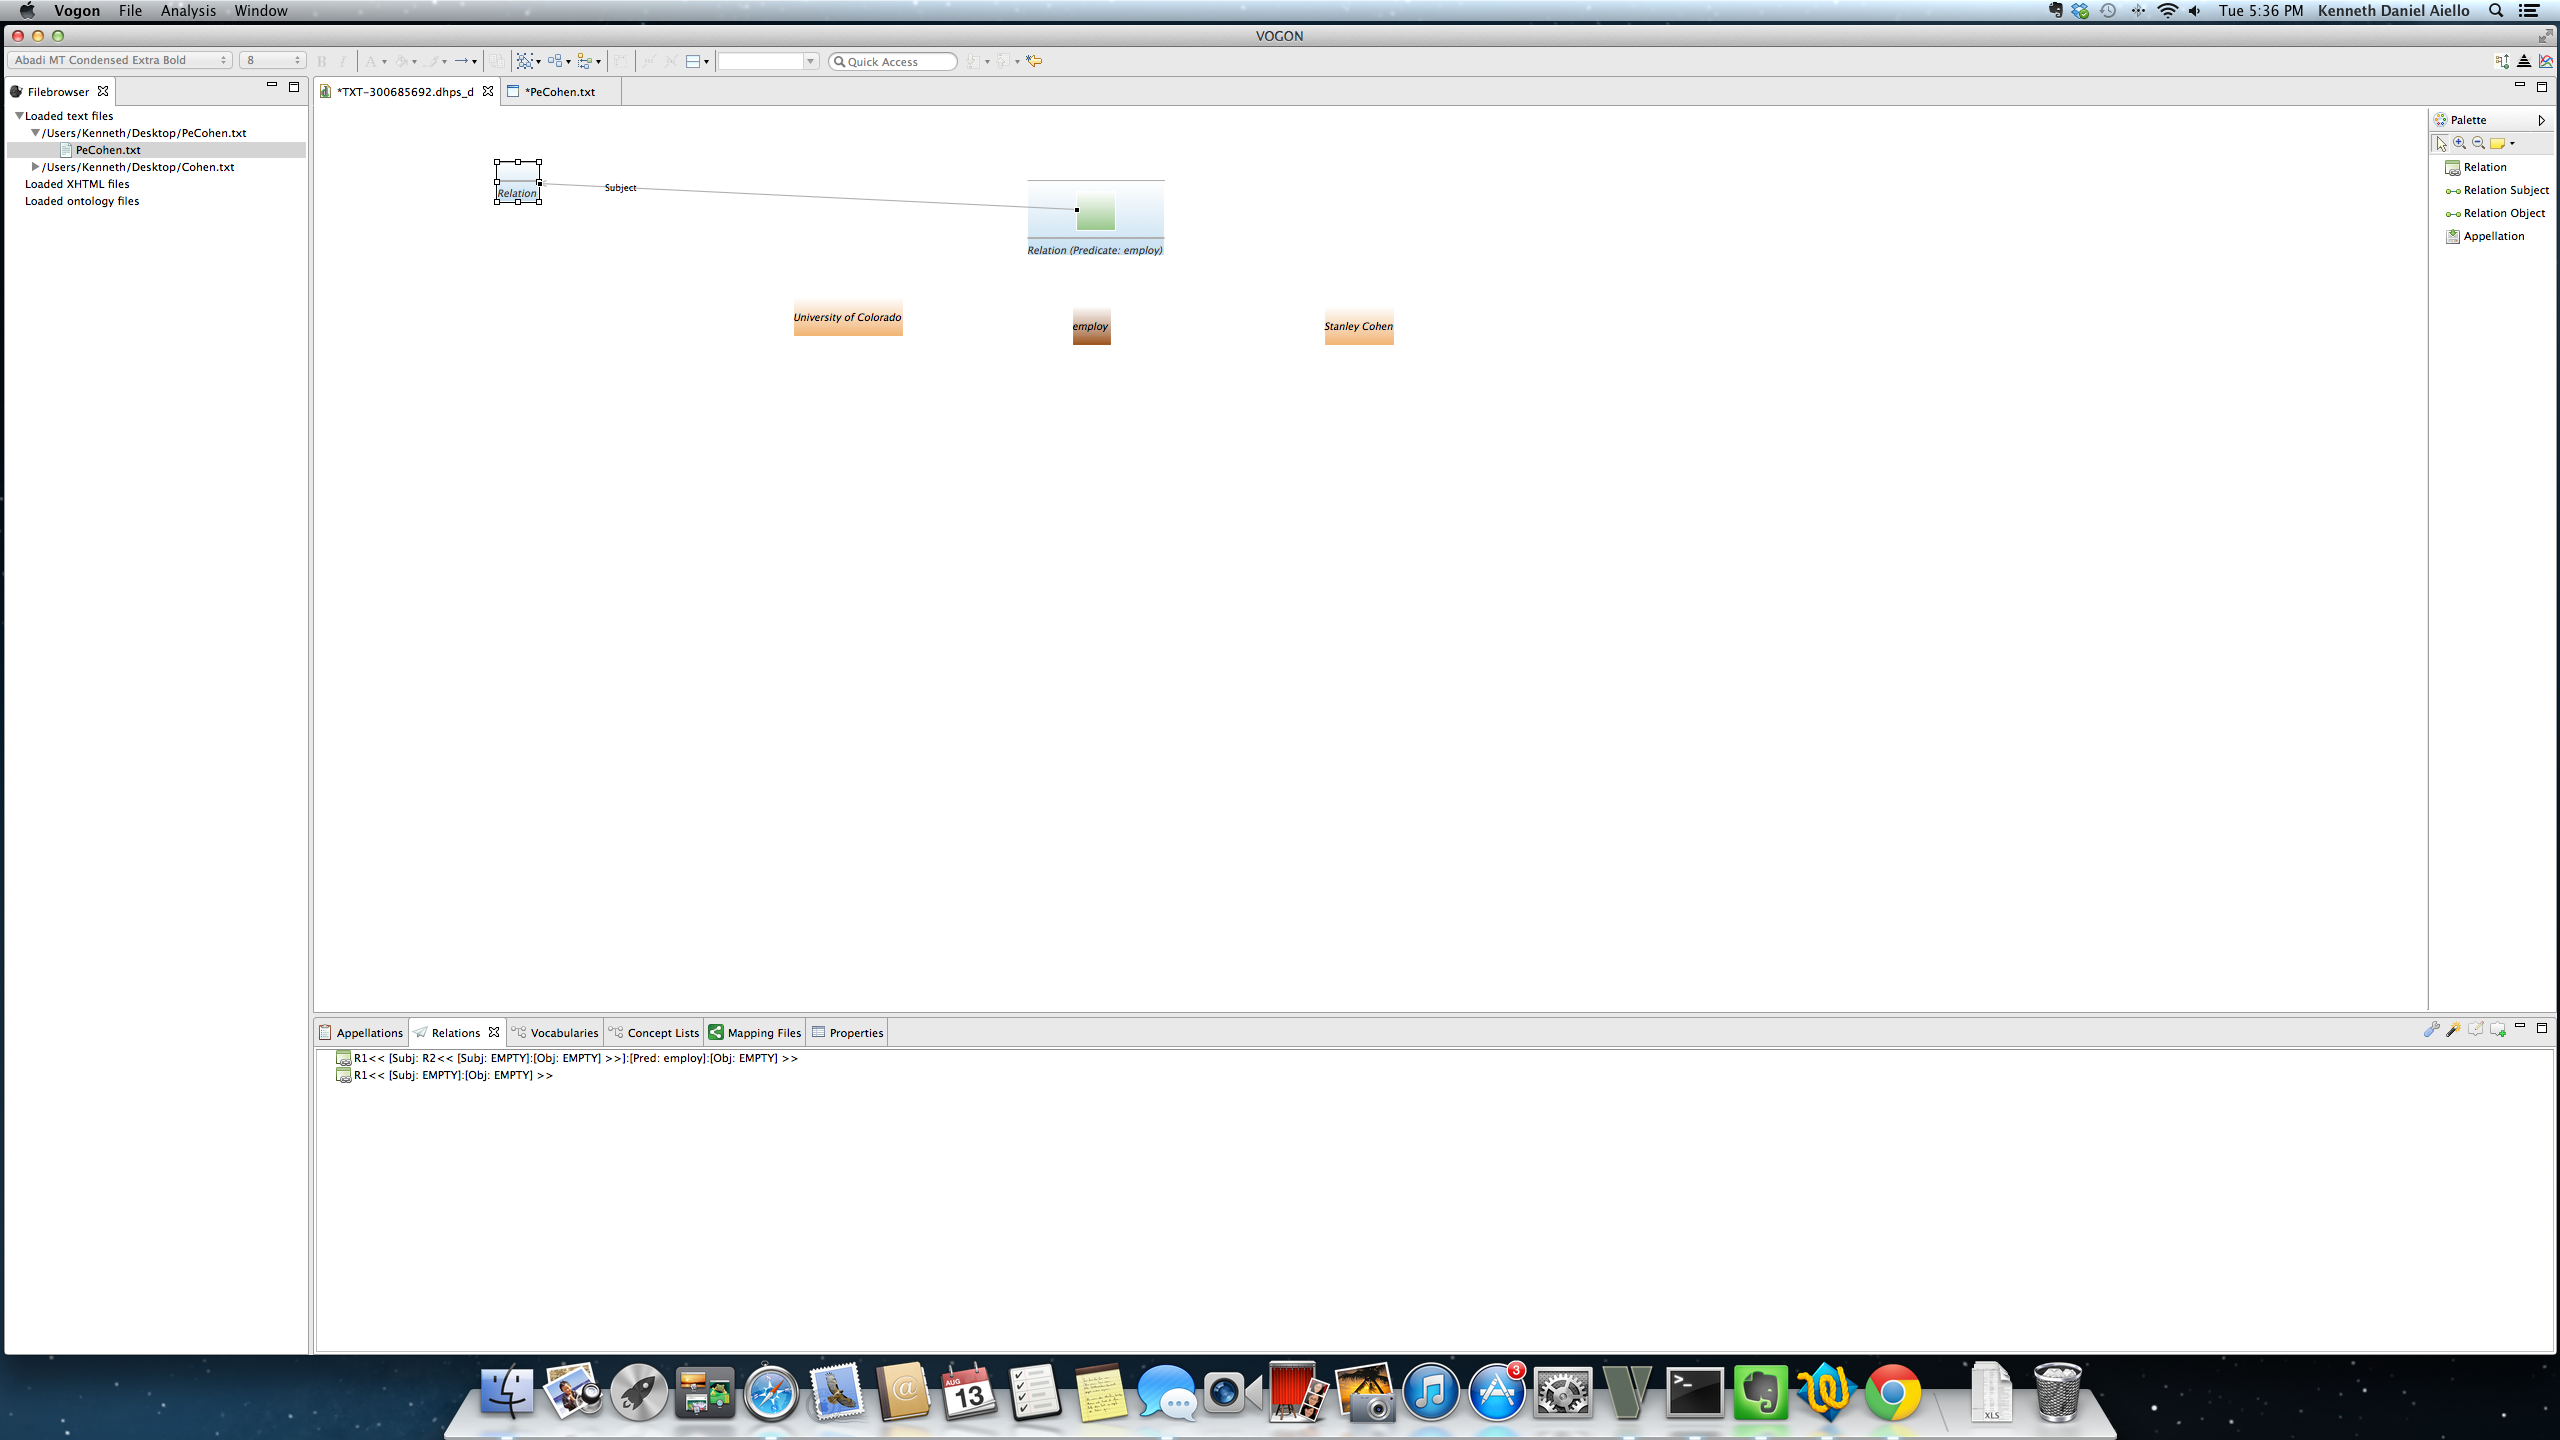
After creating the new Relation Event Compartment box the aforementioned process can be followed to fill the necessary parts of the triple to create a relation.
8.6.4. Creating Relations by hovering
If the user has populated the Graphical Editor with appellations Vogon allows the user to create relations via hovering the cursor in the Graphical Editor Main window. This option is not available until the Graphical Editor is populated with at least three appellated words. It is not necessary to select or click on the Create new relation button in the Palette or the Add New Relation button in the Relation tab.
In this example three words have previously been appellated, Stanley Cohen, employ, University of Colorado. The cursor is in the middle of the screen above the appellated word employ in the orange box.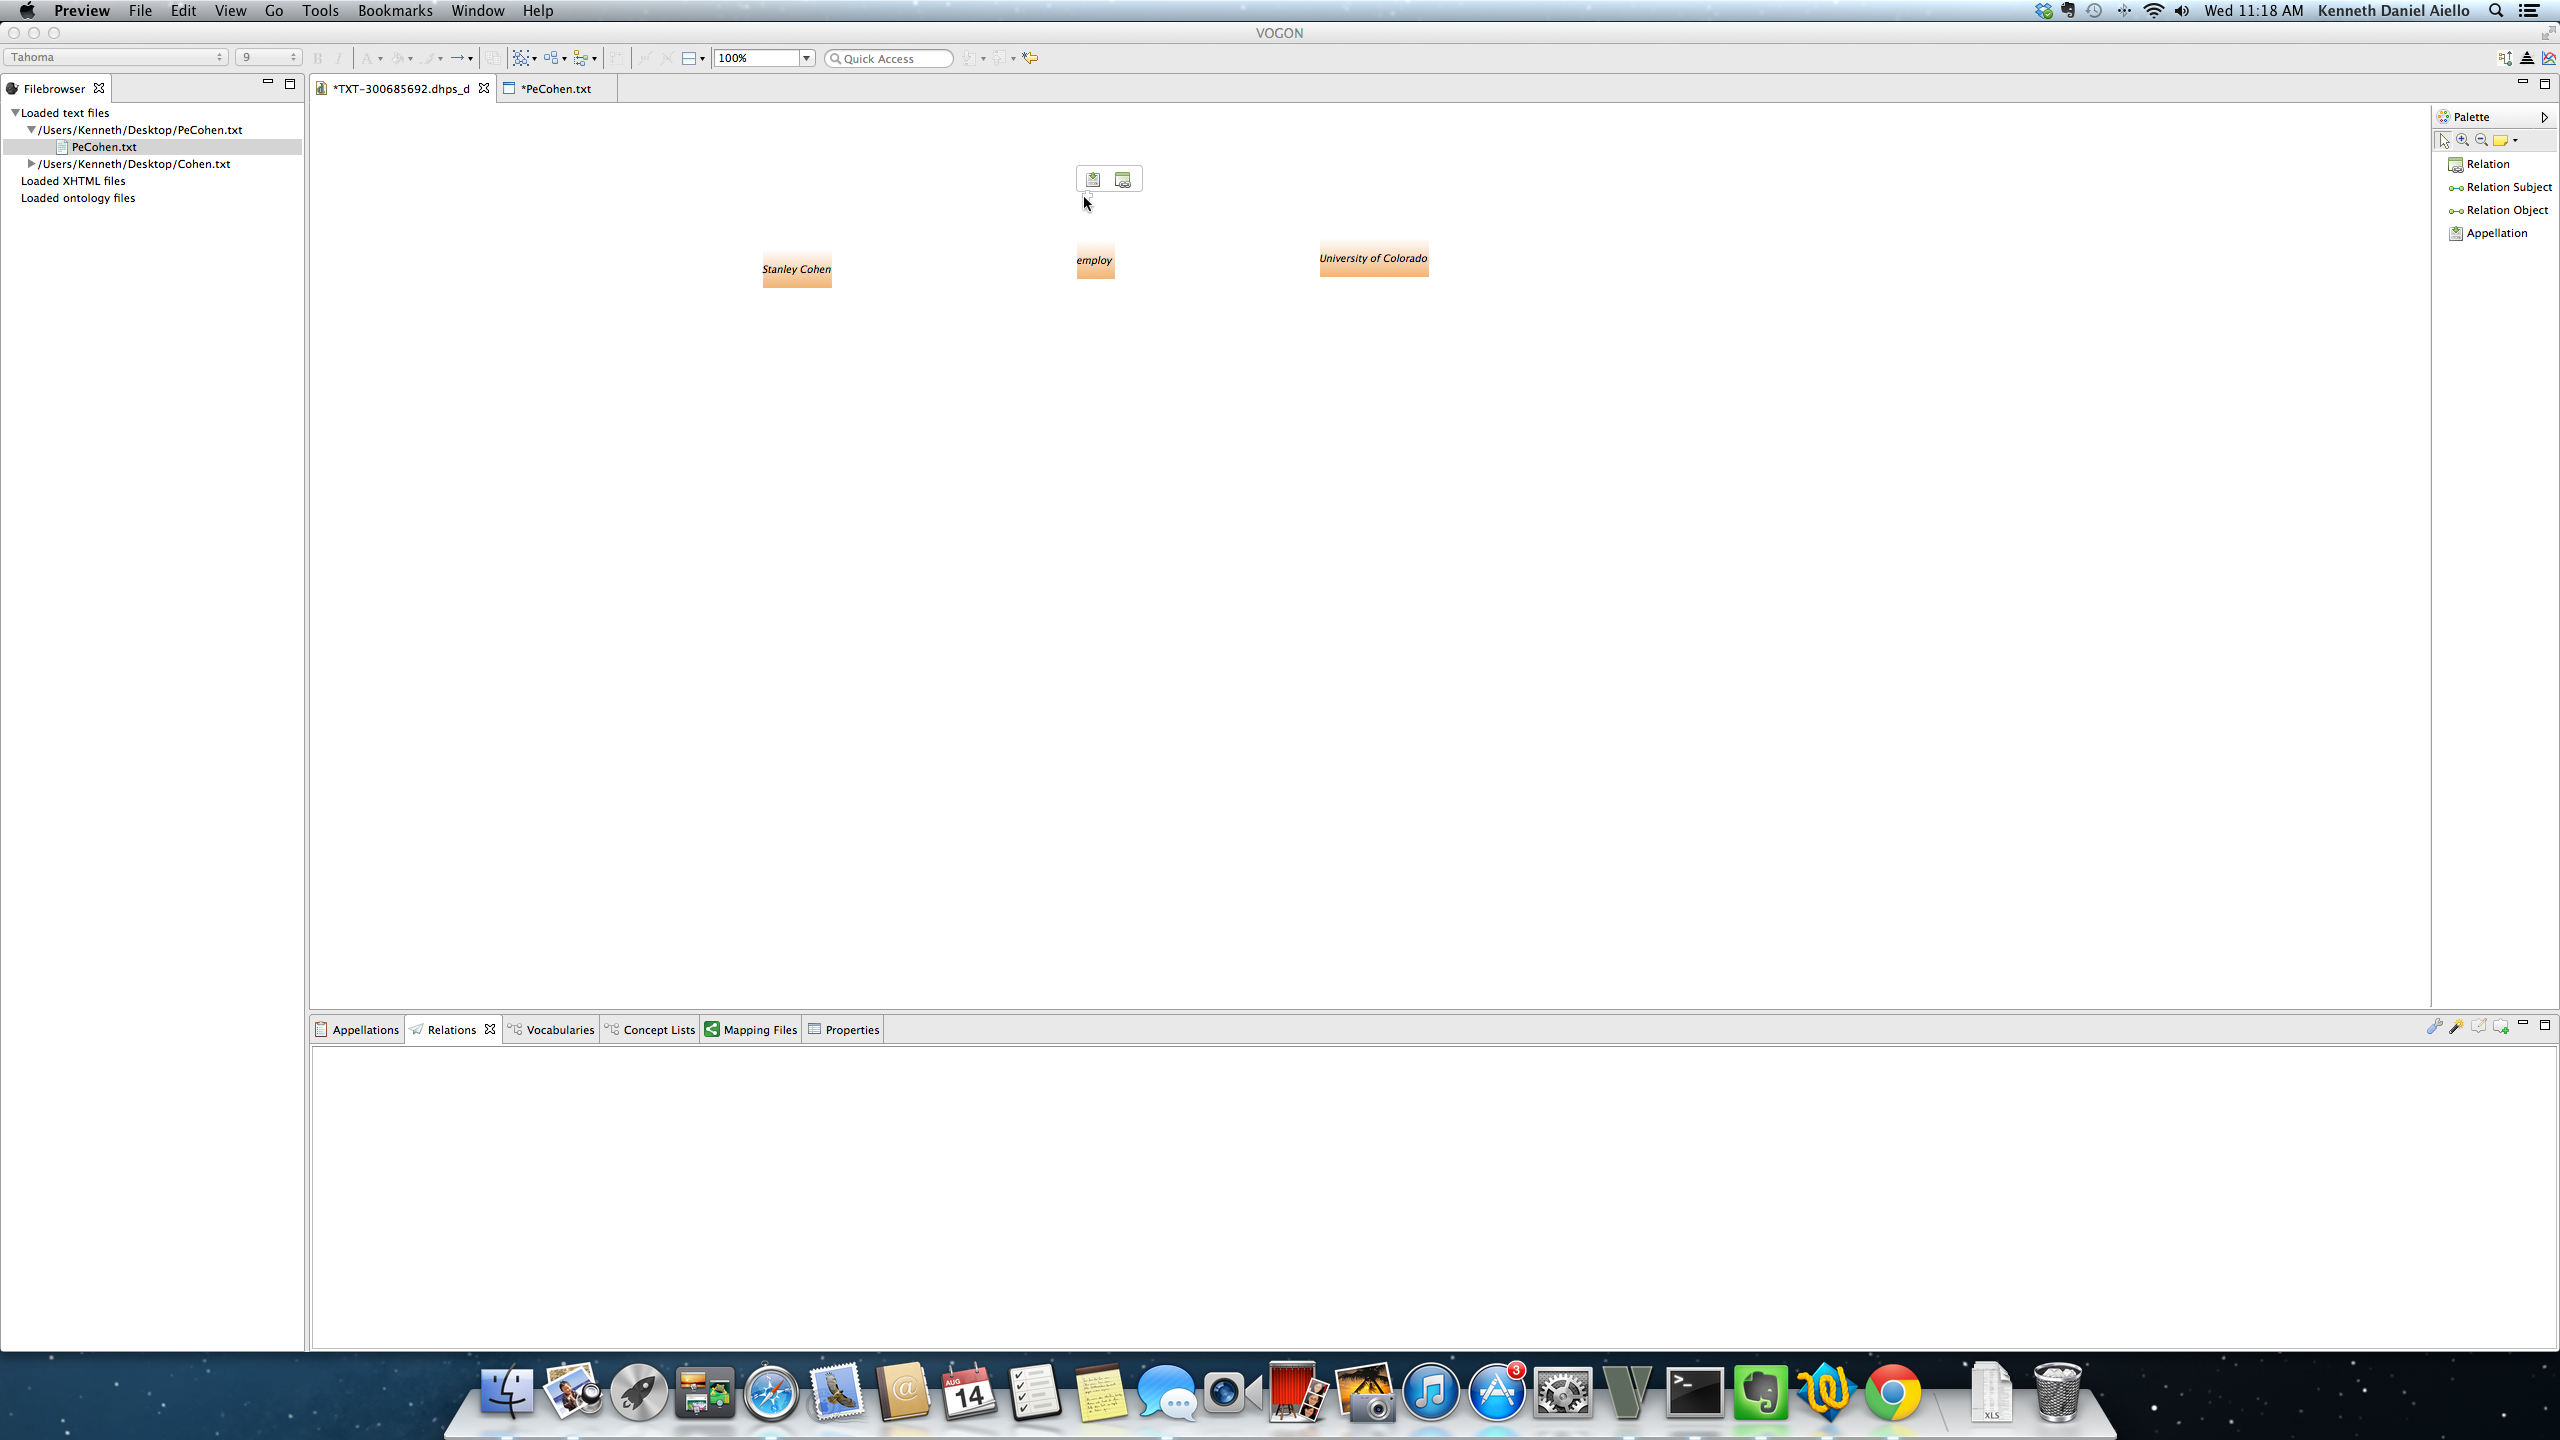
After a few seconds the Add New Event Icon will pop up giving the user the choice to create a Add IAppellation Event or Add IRelation Event.
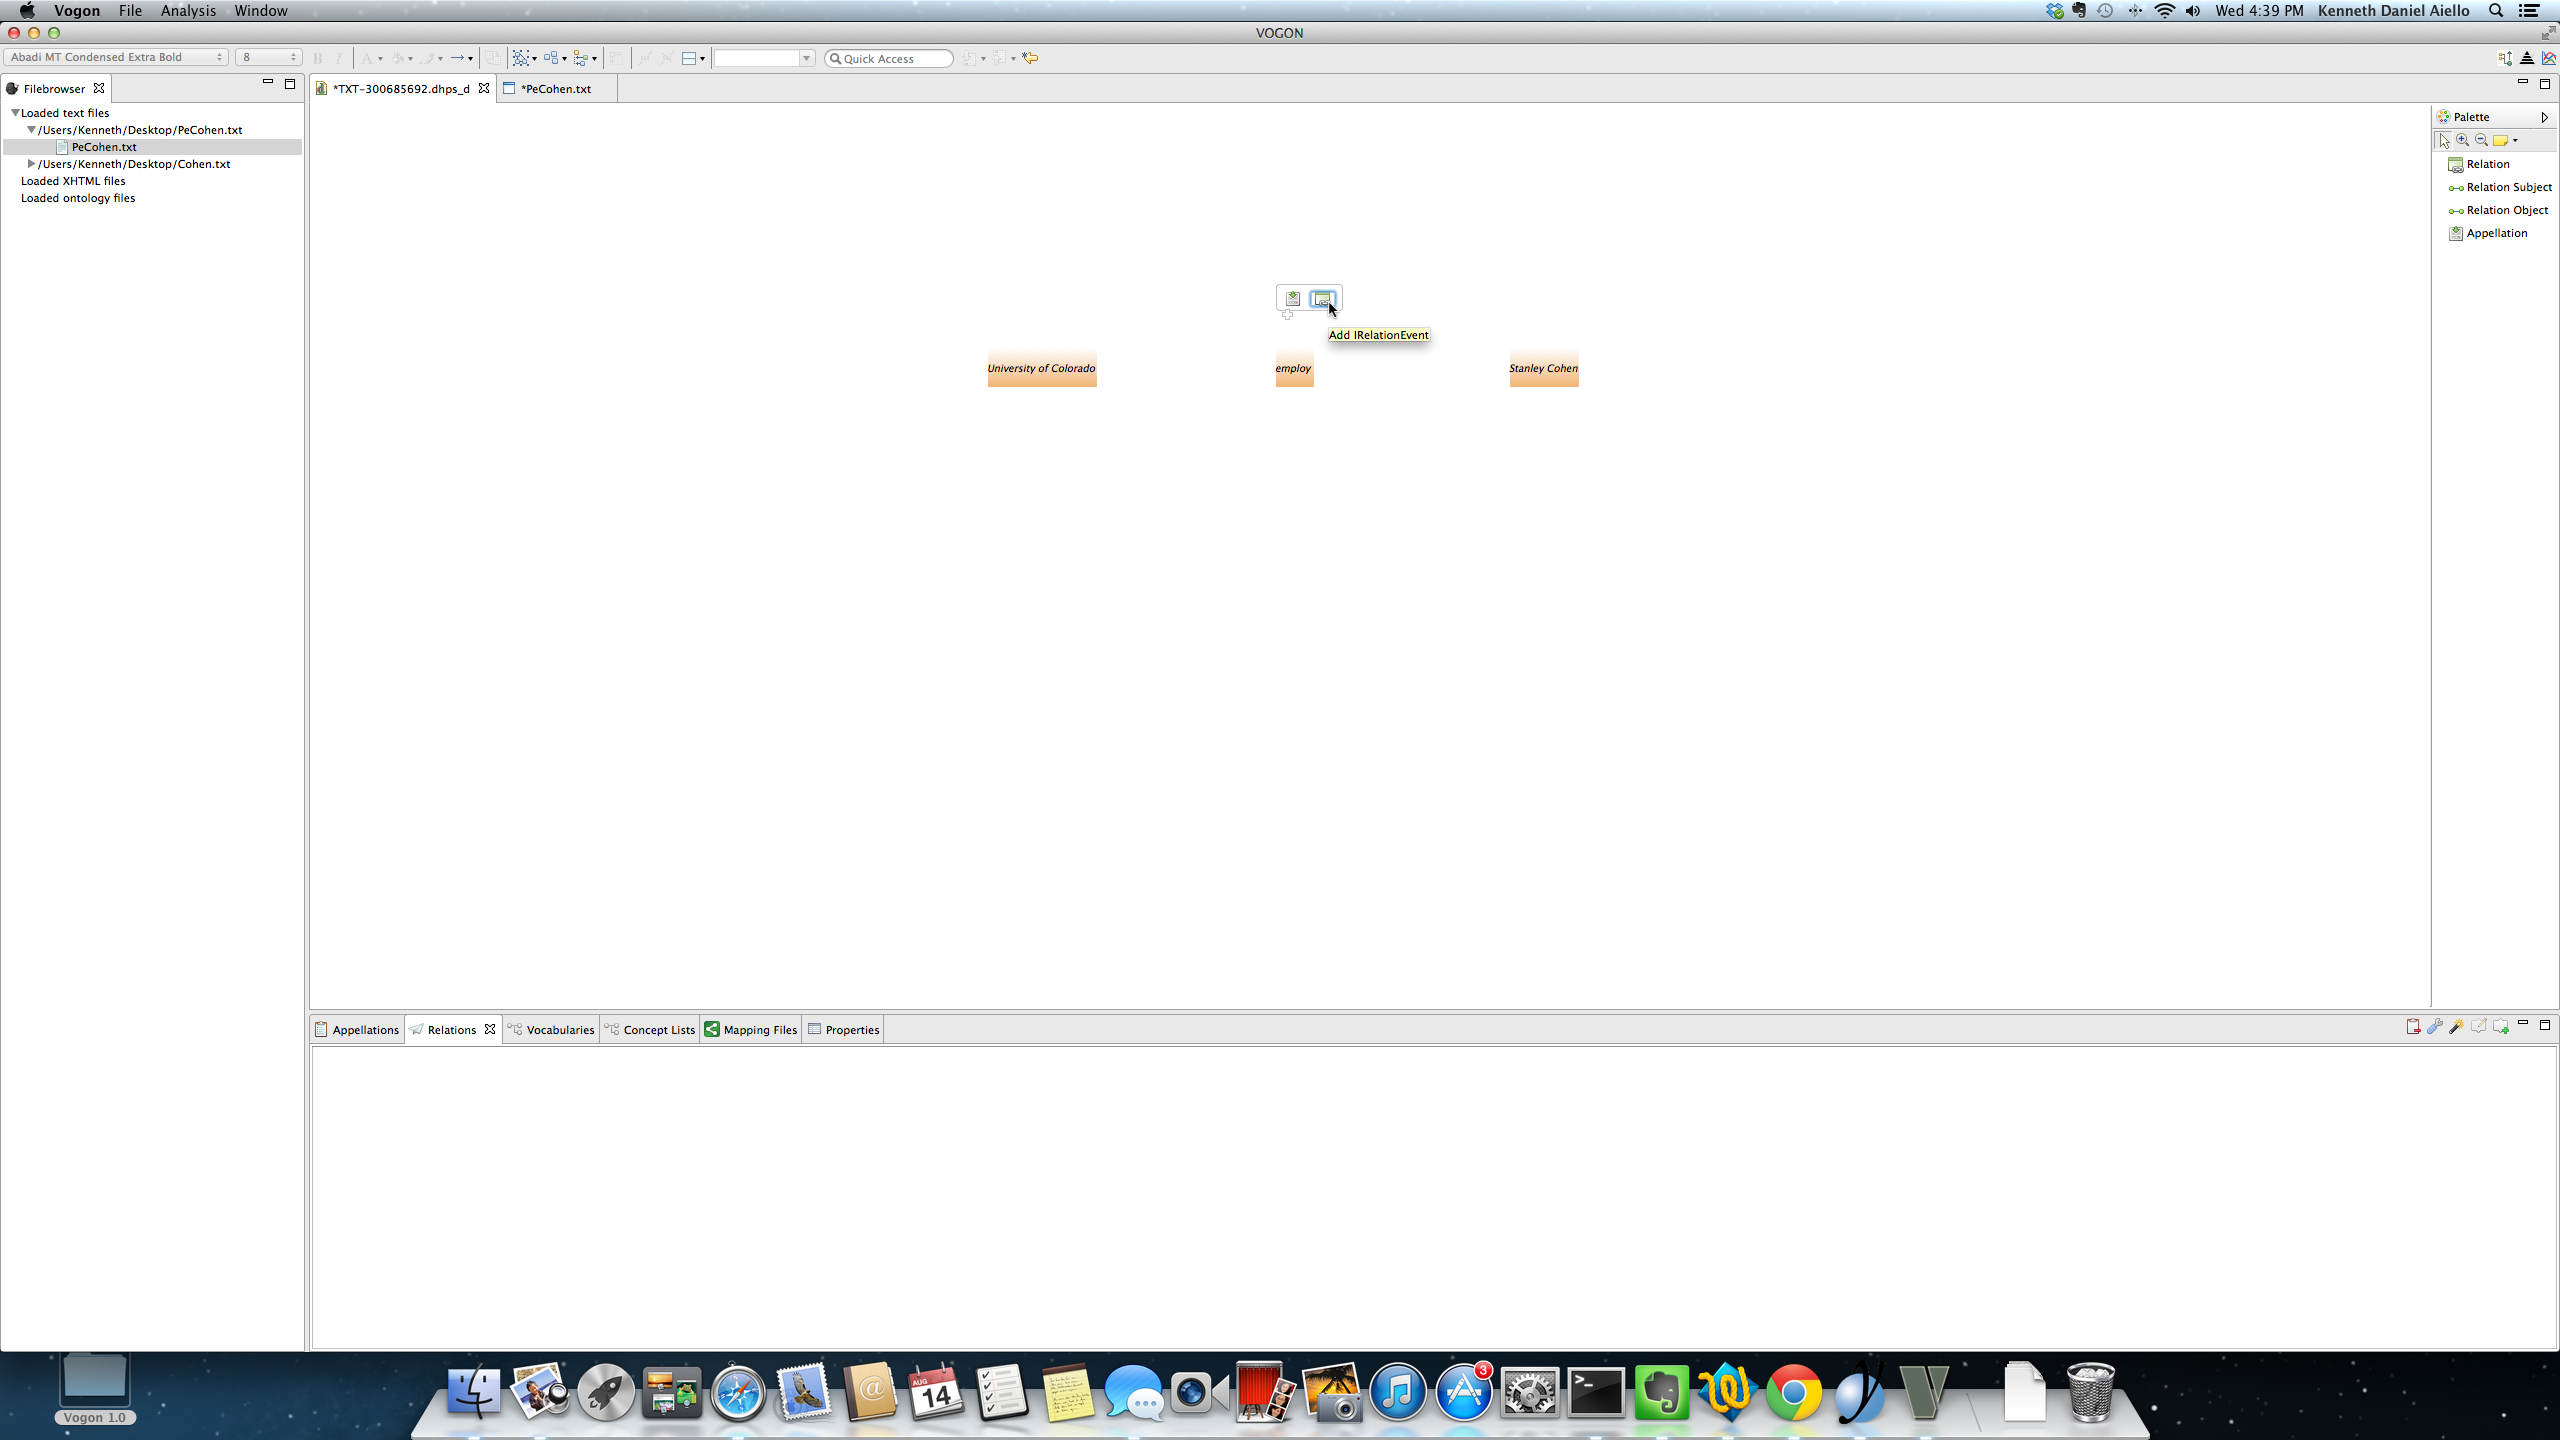
Selecting and then clicking on the Add IRelation Event will cause an unpopulated Relation Event Compartment box to pop up. After the unpopulated Relation Event Compartment box pops up the user can create a relation following the workflow in the aforementioned section.
8.7. Editing Relations
After a relation has been created there are many different processes to edit the relation.
Editing the Predicate only
- Right click the Relation Event Compartment box, editing only the Predicate.
- Editing the relation via the relation tab.
Editing the Subject or Object
- Editing the connectors from the Relation Event Compartment box.
- Editing the appellated word.
- Editing the relation via the relation tab (this function is not yet supported in Vogon).
Deleting the Relation
- Deleting the relation in the Graphical Editor Main Window.
- Deleting the relation in the Relation Tab.
8.7.1. Editing Relations: Editing the Predicate of a created relation
Editing the Predicate of a relation can be accomplished either via:
1.Editing the predicate in the Relation Event Compartment box by right clicking on the Relation Event Compartment box in the Graphical Editor Main Window. After right clicking on the Relation Event Compartment box the Graphical Editor Sub-Window Quick List will pop up. This option allows the user to edit the appellated word used as the predicate in the relation. This function does not allow the user edit the normalization or characters of a predicate.
2. Editing the predicate in the Relation tab by clicking on the Add New Appellation window. This option allows the user to edit the normalization and characters of a predicate. This function does not allow the user ot editan interpretation of a predicate or the appellated word used as the predicate in a relation.
8.7.1.1. Editing Predicates in the Graphical Editor Sub-Window Quick List
Vogon does not support editing an appellated word box that is the predicate of an existing relation via right clicking. You cannot edit an appellated word if the word is in a brown appellated word box and in a Relation Event Compartment box. Right clicking on the appellated word brown box the Graphical Editor Sub-Window Quick List does not have the function to edit predicate.
You can edit the predicate in the Relation Event Compartment box by right clicking on the Relation Event Compartment box in the Graphical Editor Main Window. After right clicking on the Relation Event Compartment box the Graphical Editor Sub-Window Quick List will pop up.
In the Sub-Window the user can choose from 5 functions:
Delete from model restore elements isolate element edit predicate show properties
Select the edit predicate option by highlighting in blue. Click on the edit predicate option to bring up the Graphical Editor Create Relation: Create New Relation Window.
In this example the edit predicate option has been highlighted in blue. The relation in the Relation tab is R1 << [Subj: University of Colorado]:[Pred:employ][Obj:Stanley Cohen] >>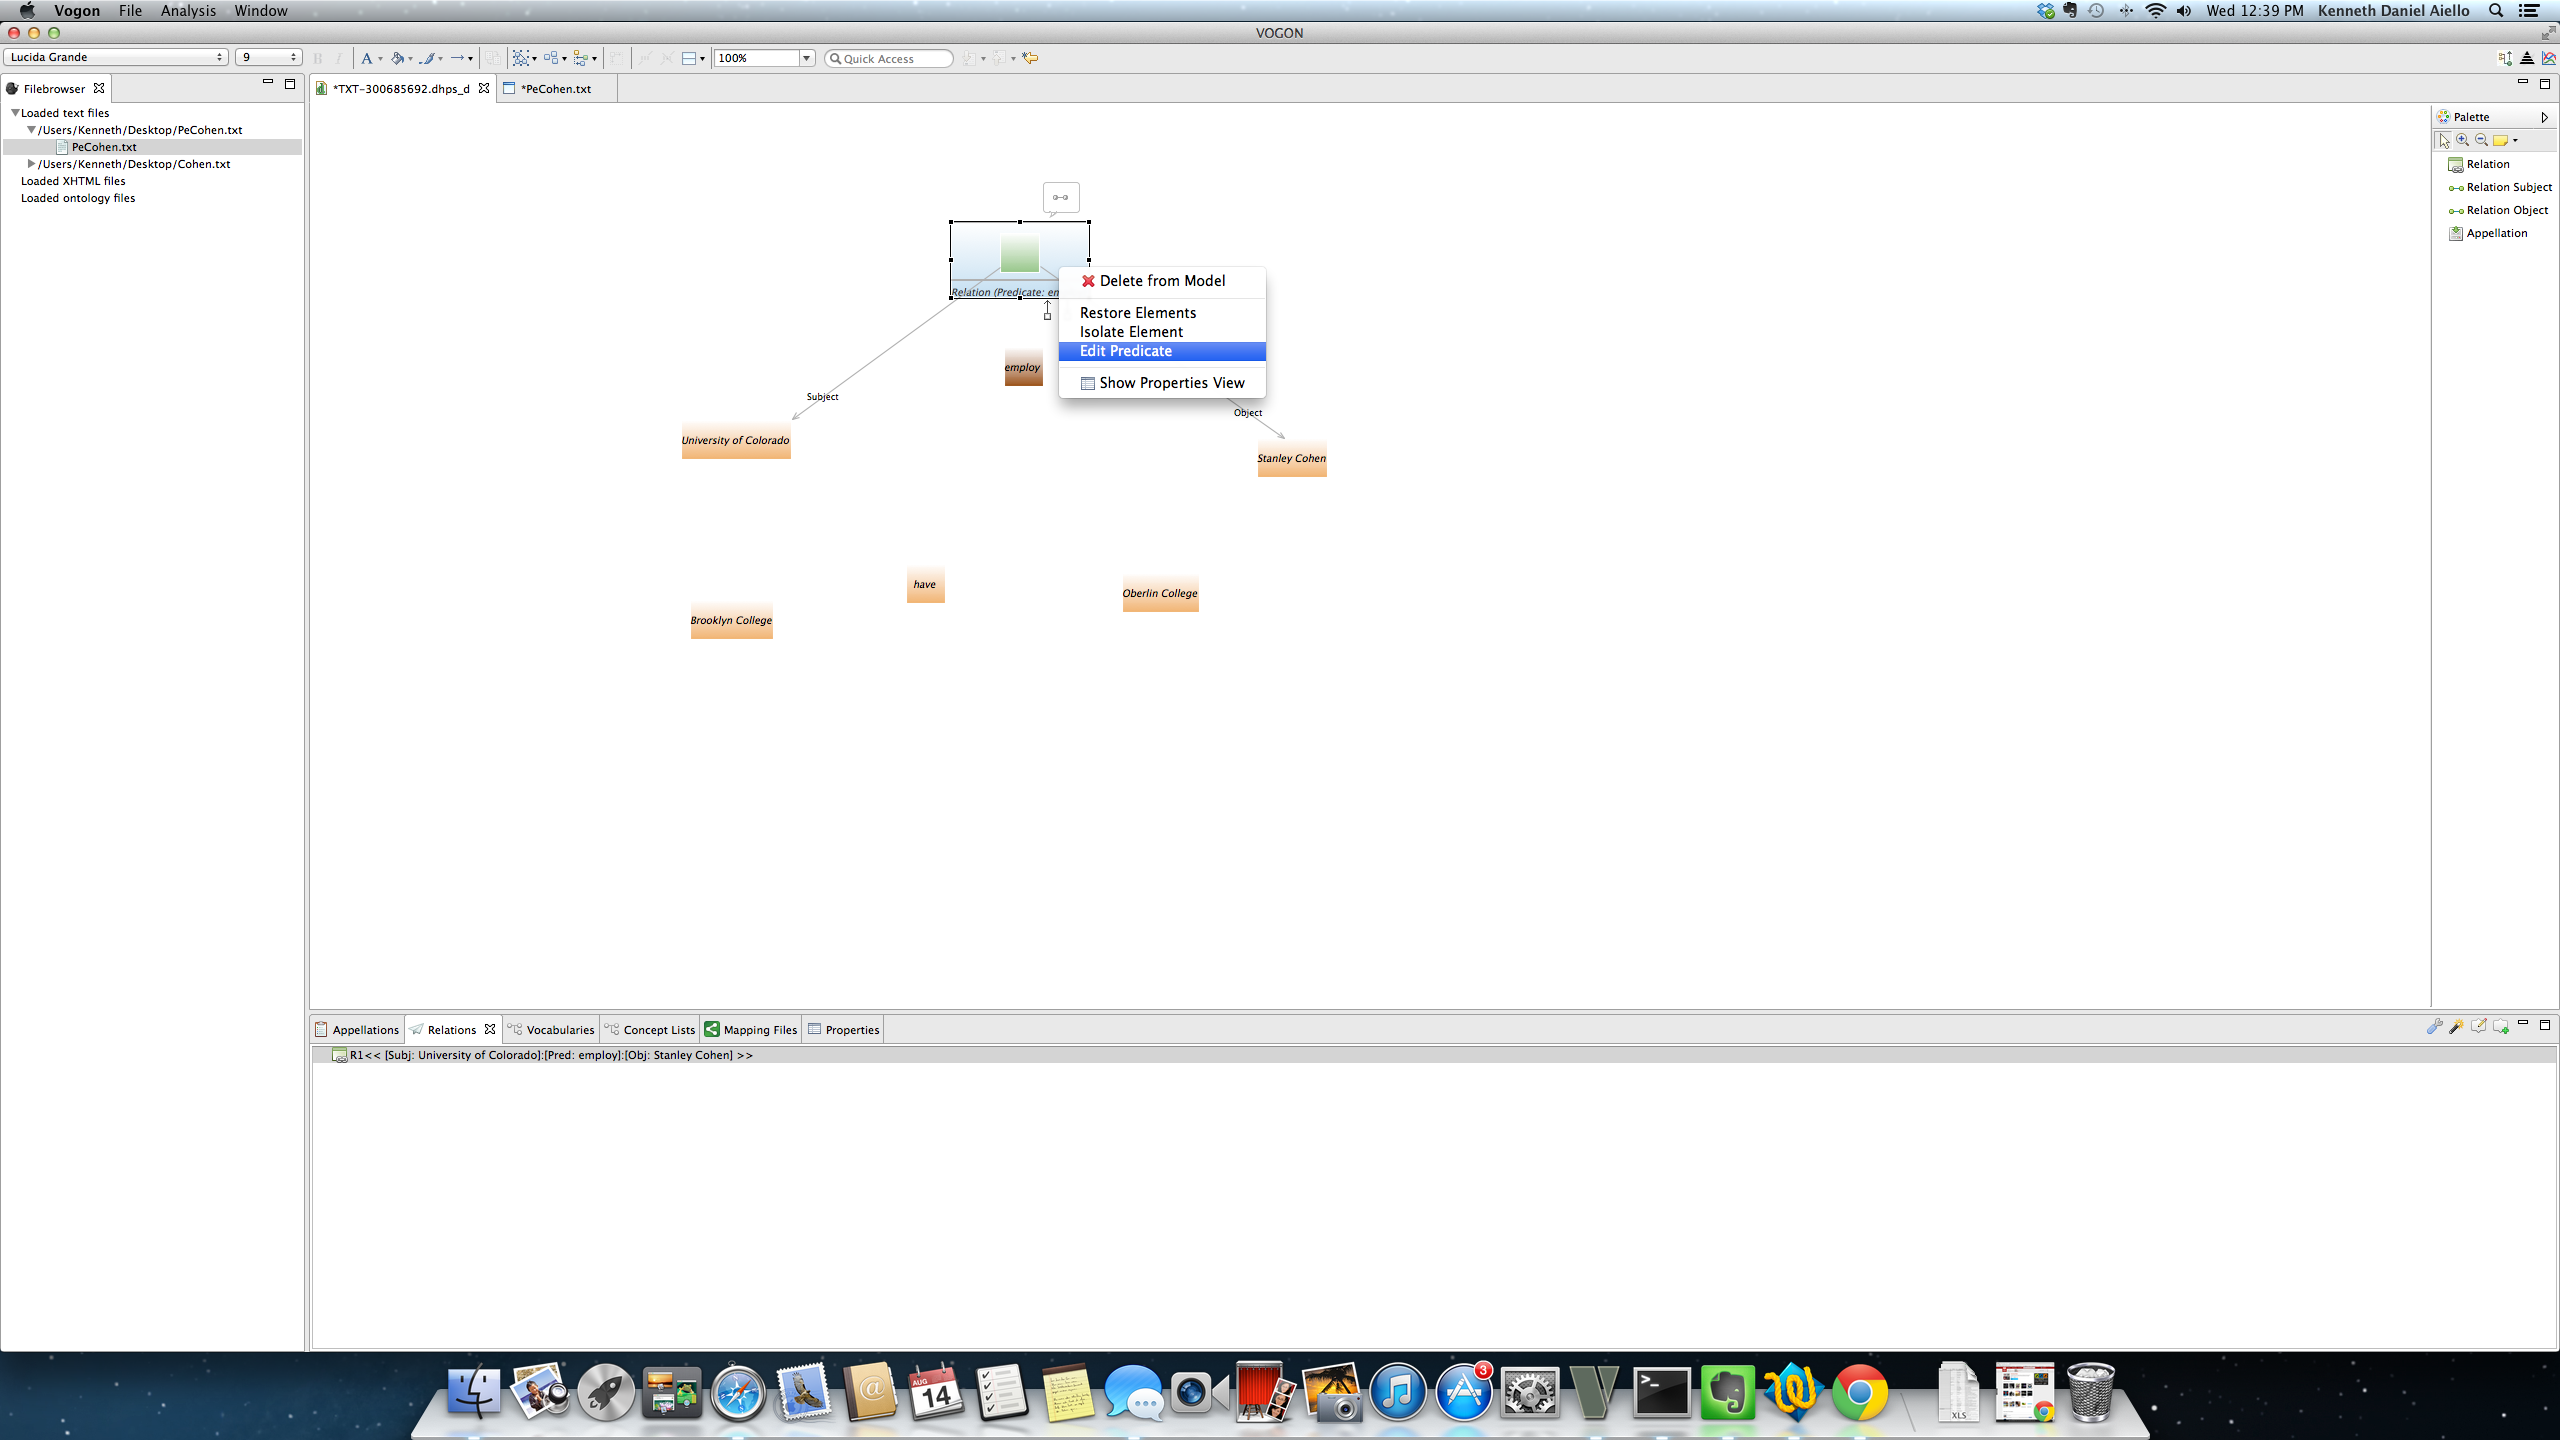
The edit predicate function takes you to the Graphical Editor Create Relation: Create New Relation Window. Select the replacement predicate in the predicate bar by highlighting and then clicking on the highlight to confirm the selection. Click on the blue finish bar to complete the operation.
In this example the Graphical Editor Create Relation: New Relation Window is opened and the predicate bar is open. The user’s list of appellated words is visible and the replacement predicate have is selected.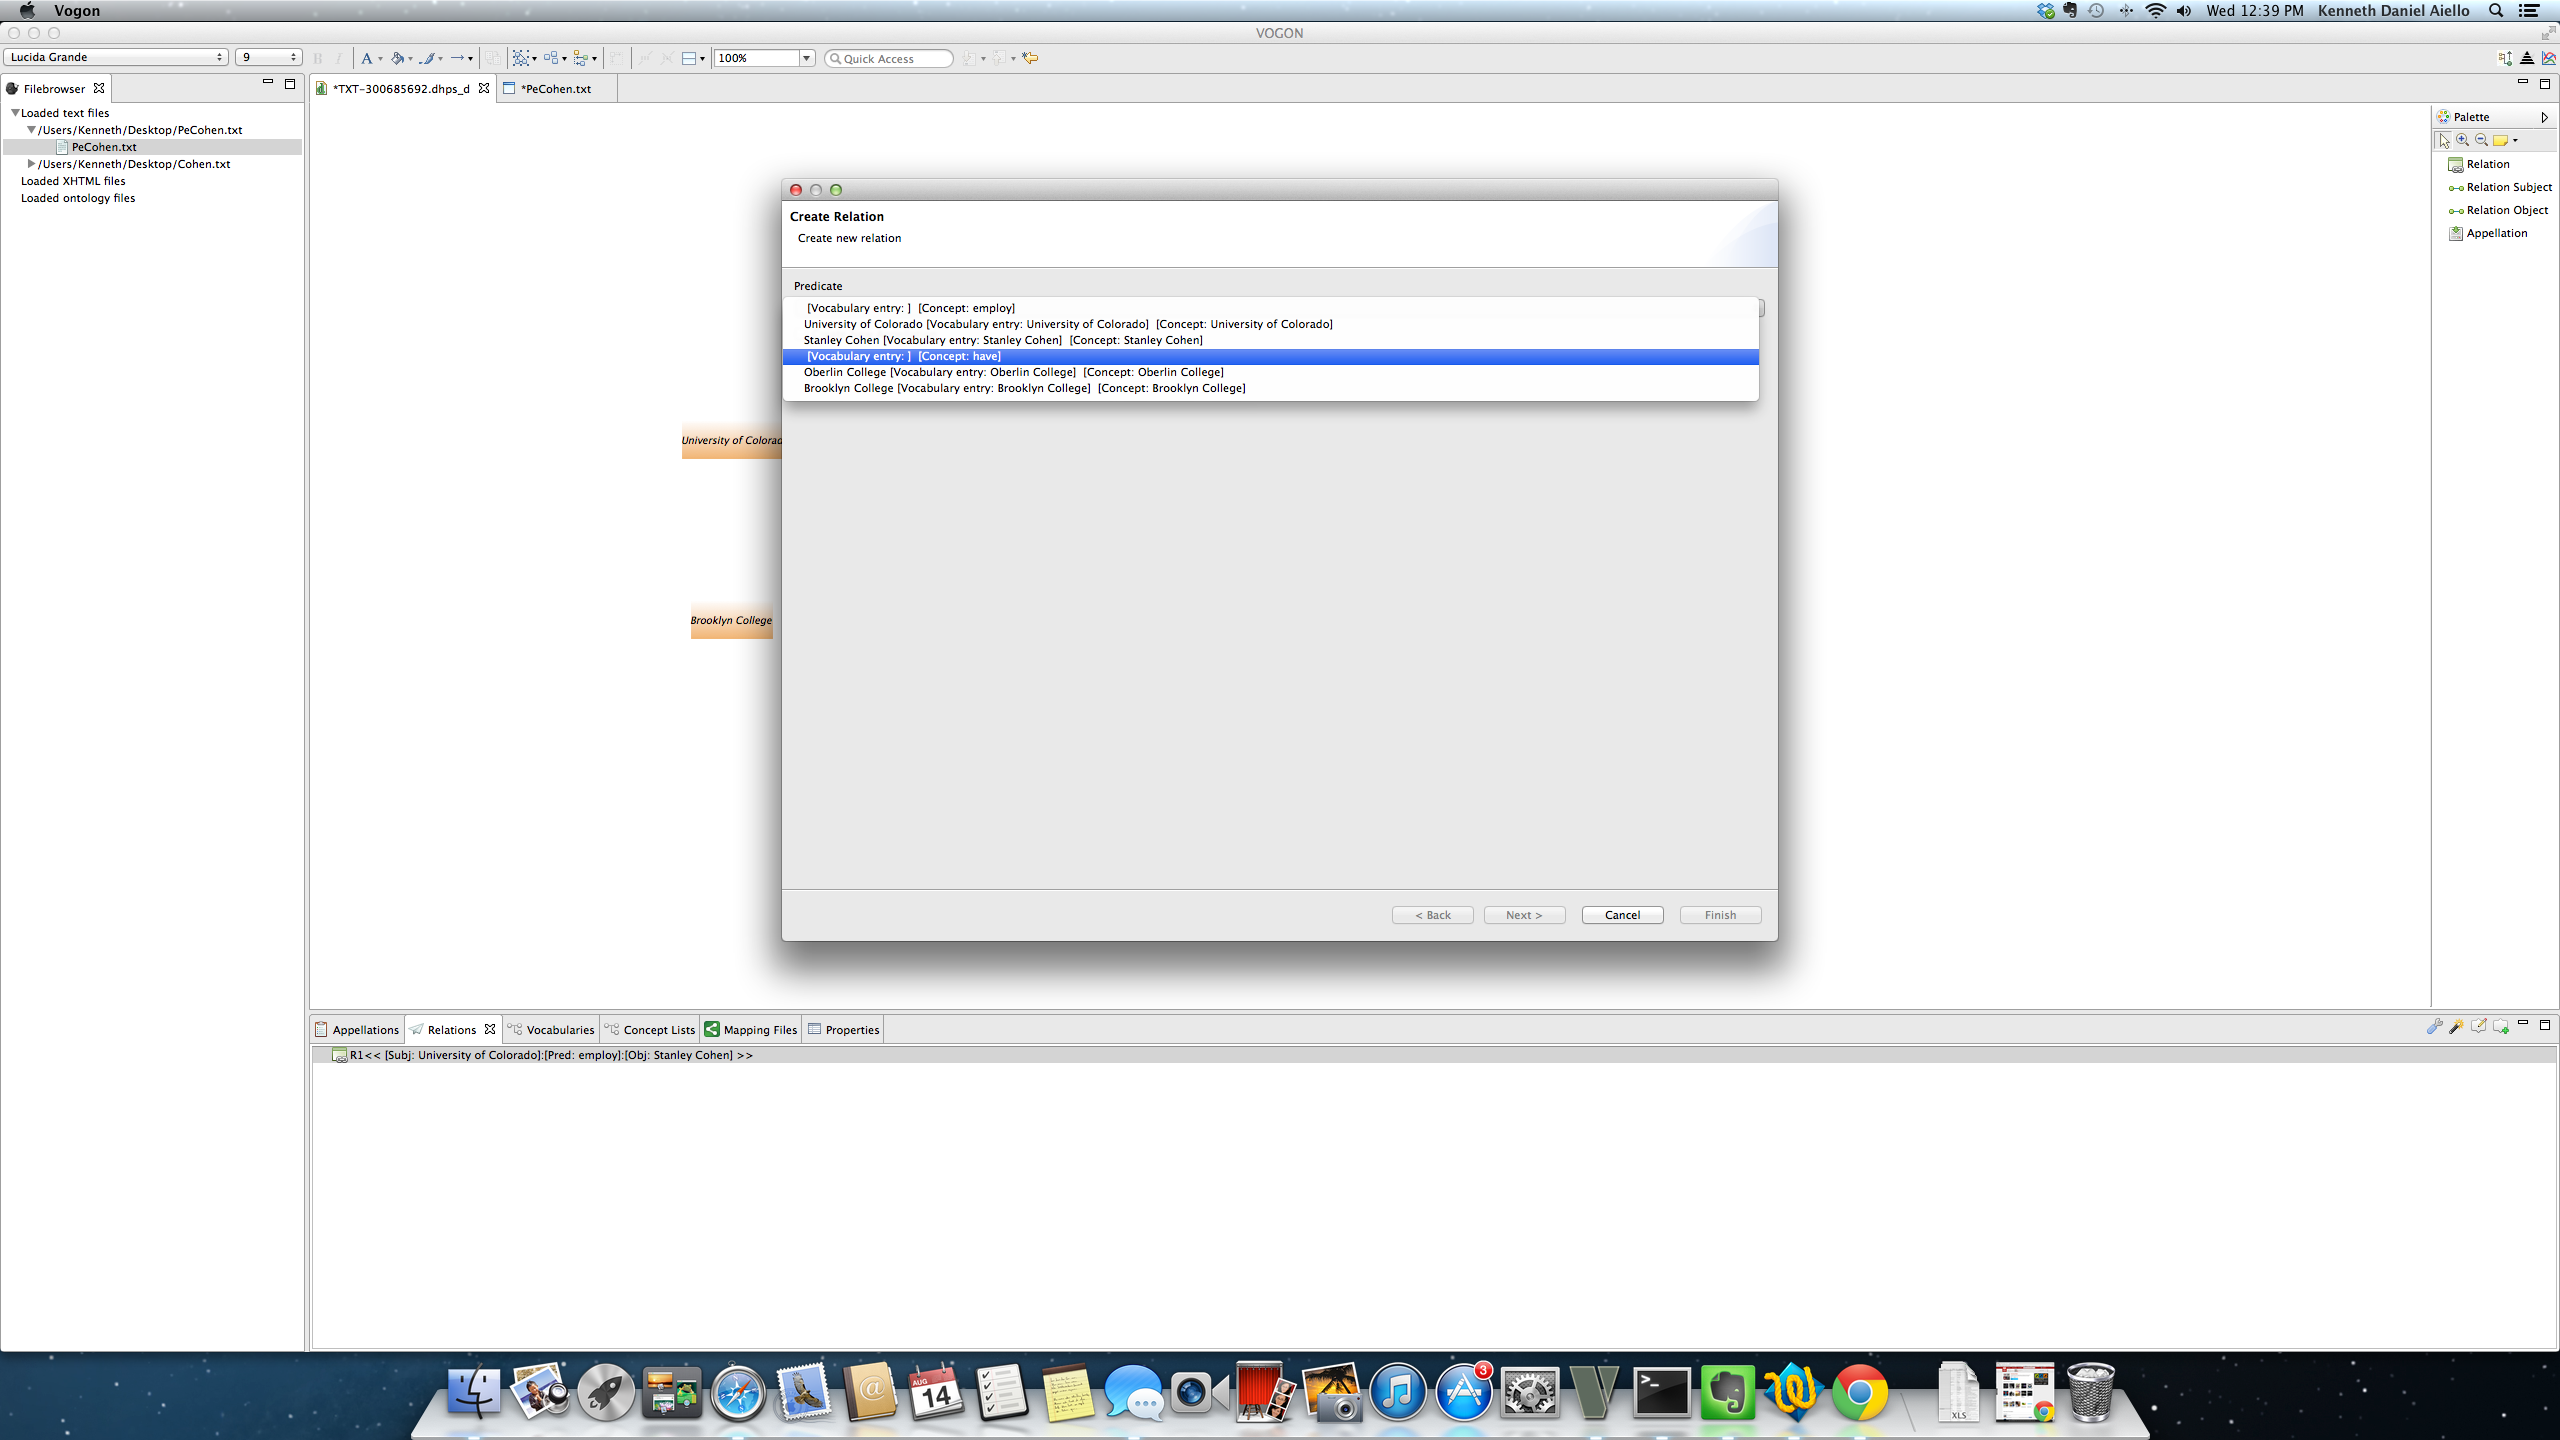
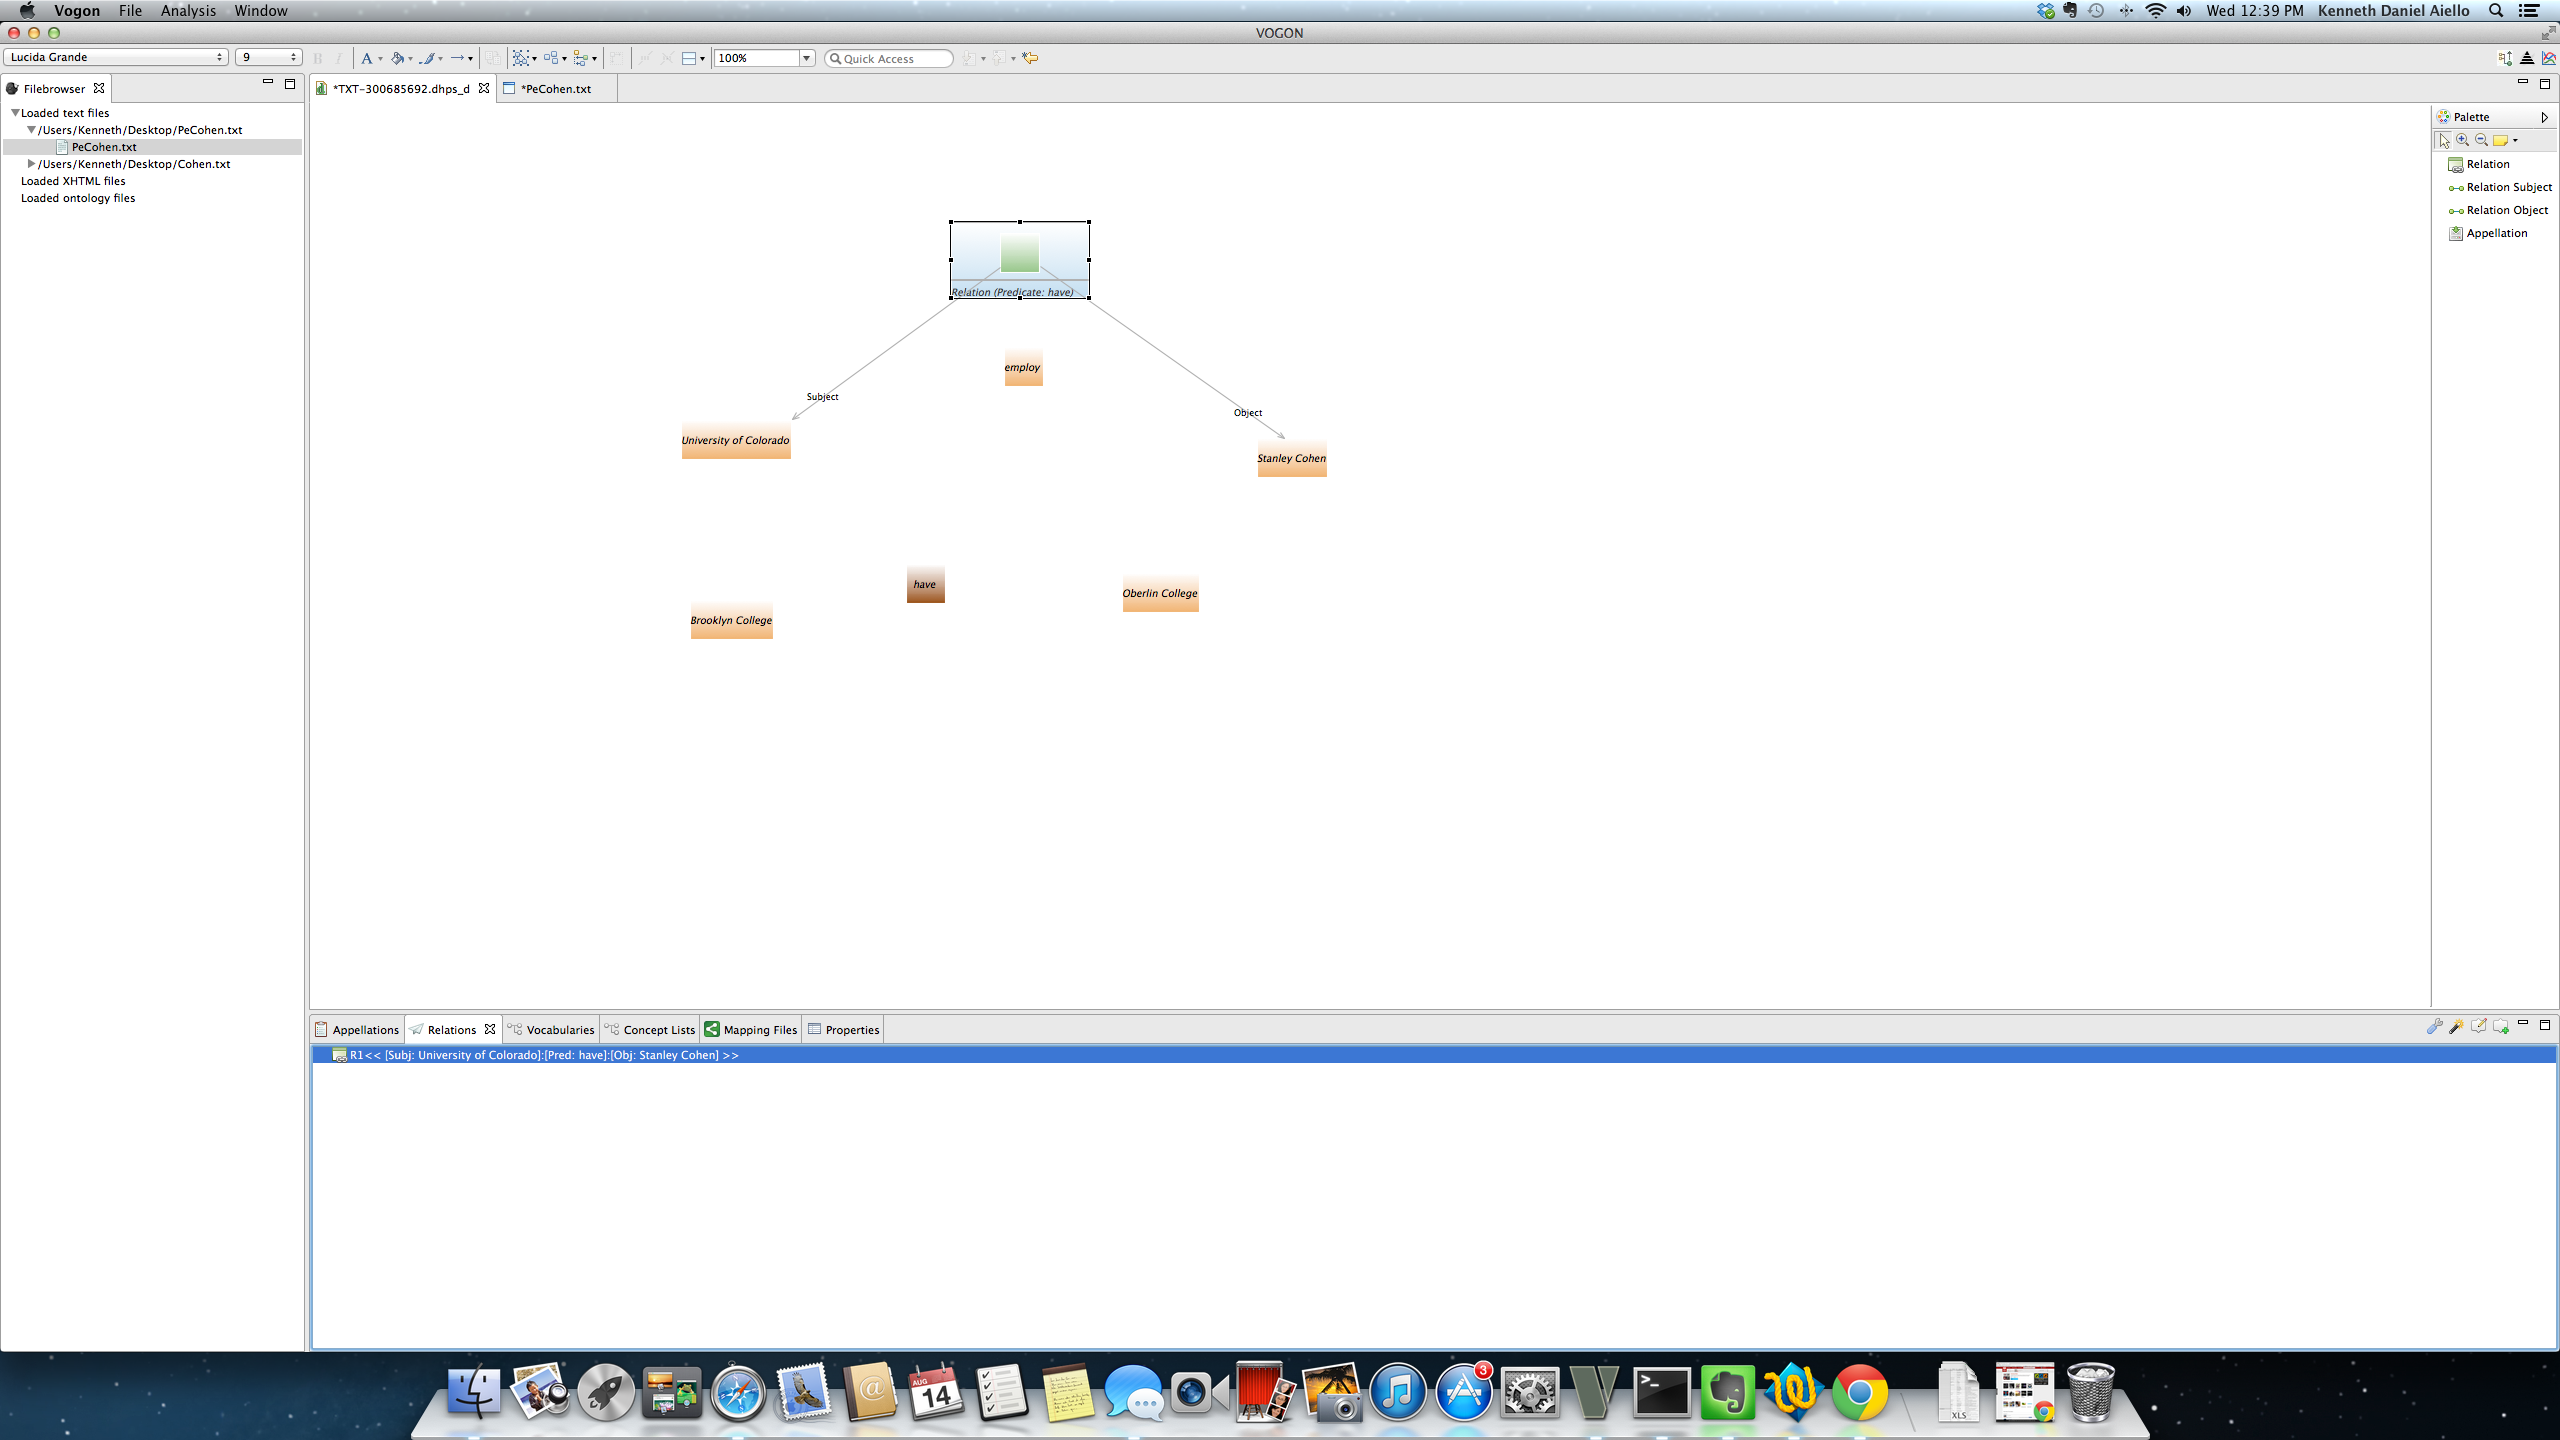
After clicking on finish the new predicate will be visible in the Relation Event Compartment box. The previous predicate appellated word box will change color from brown to orange. The new predicate appelalted word box will change color from orange to brown. The relation in the the Relation tab will also have been updated with the new predicate.
In this example the new predicate have is in the Relation Event Compartment box. The previous predicate appellated word employ box changed color from brown to orange. The new predicate appellated word box have changed color from orange to brown. The relation in the Relation tab now reads R1 << [Subj: University of Colorado]:[Pred:have][Obj:Stanley Cohen] >>
8.7.1.2. Editing Predicates in the Relation tab : Add New Appellation window
Vogon does not support changing the interpretation of an appellated word box that is the predicate of an existing relation via the Relation tab. By selecting a predicate of an existing relation and then clicking on the Edit Appellation button in the Relation tab the Add New Appellation window pops up. In the Add New Appellation window you can edit, change, add, or delete the characters of the appellated word and edit the normalization of a predicate used in a relation.
8.7.2. Editing the Subject or Object of a created relation
The subject and object of a relation can be edited with greater ease than the predicate. Vogon allows users to edit the connectors of the relation. You can also edit the appellated words used in the relation via the the Relation tab and the Graphical Editor Sub-Window Quick List.
8.7.2.1. Editing the Subject or Object of a created relation: Editing the connectors
To edit the subject or object of a relation click on the connector you wish to edit. After single clicking on the connector black boxes will appear on the ends of the connector between the Relation Event Compartment box and the subject or object.
- In this example the relation is R1 << [Subj: University of Colorado]:[Pred:employ][Obj:Stanley Cohen] >>
- After clicking on the subject connector from the Relation Event Compartment box Pred: employ to the appellated word University of Colorado orange box will be selected. The selection is indicated by the black boxes appear on the ends of the connector.
Pressing delete once from your keyboard will delete the connector. The connector will disappear from the Graphical Editor Main window. The Relation tab will update to reflect the change in the relation.
In this example the relation changed to R1 << [Subj: EMPTY]:[Pred:employ][Obj:Stanley Cohen] >> The subject connector from the Relation Event Compartment box Pred: employ to the appellated word University of Colorado orange box has been deleted and now longer appears in the Graphical Editor Main Window.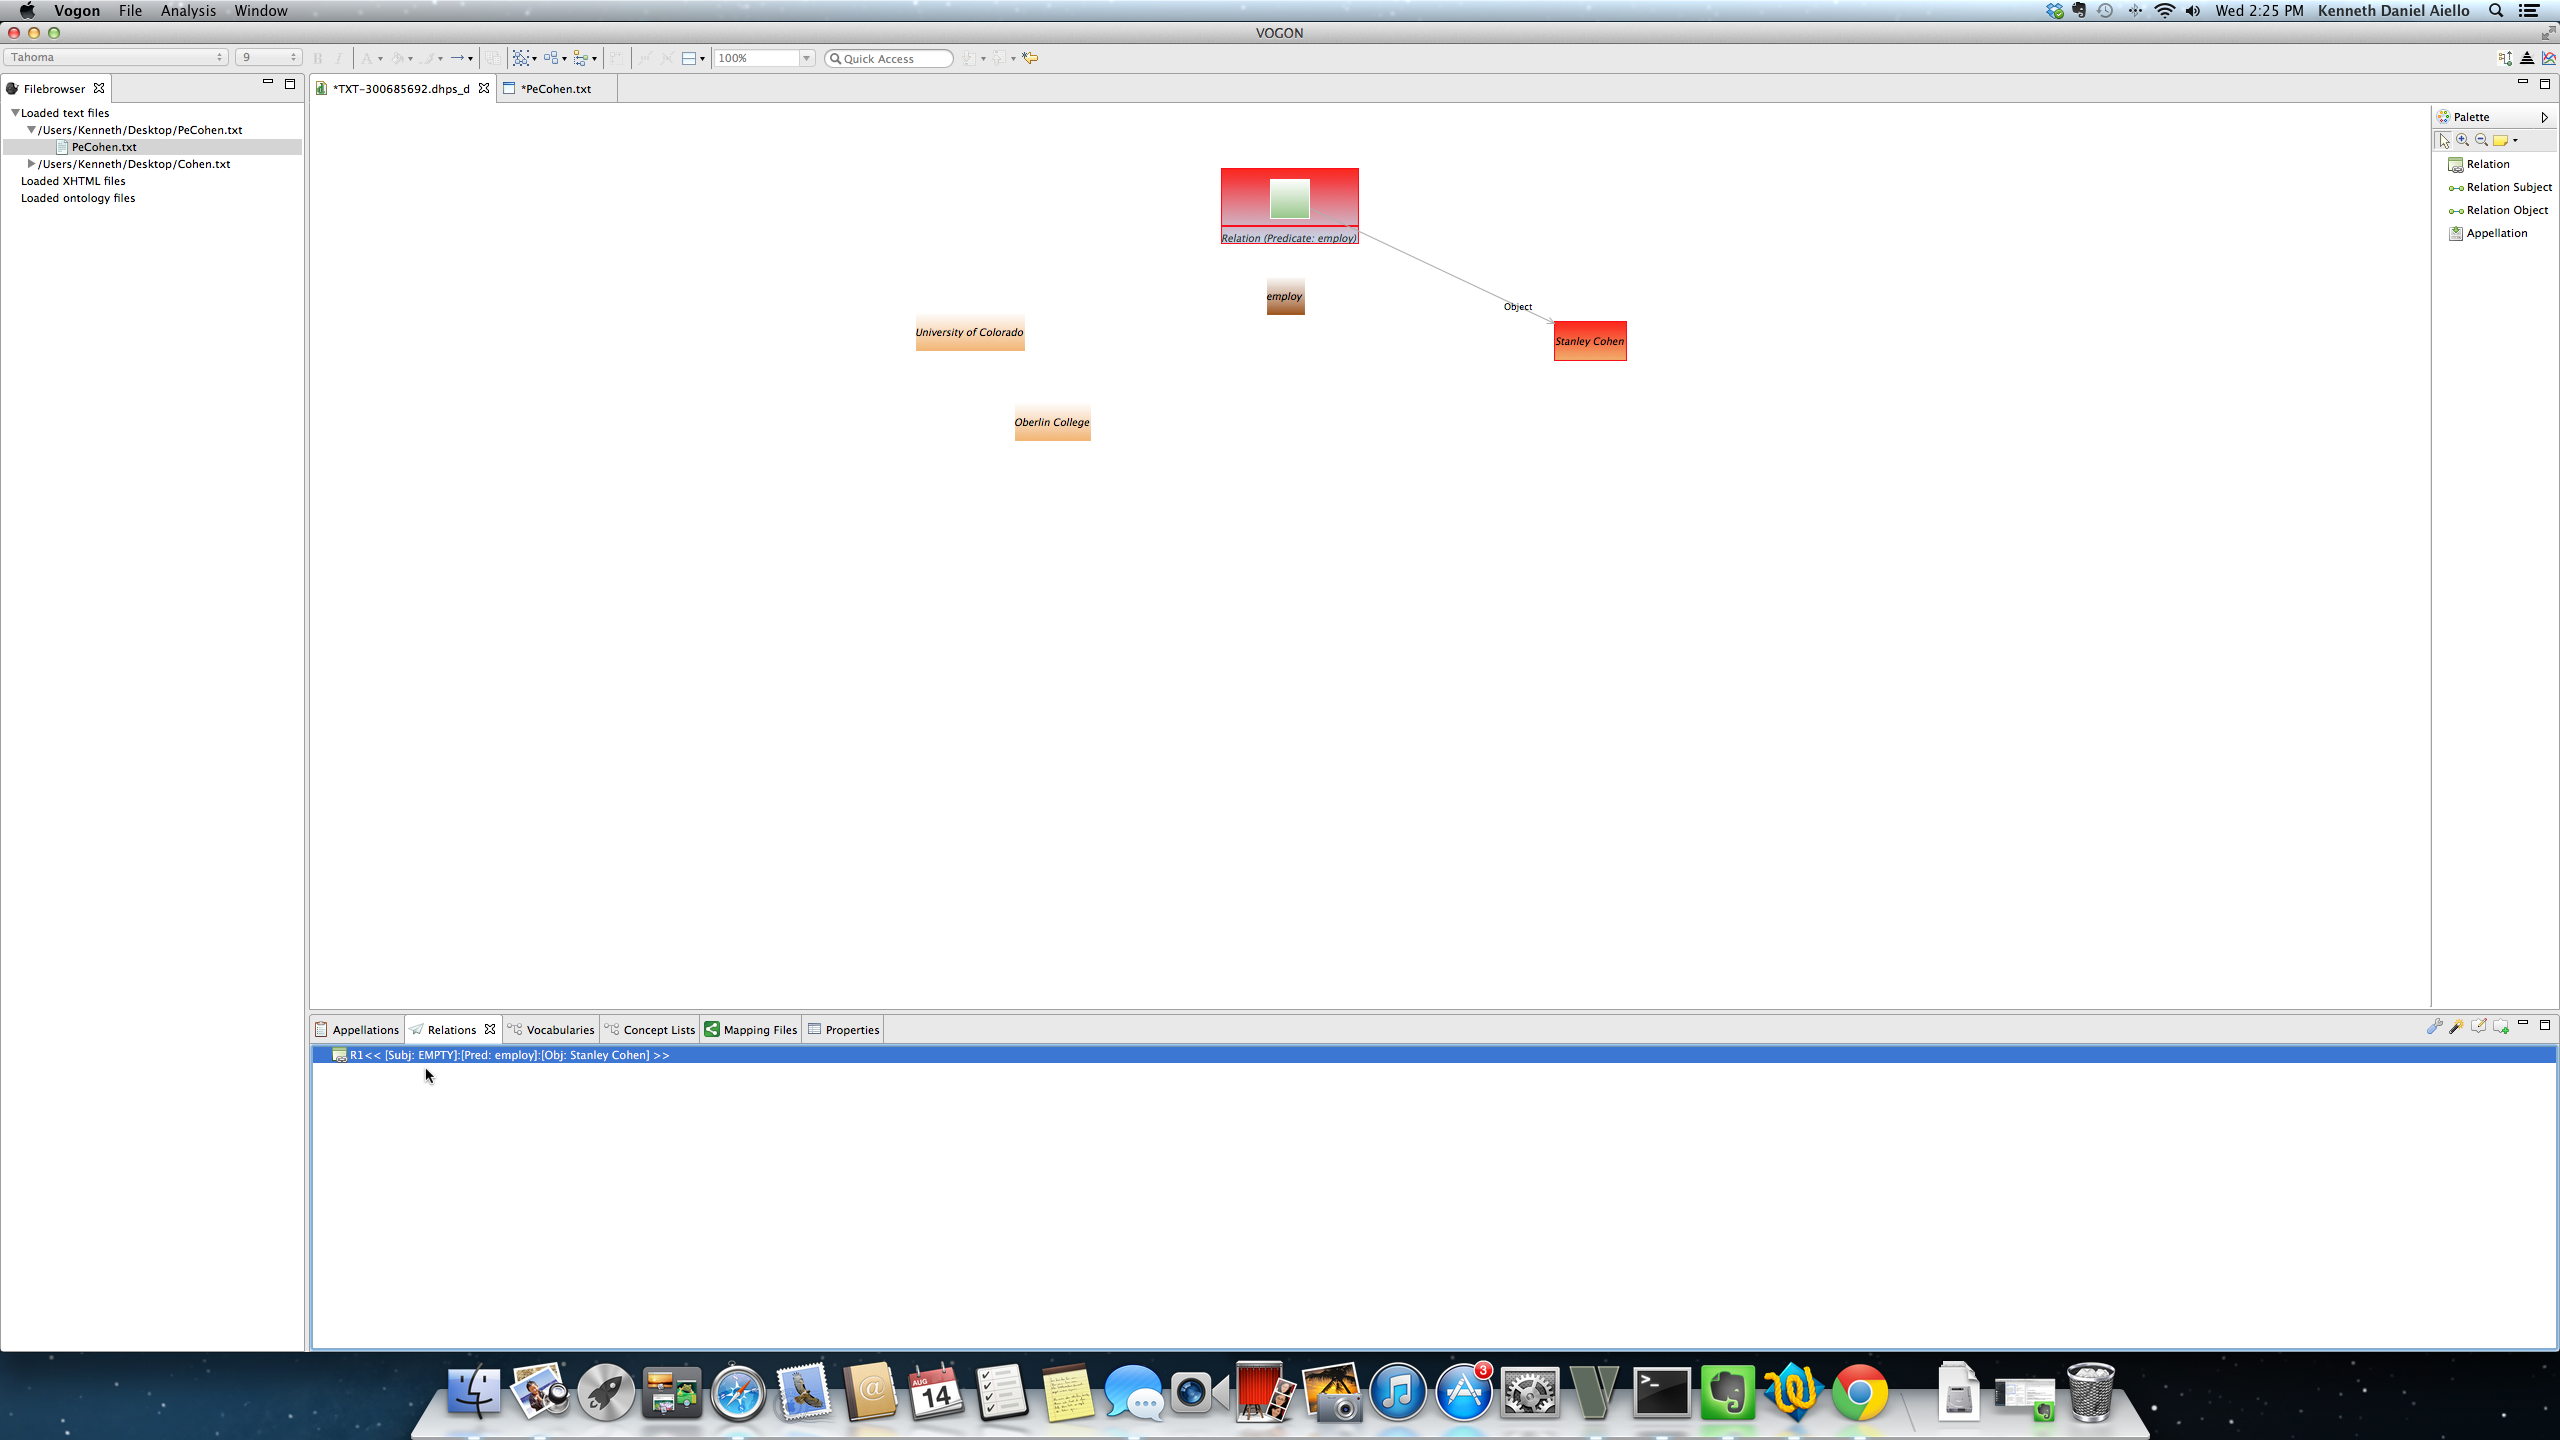
To edit the relation and create a different connector select the connector (subject or object) you wish to create from the Palette bar. Click and hold the cursor inside the green box in the Event Relation Compartment box. Drag the cursor inside the box of the appellated word of your choice.
Continuting this example the new subject connector has been created to the appellated word Oberlin College orange box from the Relation Event Compartment box (Predicate:employ). The relation in the Relation tab is now R1 << [Subj: Oberlin College]:[Pred:have][Obj:Stanley Cohen] >>
8.7.2.2. Editing the Subject or Object of a created relation: Editing using the Relation tab
You can edit the appellated word used in the relation via the Relation tab. You cannot edit the normalization, interpretation, or characters of the subject or object using the Relation tab. Using the Relation Tab highlight and select relation you wish to edit. Click on the Edit Relation button and the Create Relation: Create New Relation window will pop up. Here you can edit the subject and/or object of the relation that you selected in the Relation tab.
In this example the relation in the Relation tab is R1 << [Subj: University of Colorado]:[Pred:employ][Obj:Stanley Cohen] >> The relation is selected indicated by the red appellated words boxes of the (Subject, Relation Event Compartment box/ Predicate, Object) used in the Graphical Editor Main Window.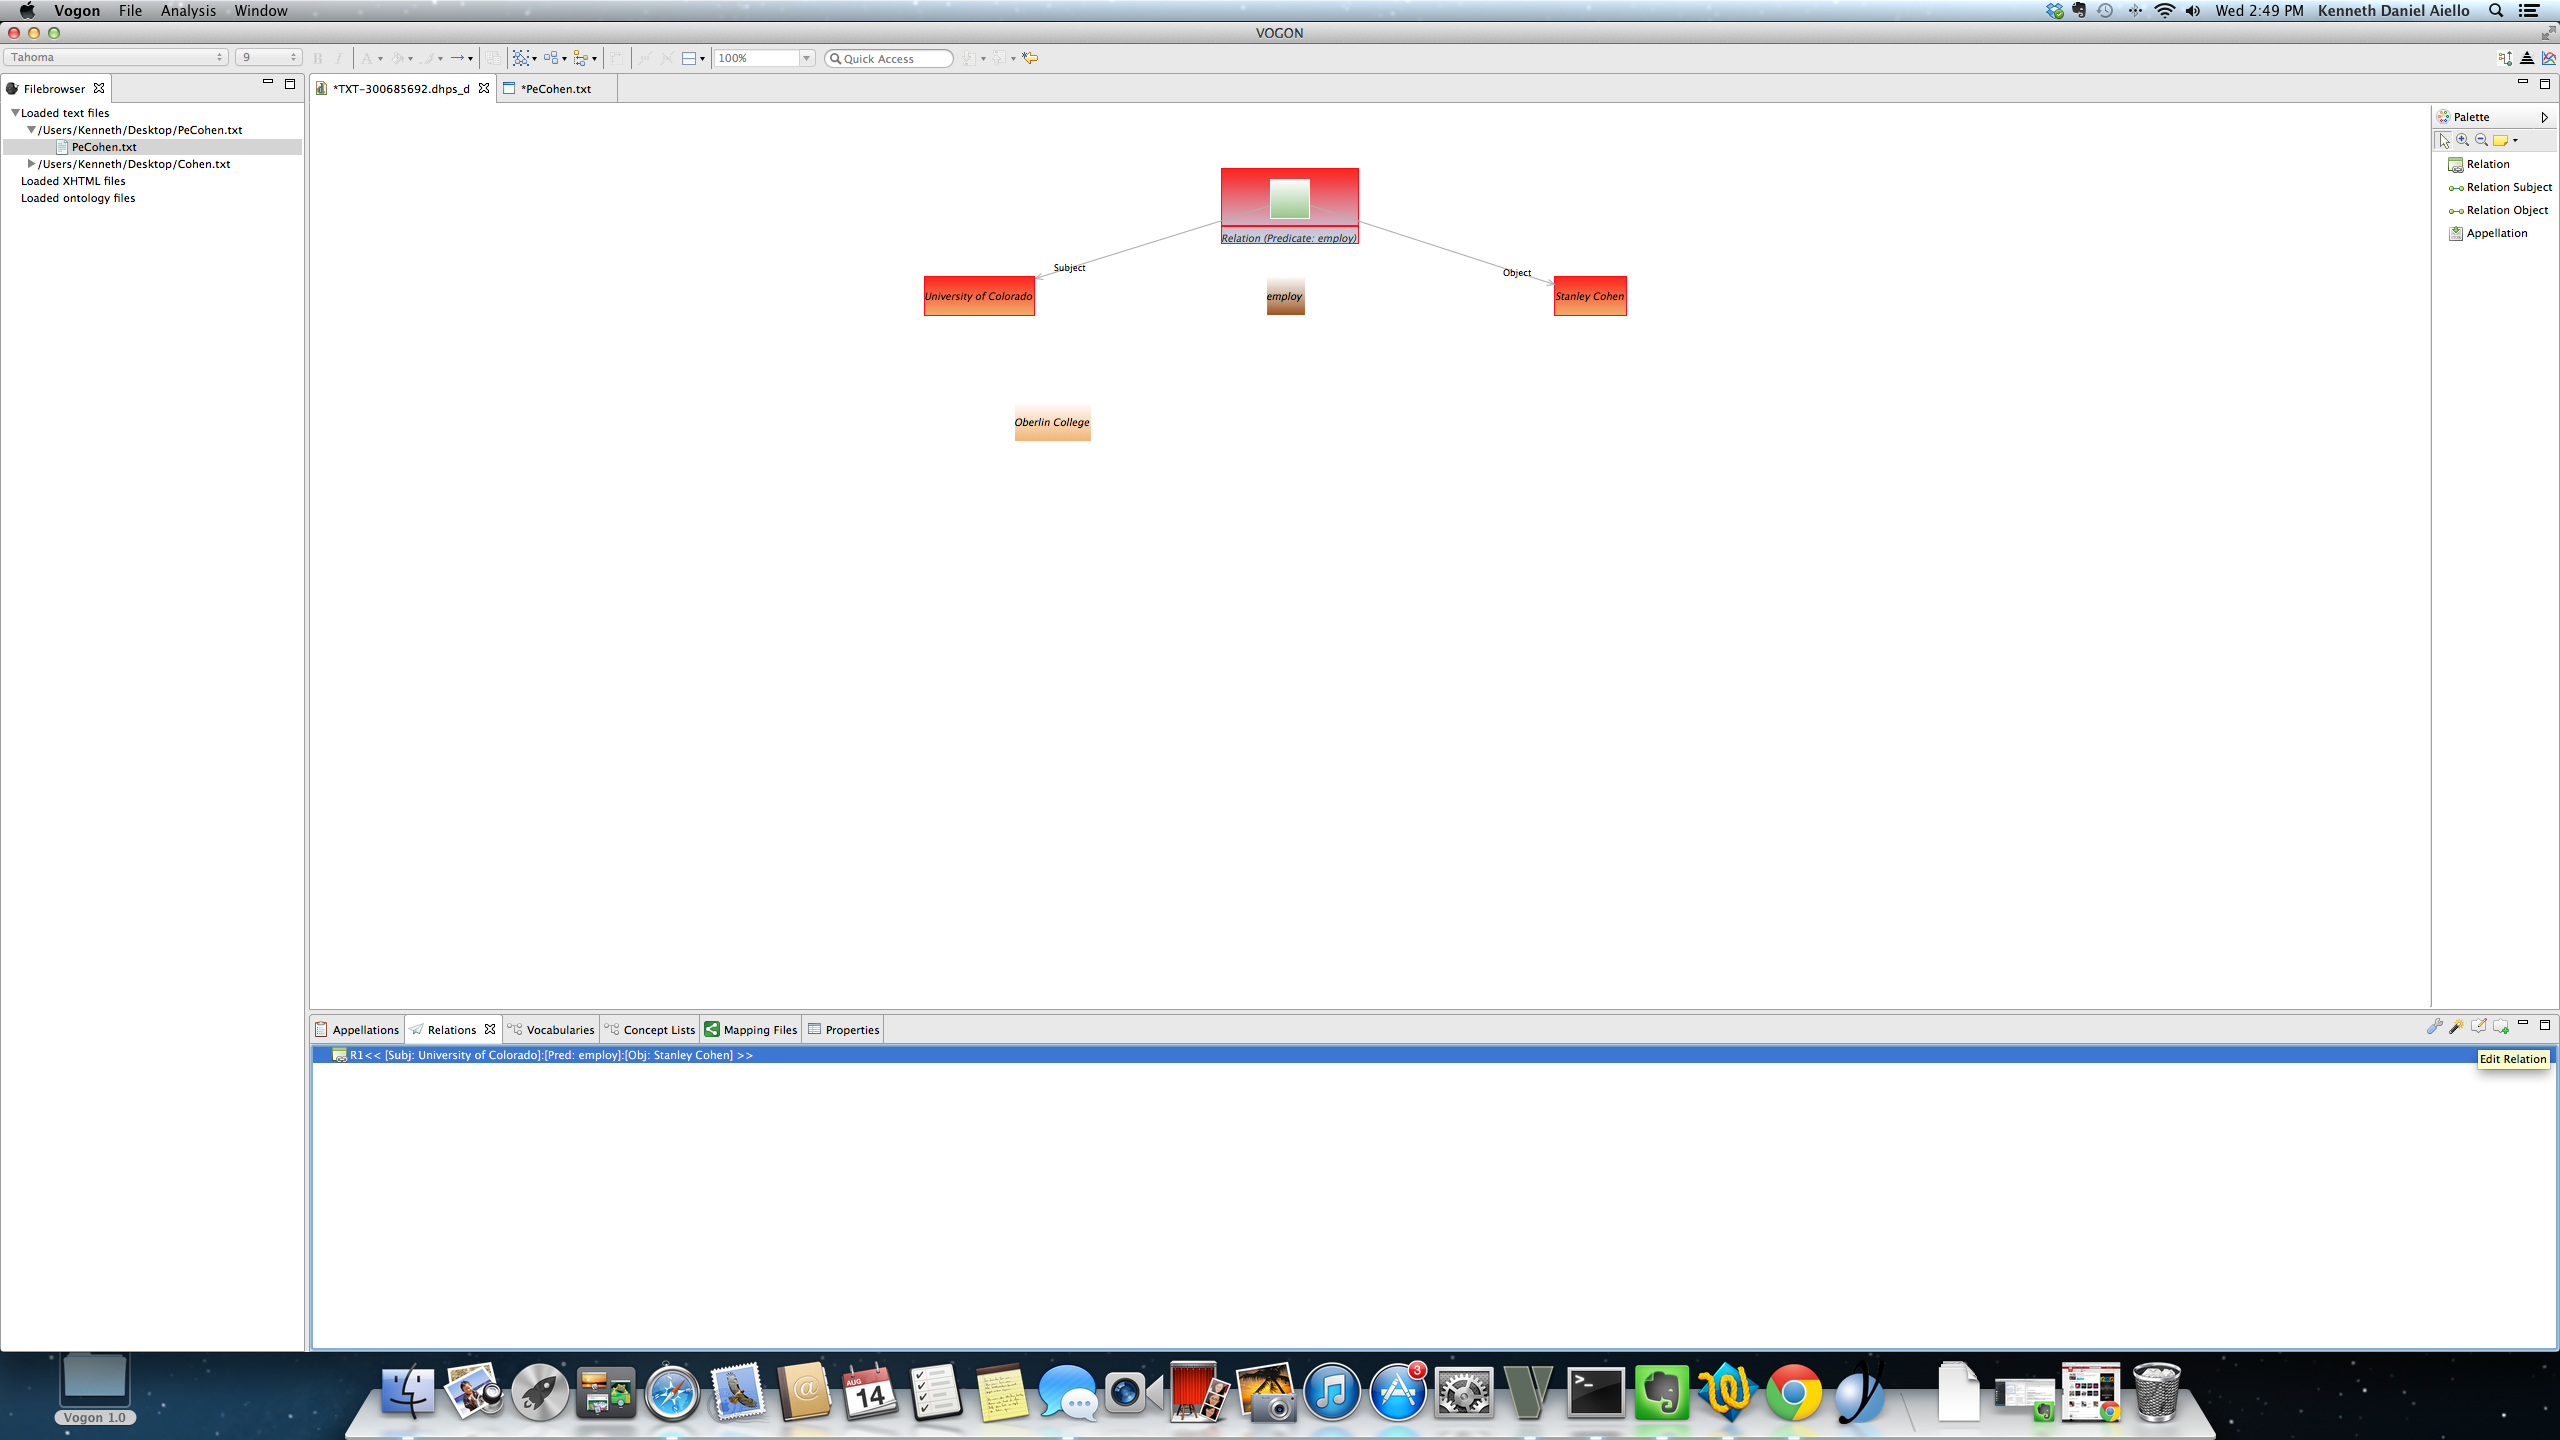
After selecting the Edit Relation button the Create Relation: Create New Relation window is open and is populated with the Subject, Predicate, and Object of the selected relation in the corresponding Relation Triple Bar Select the Subject or Object Relation Triple bar to edit the subject or object of the selected relation in the Relation tab. After you have edited the appellated words of the relation click on the blue finish button to complete the operation.
8.7.2.3. Editing the Subject or Object of a created relation: Editing using the Graphical Editor Sub-Window Quick List
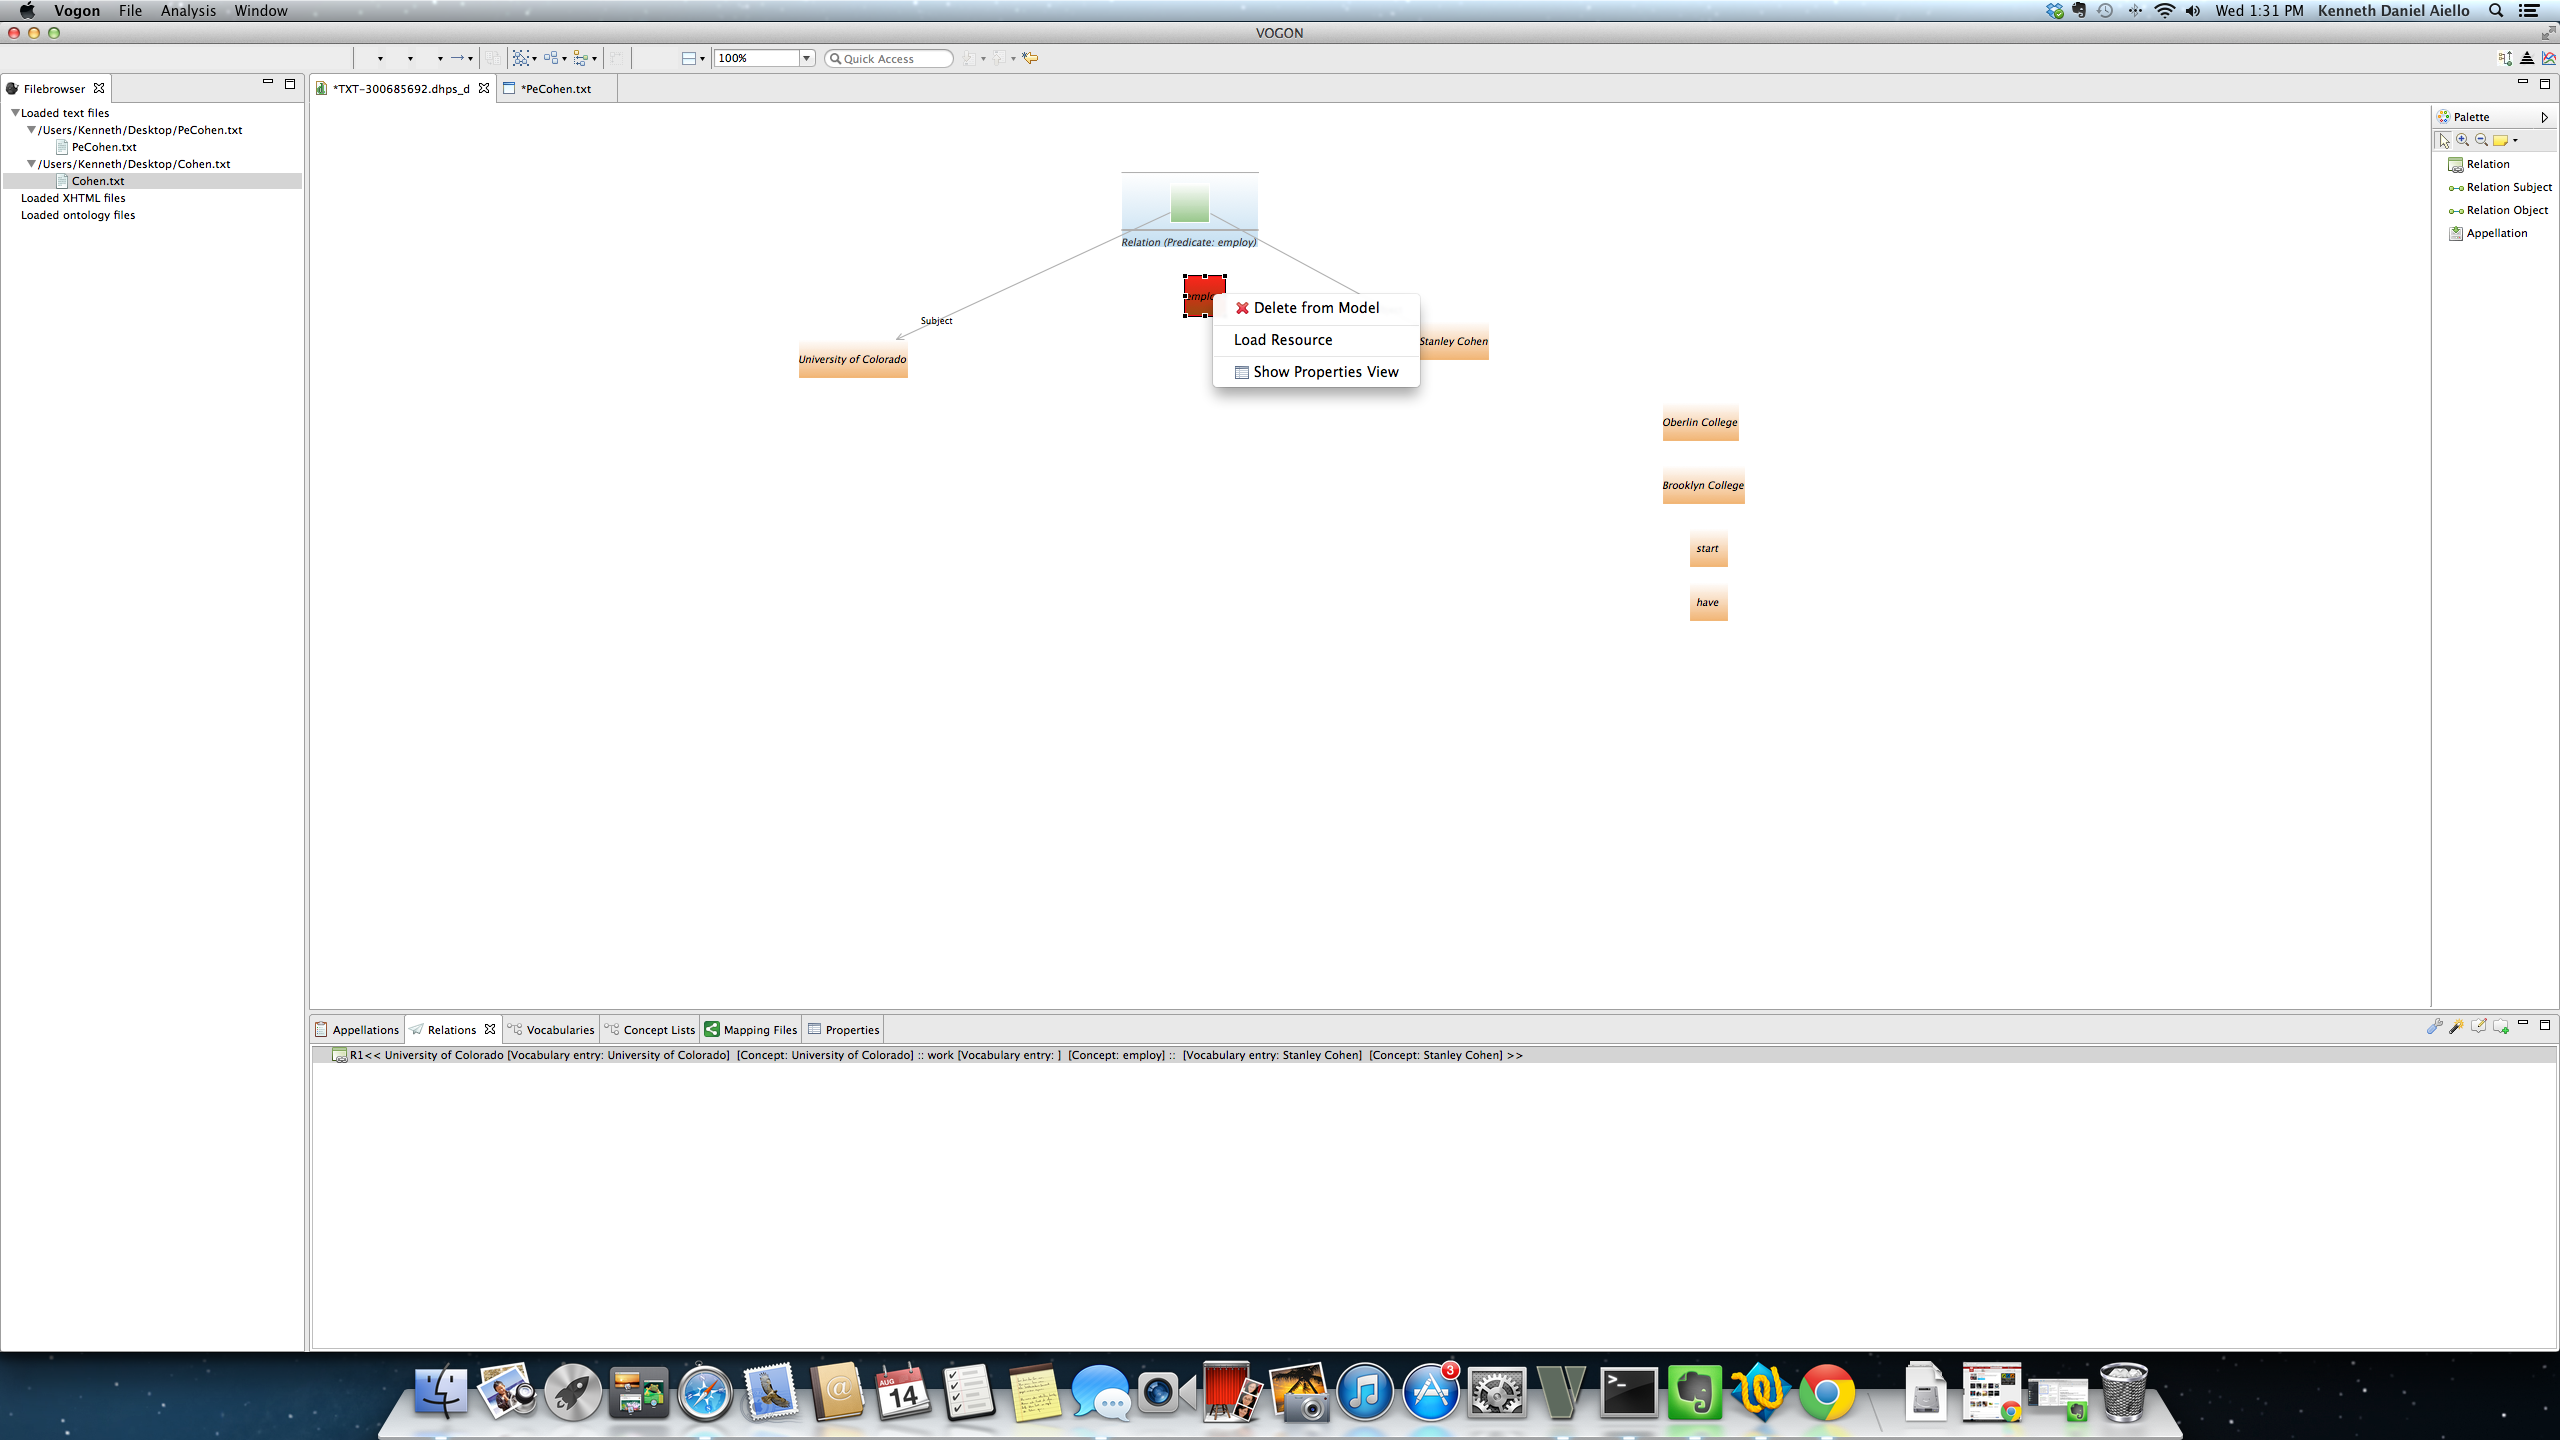
You can edit the normalization, interpretation, or characters of an appellated word that is the subject or object of a relation in the Graphical Editor Main Window by using the Graphical Editor Sub-Window Quick List. You can create new appallated words to be part of an existing relation using the Graphical Editor Sub-Window Quick List. Right click on the appellated word box of a subject or object of a relation. Right click and the Graphical Editor Sub-Window Quick List will pop up.
Graphical Editor Sub-Window Quick List (right clicking on an appellation used in a relation)
Delete from model restore elements isolate element edit predicate show properties
In this example the relationship is R1 << [Subj: Oberlin College]:[Pred:employ][Obj:Stanley Cohen] >>] By right clicking on the appellated word box of the subject of this relation (Oberlin College) the Graphical Editor Sub-Window Quick List pops up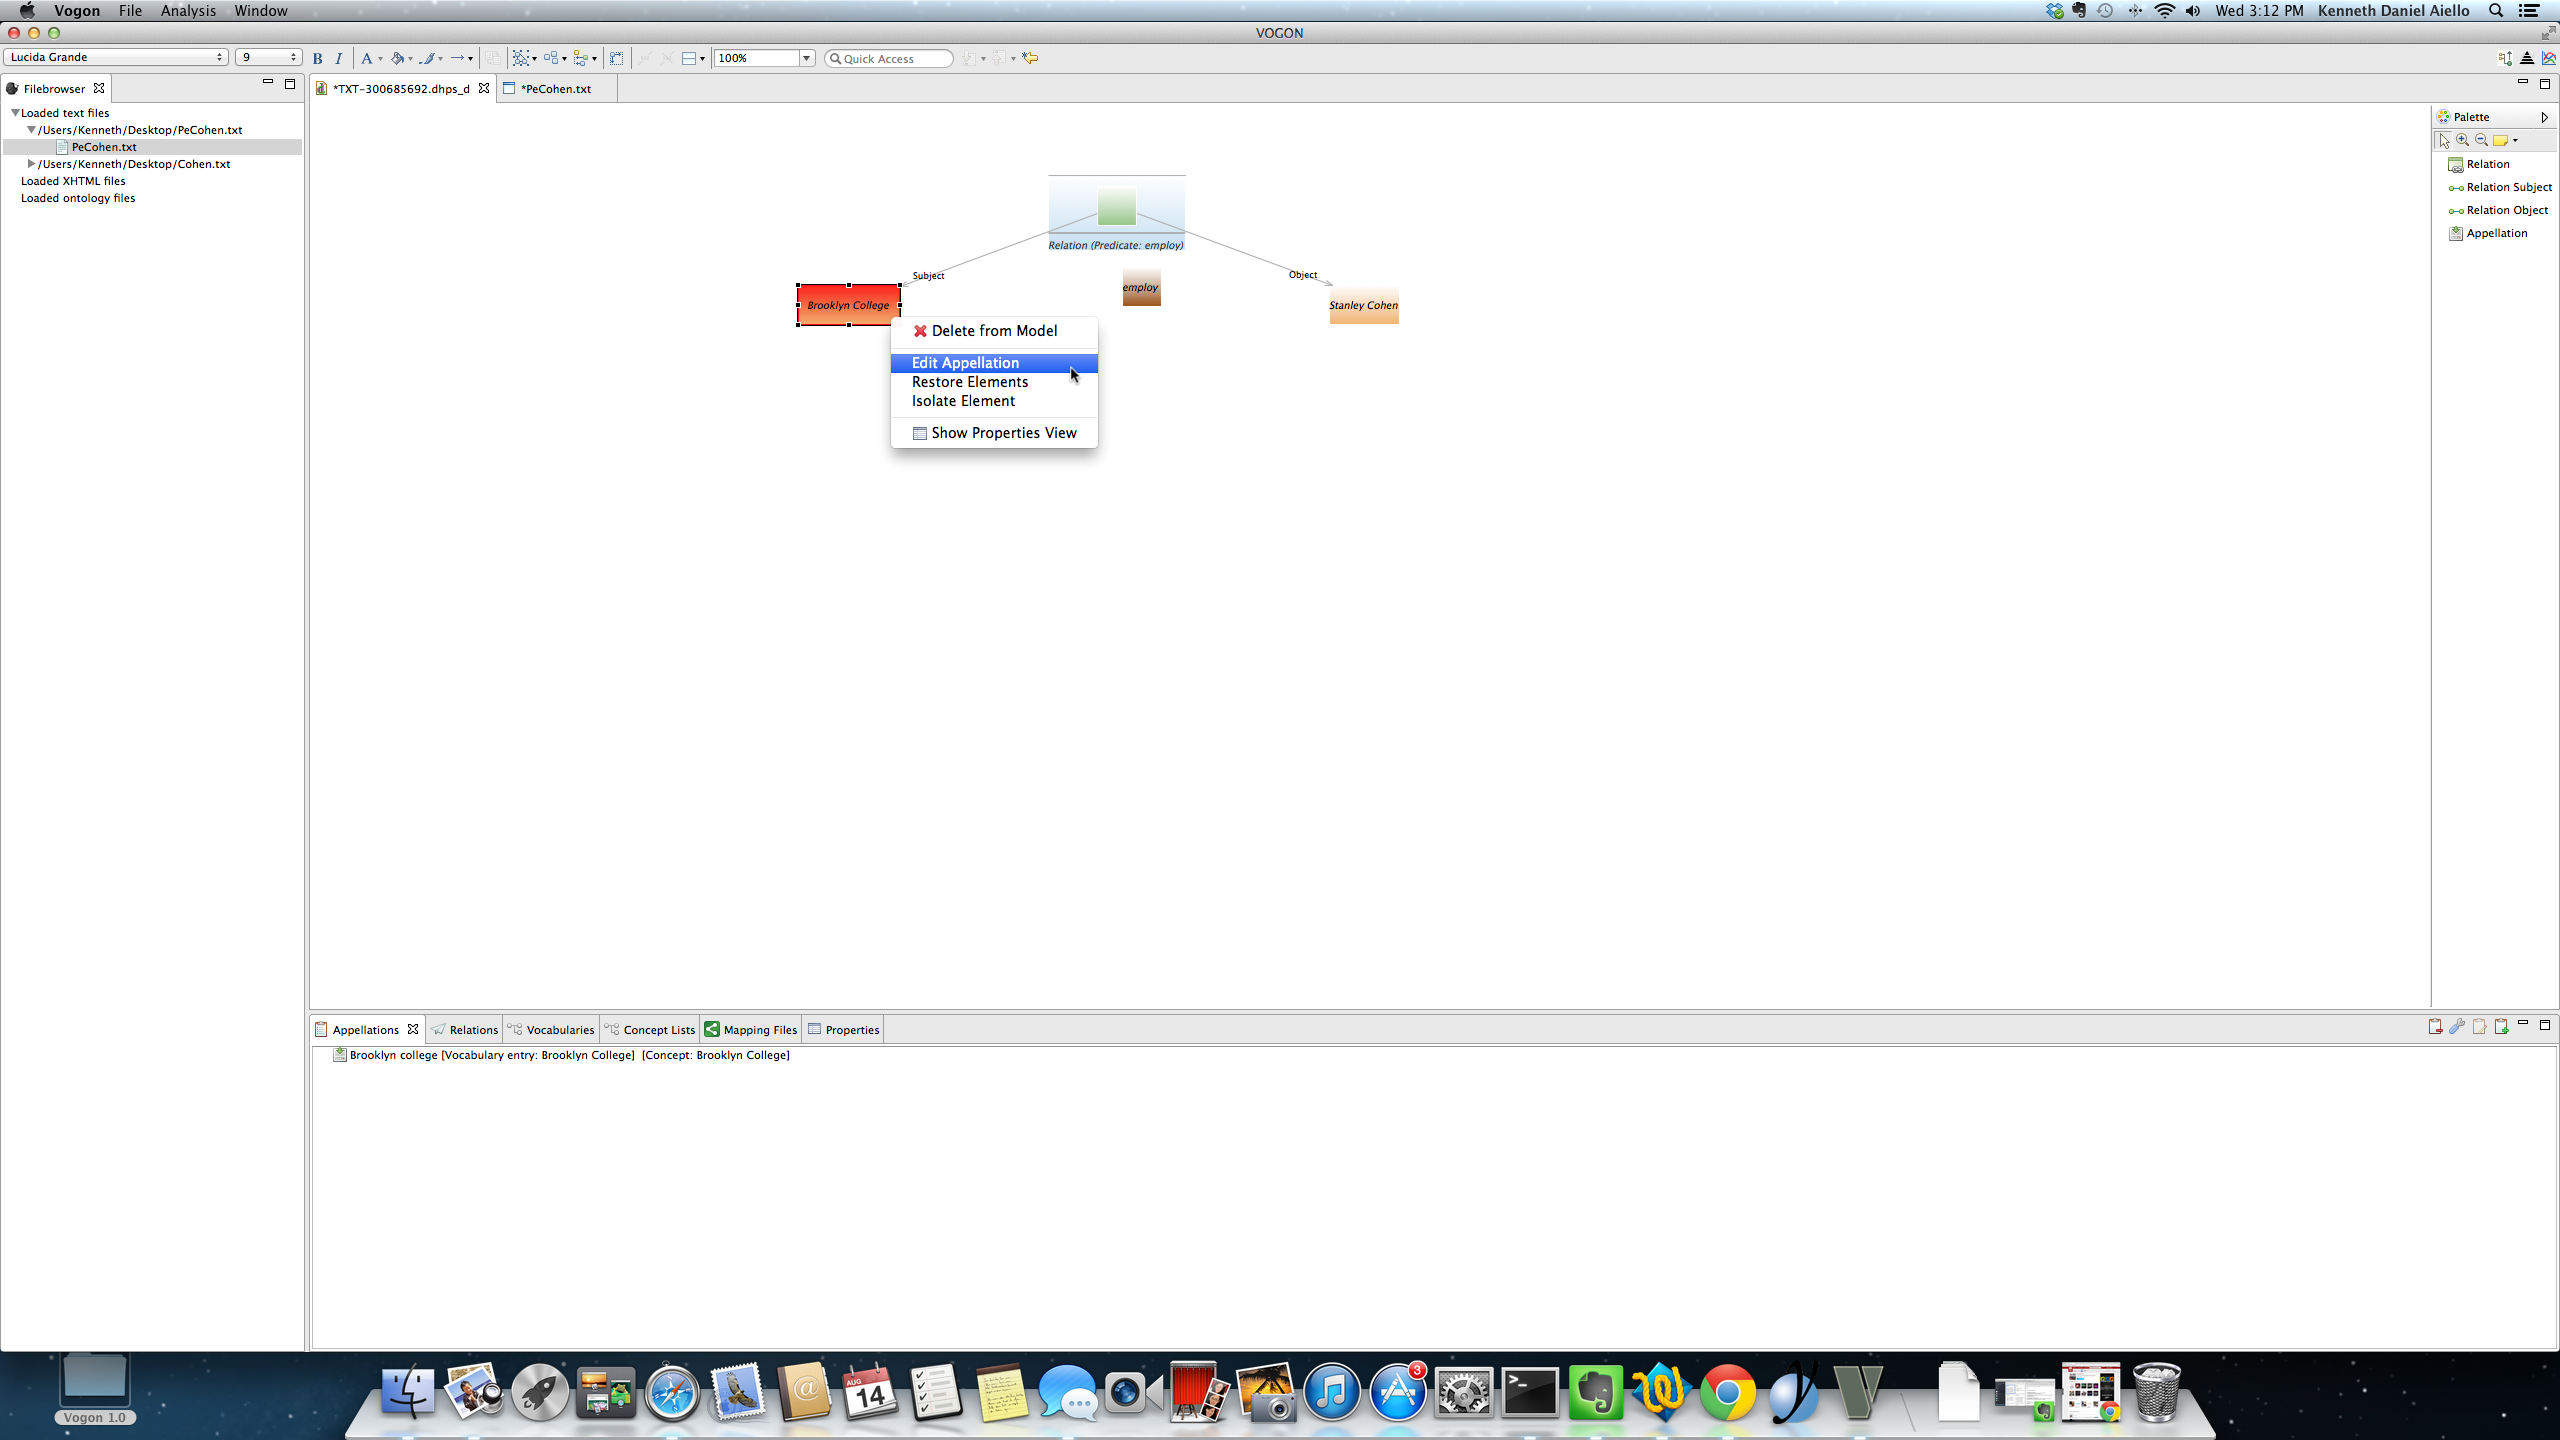
The Add New Appellation Window pops up populated with the information from the appellated word that was selected. In the Add New Appellation Window the user can edit the normalization, interpretation, and characters of the selected word. The user can create new appallated words to be part of an existing relation.
In this example the Add New Appellation Window is populated with the information from the subject of the relation (Oberlin College)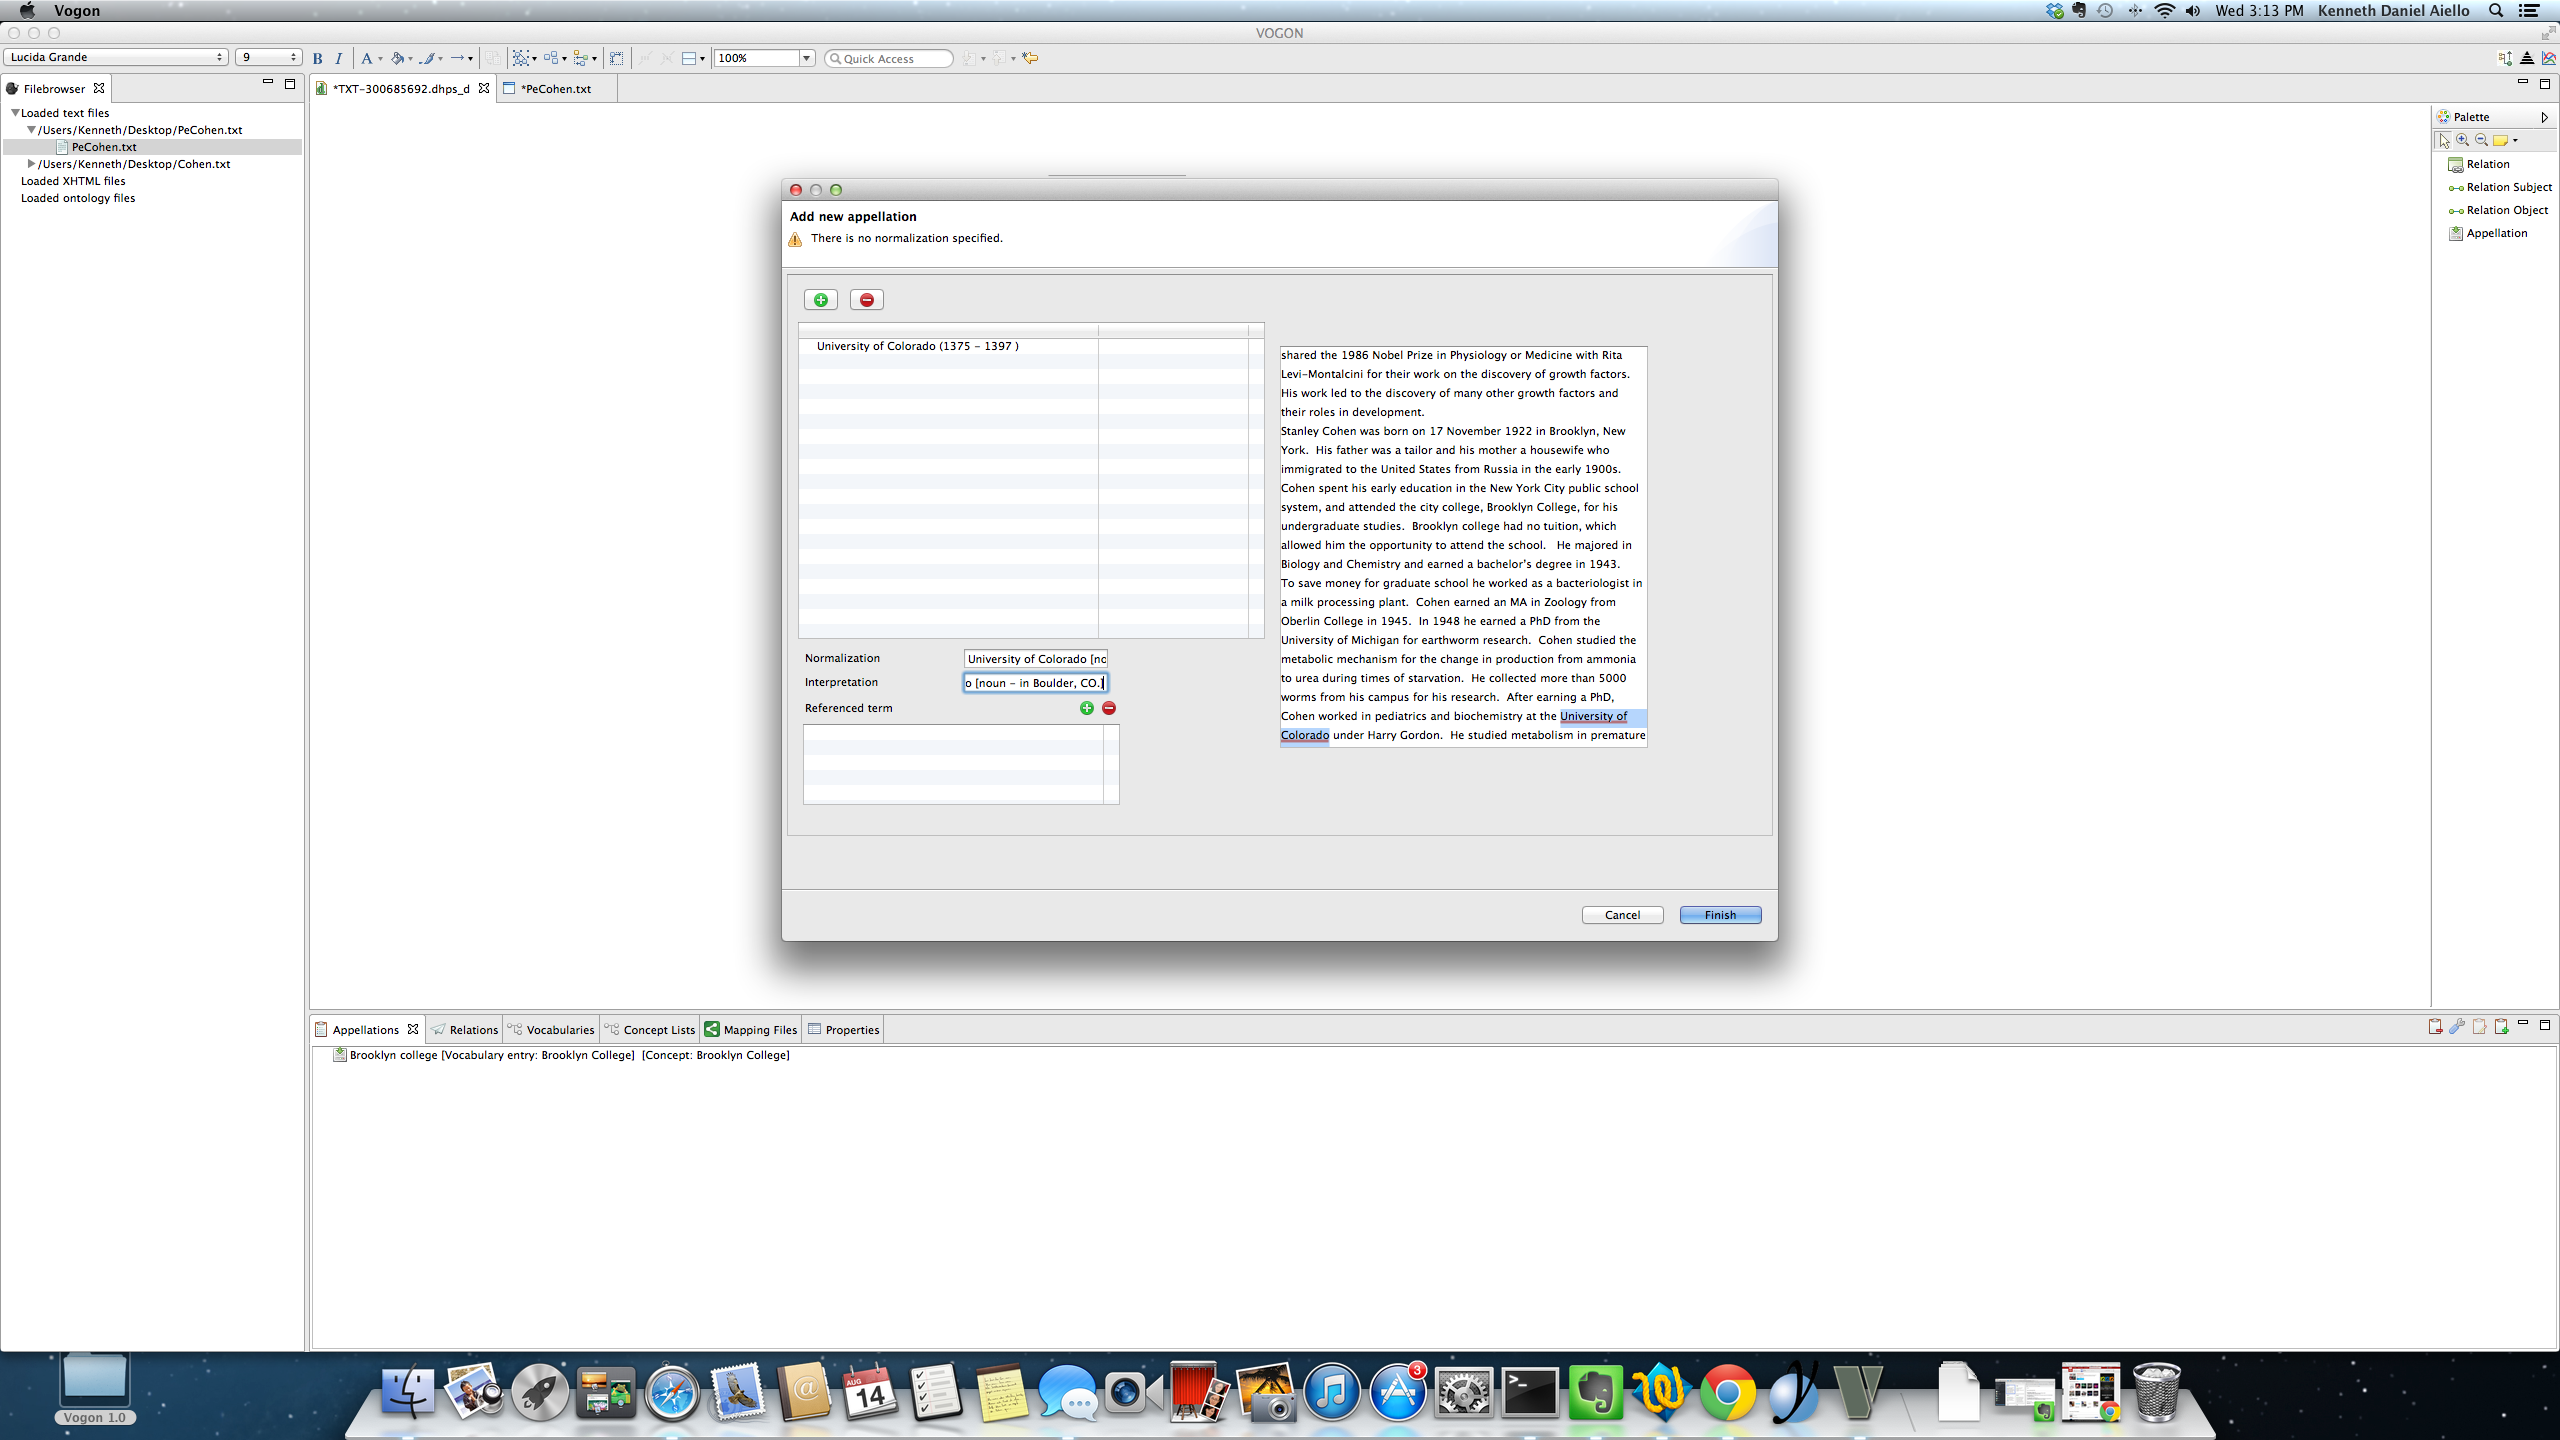
The user has created a new appallated word to be part of an existing relation. The Graphical Editor and the new appallated word appear in the Graphical Editor Main Window.
The Relation tab still reflects an error
8.7.3. Deleting Relations
Vogon allows the user to delete relations that were created in the Text or Graphical Editor. If you delete the relation in the Graphical Editor Main Window the all appellations in the relation will also be deleted. If you delete the relation in the Relations tab only the Relation Event Compartment box will be deleted. The appellations in the relation will not be deleted. If you delete in Vogon there is no back or undo button.
8.7.3.1. Deleting in the Graphical Editor Main Window
Deleting in the Graphical Editor Main Window will delete the relation. All appellations used in the relation will also be deleted. These appellations will also be removed from Appellations tab. This action cannot be undone.
Deleting in the Graphical Editor Main Window you must select all parts of the relation. This can be done by clicking on the relation in the Relations Tab or by selecting all parts of the relation in the Graphical Editor Main Window.
In this example we want to delete the relation R1 << [Subj: University of Colorado]:[Pred:employ][Obj:Stanley Cohen] >>] Start by selecting all parts of the relation
Hit delete on your keyboard and the entire relation and all appellations in the relation will be deleted.
8.7.3.2. Deleting in the Relations Tab using the Delete Relation button
If you delete the relation in the Relations tab only the Relation Event Compartment box will be deleted. The appellations in the relation will not be deleted. This action cannot be undone.
Deleting in the Relations Tab you must first select the relation to be deleted. Select by highlighting the relation. After selecting the relation then click on the Delete Relation button.
In this example there is only one relation in the Relation tab R1 << [Subj: University of Colorado]:[Pred:employ][Obj:Stanley Cohen] >>] It is selected in the active window and is highlighted in blue. In this example the Relation Event Compartment box is above the appelated word employ brown box.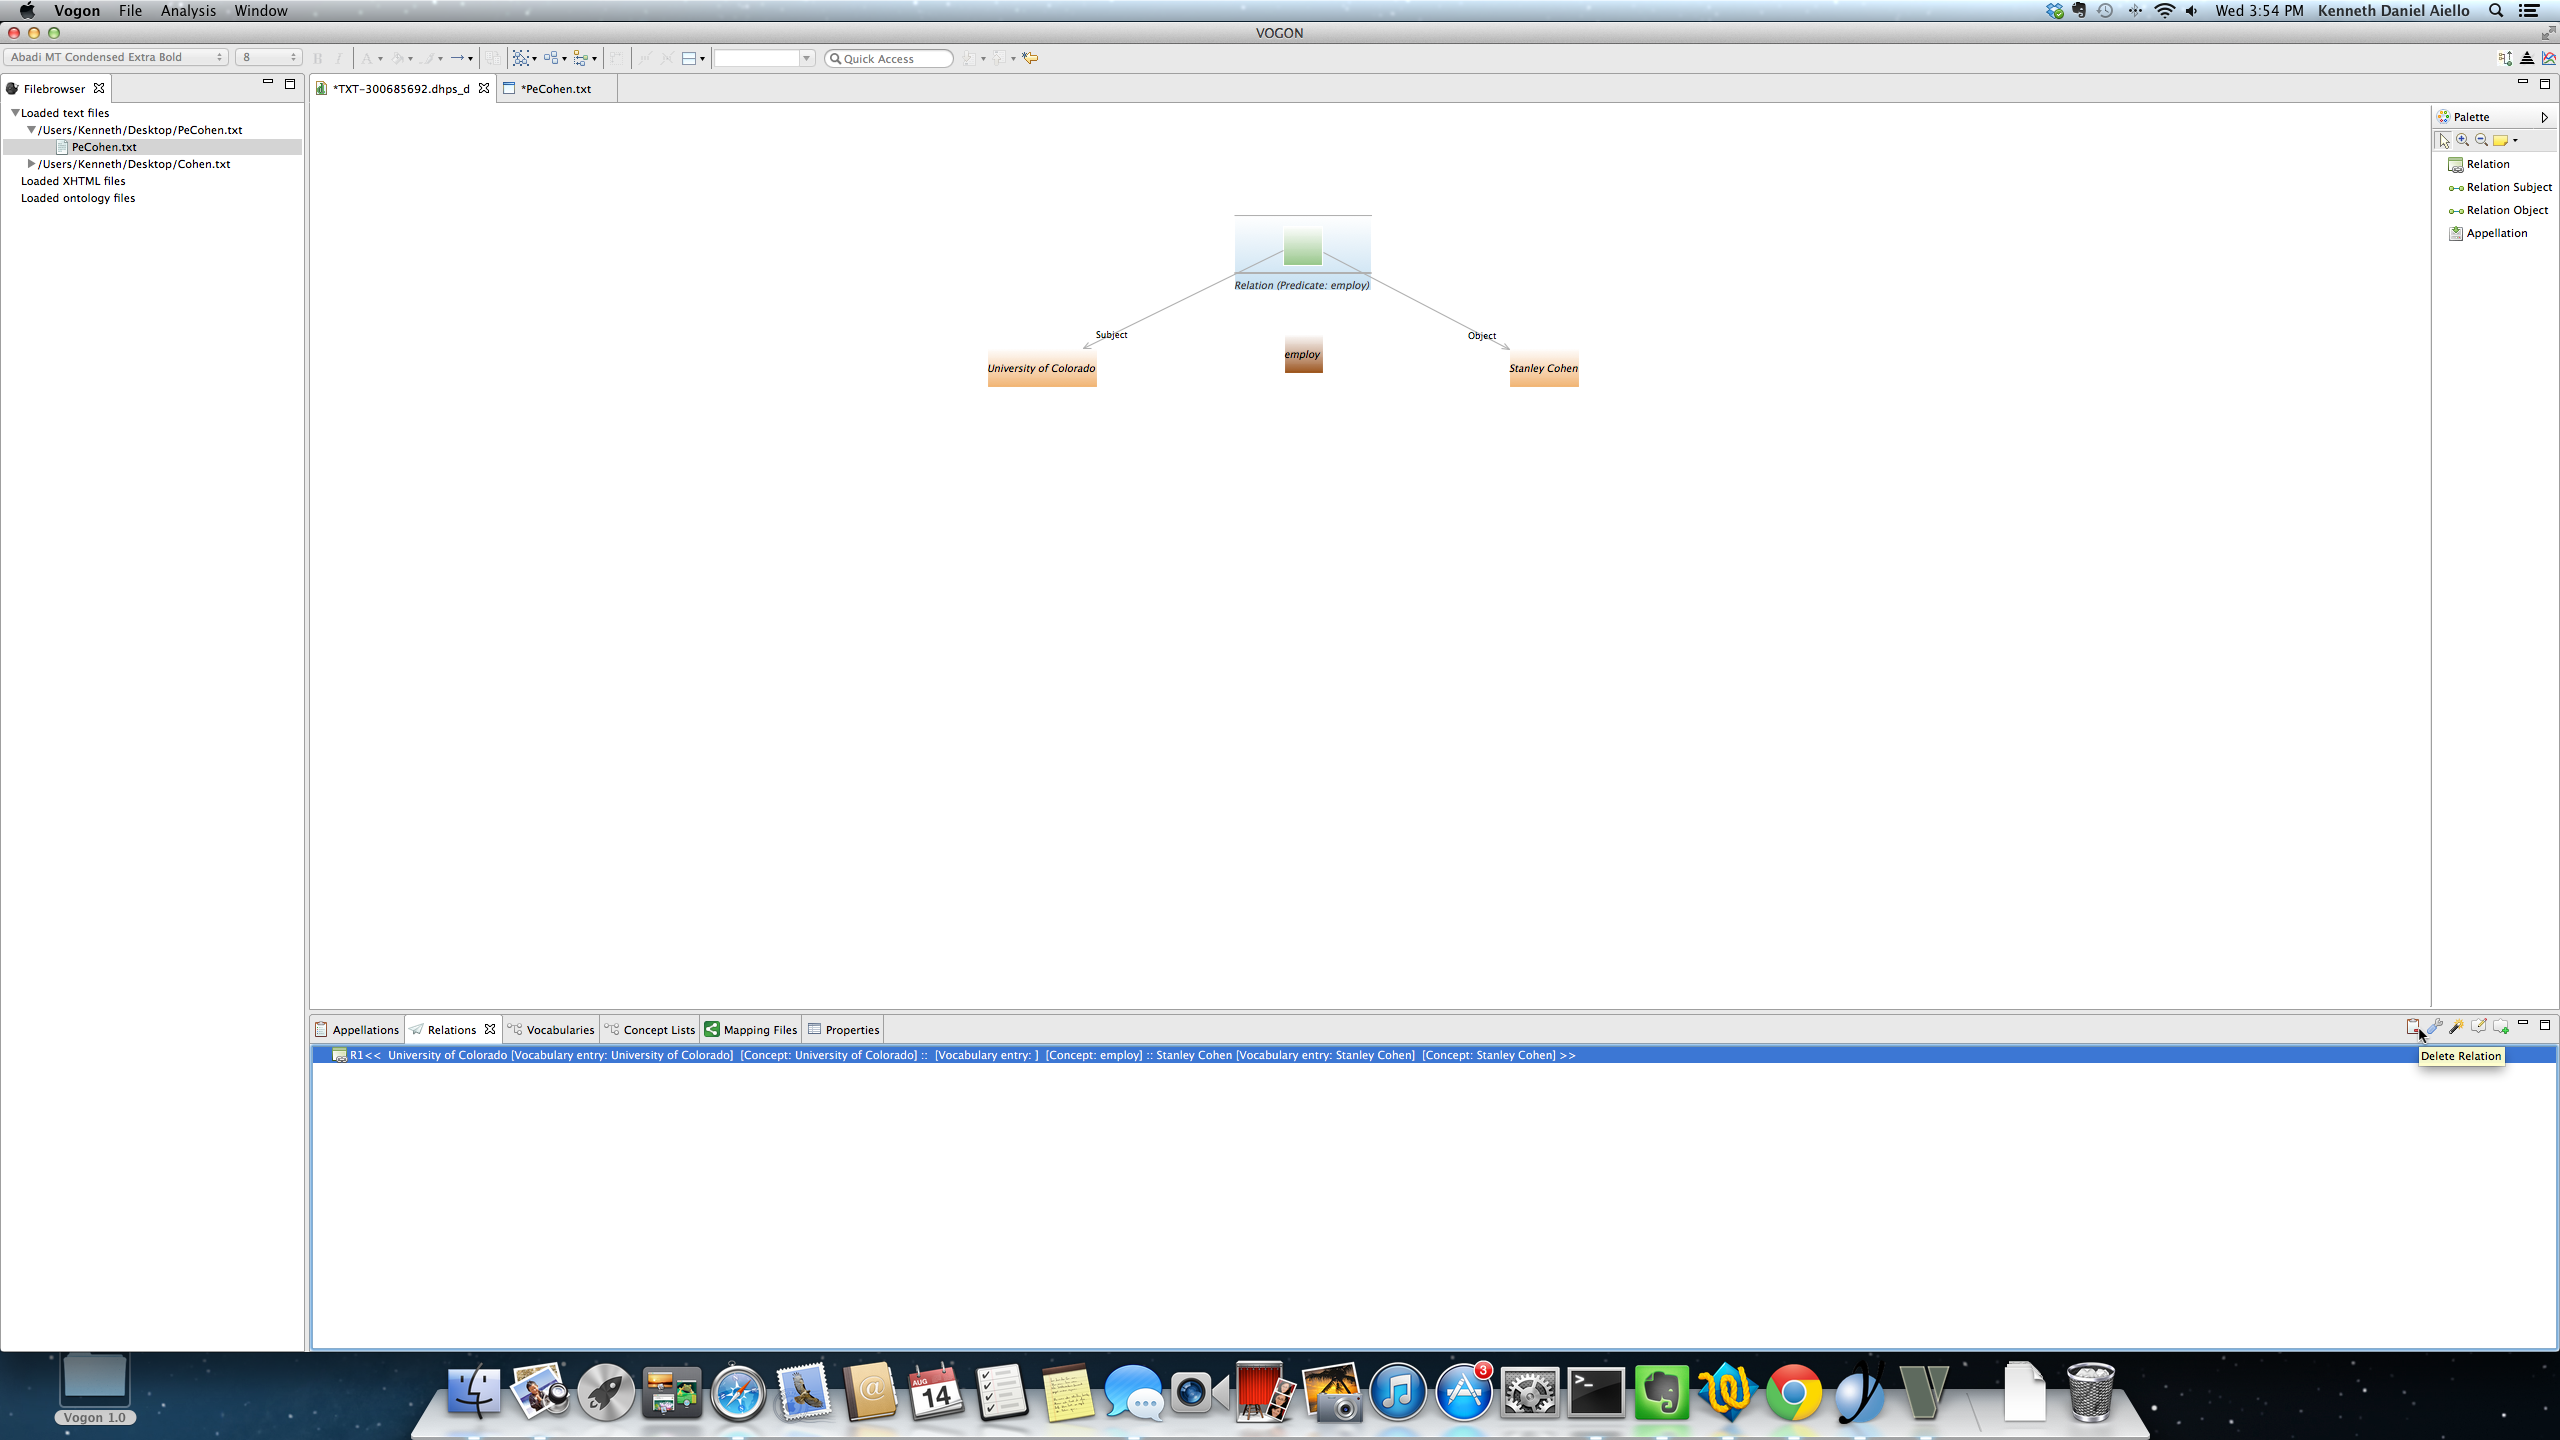
After clicking on the Delete Relation button the Delete Appellation Window pops up. The window asks, “You are about to delete 1 relation(s). Continue? Click on the blue Ok button.
In this example there is only one relation in the Relation tab R1 << [Subj: University of Colorado]:[Pred:employ][Obj:Stanley Cohen] >>] It is selected and is now highlighted in gray.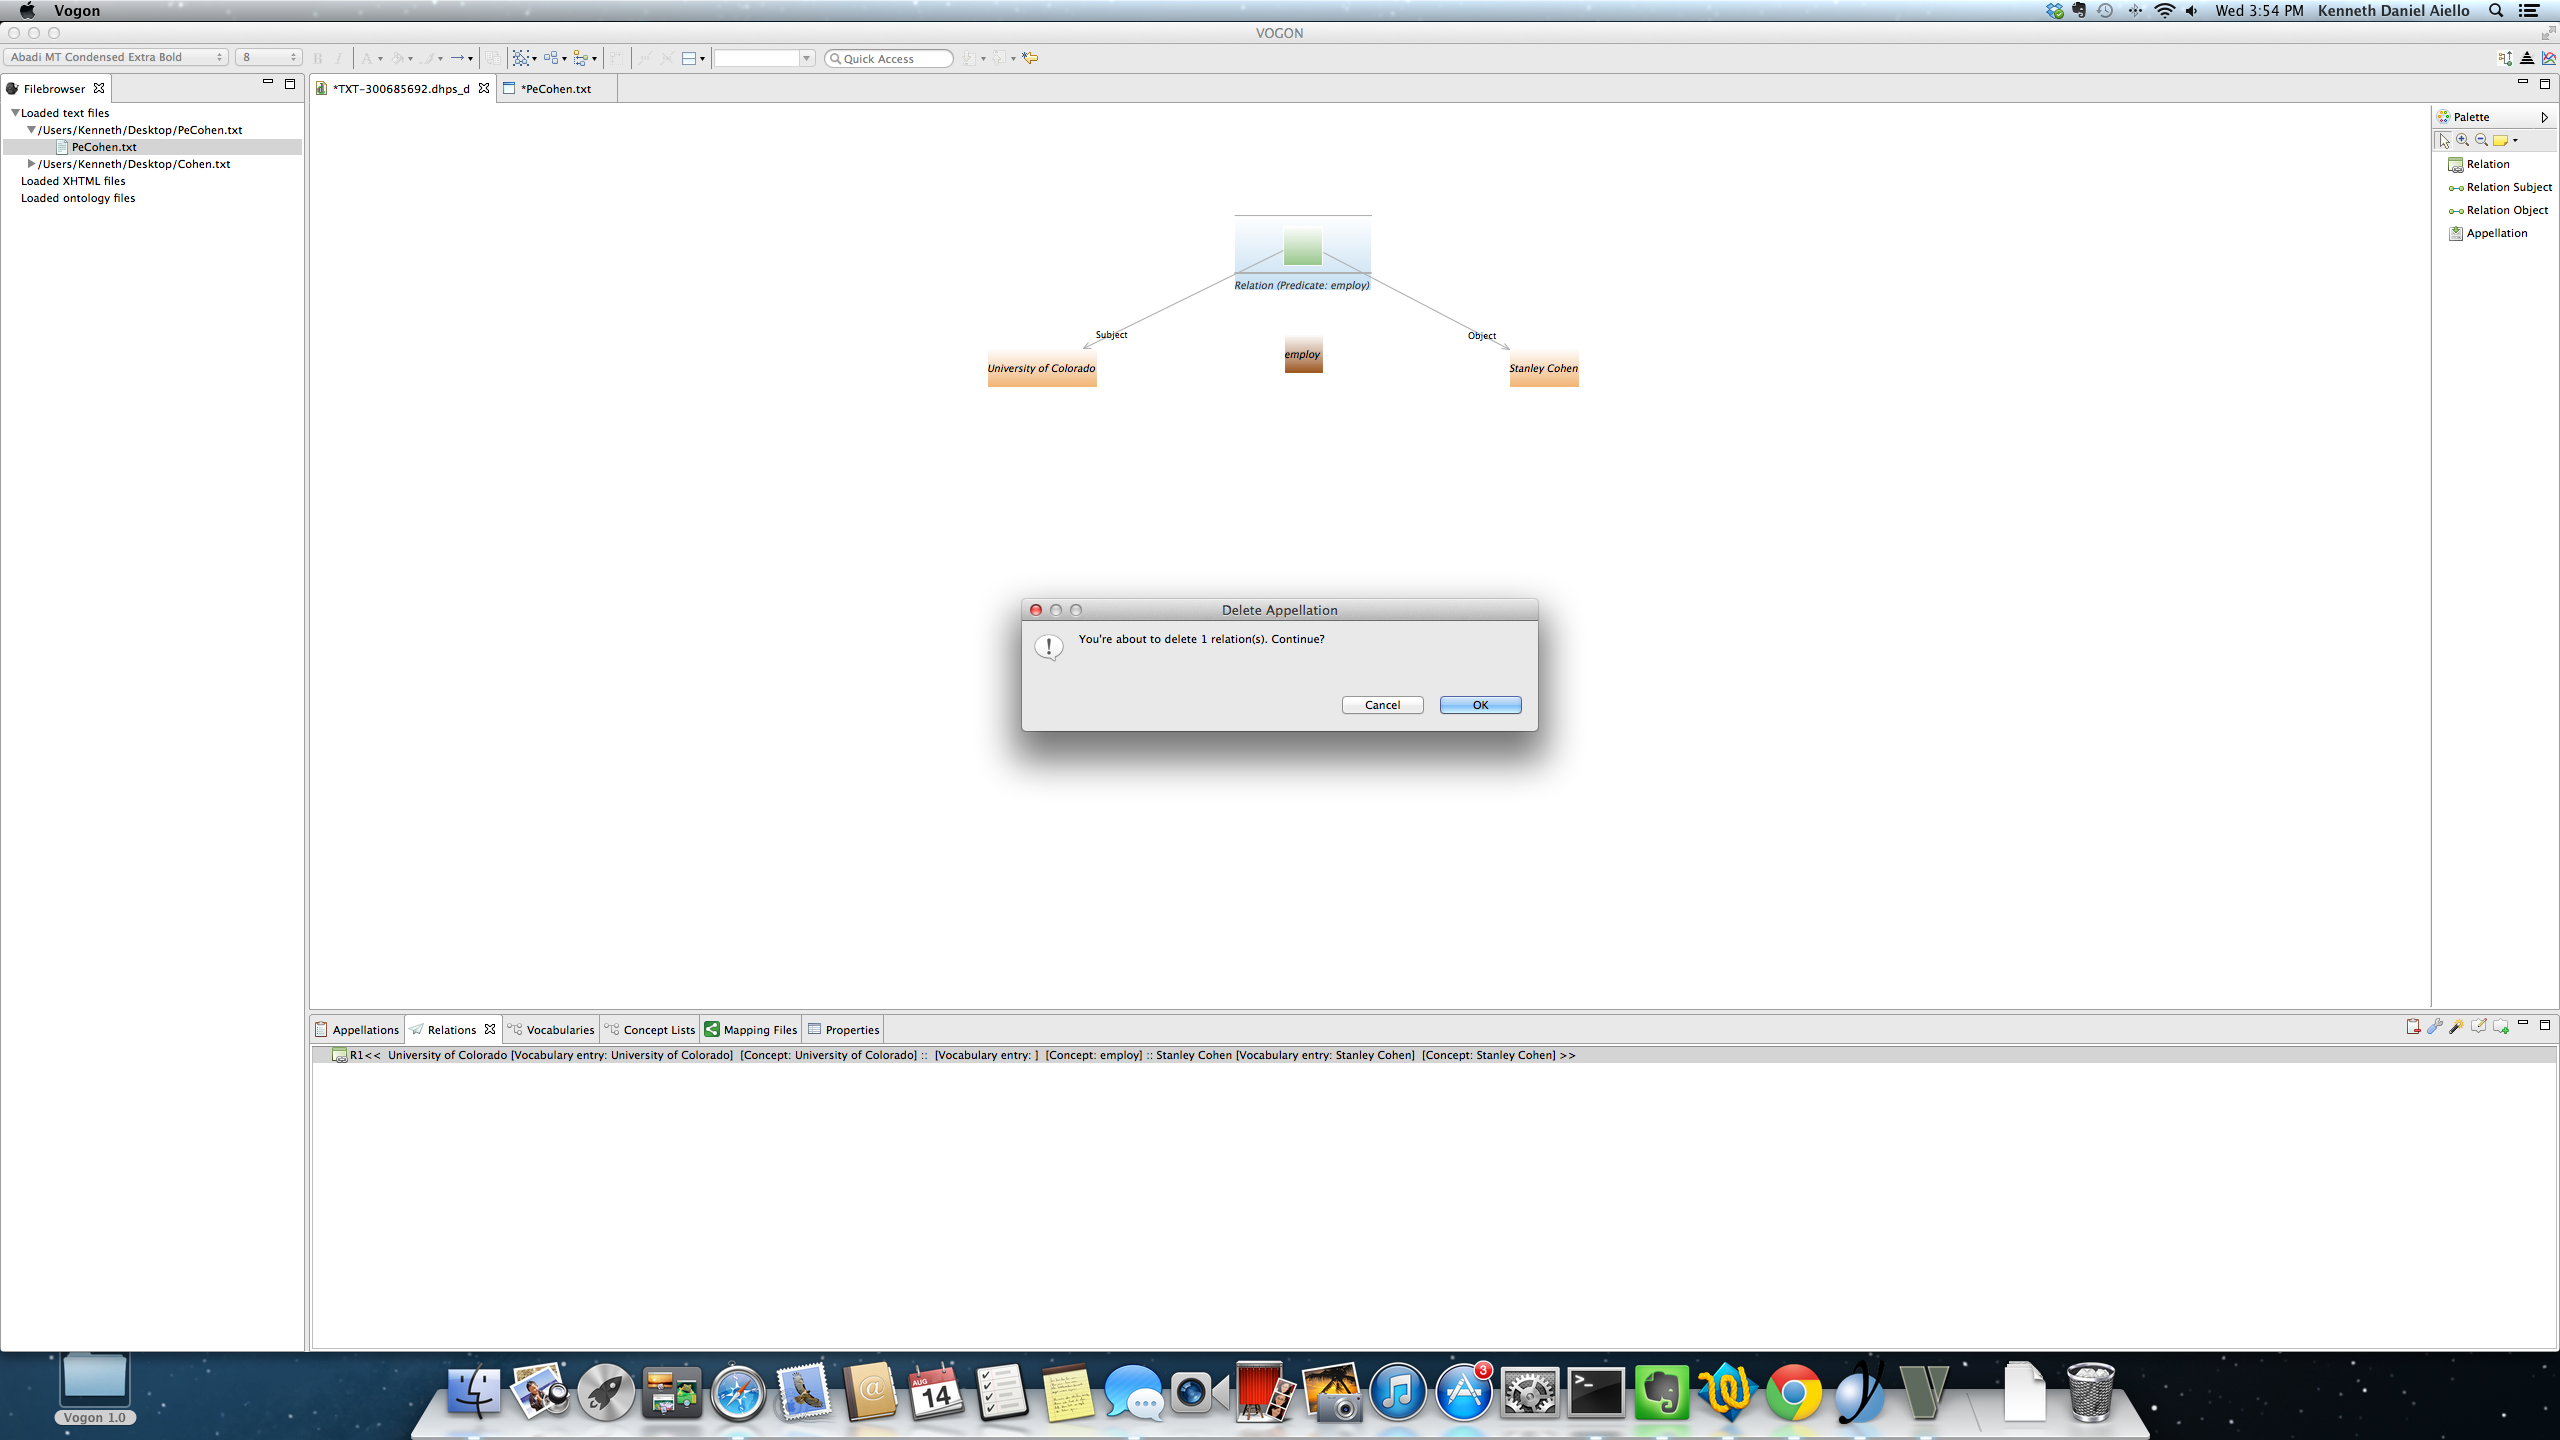
The Relation Event Compartment box is now deleted. The appellated words that were part of the relation are still in the Graphical Editor Main Window.
In this example the Relation Event Compartment box was above the word employ has been deleted from the Graphical Editor Main Window. The Relation Tab is now blank.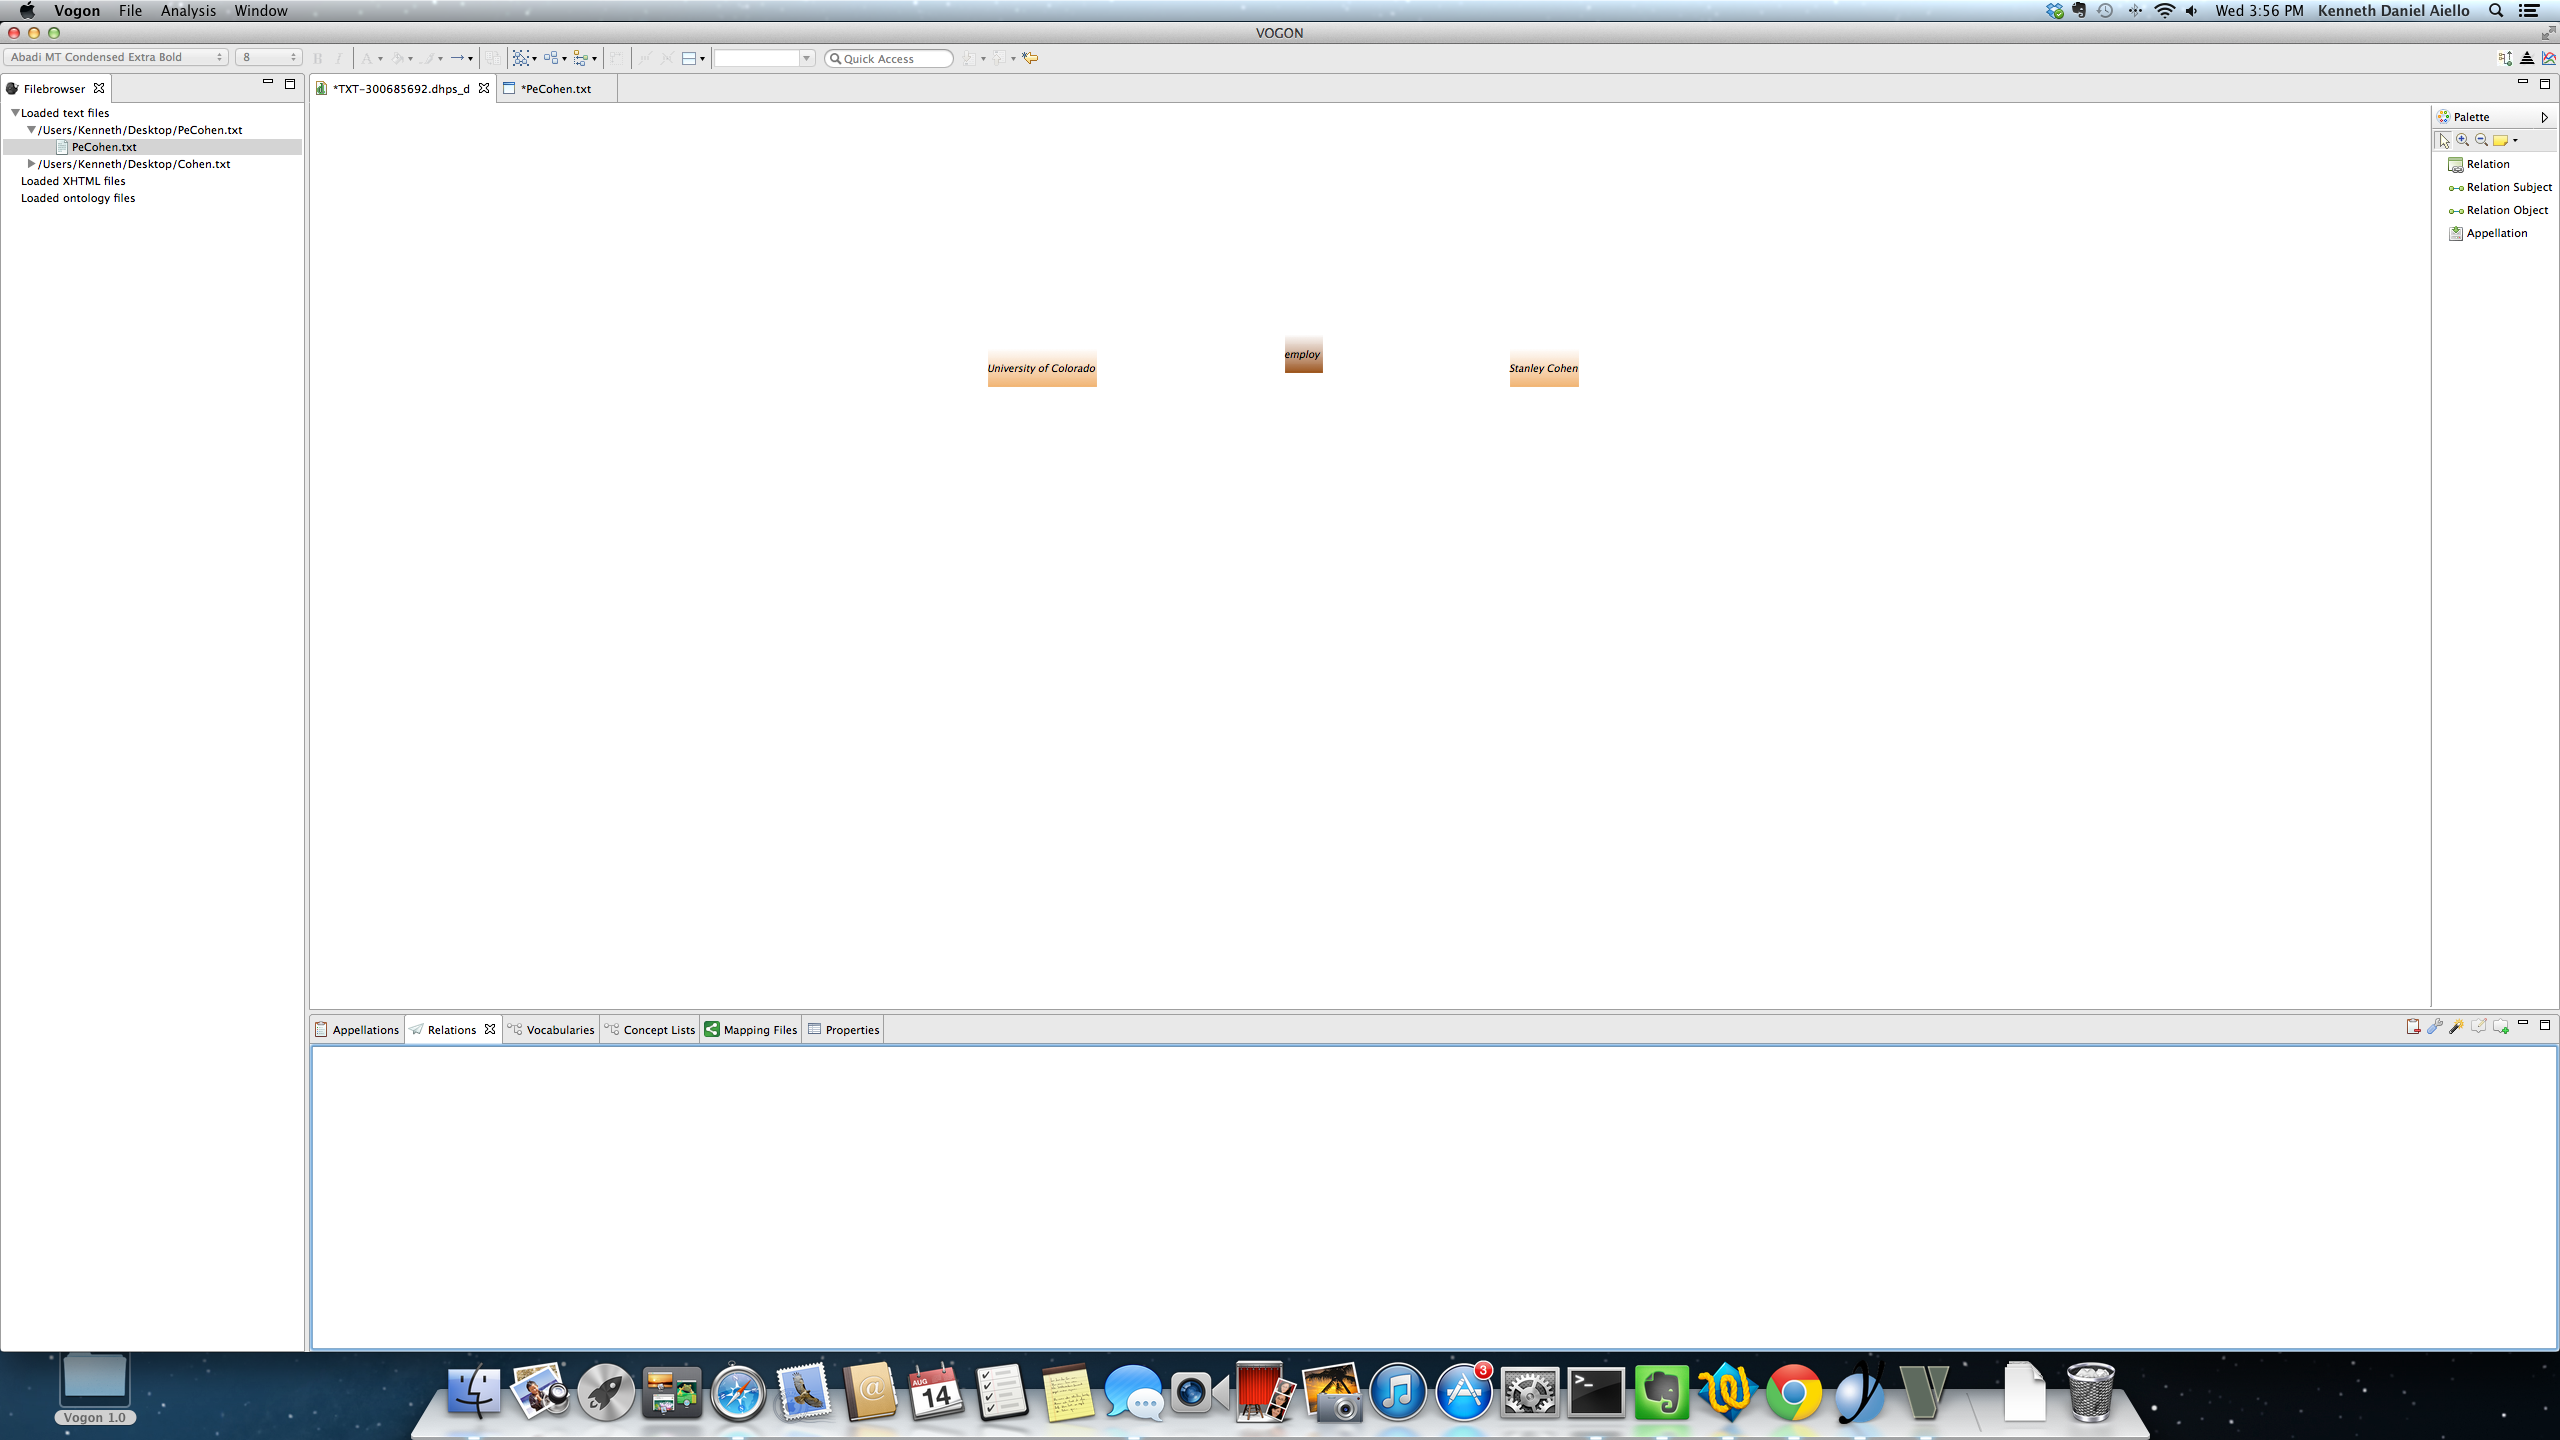
8.8. Complex Sentences or Nested Triples
The triples structure can be used in Vogon to create multiple triples that are related or connected to each other, these are nested triples. A nested triple is part of one triple referencing or being part of another triple. A nested triple, relationship or relation are all synonymous. Nested triples are used to help convey additional information about parts of a text and used to build networks. Relations can be created based to meet individual project needs. Theoretically, there is an infinite number of relations (triples or nested triples) that can be created with Vogon.
The Standard Graph (SG) Collection has templates for specific nested triples or relations to be used in Vogon. The examples shown in this tutorial are based on the SG Collection. The SG templates can be used with the mapping function in Vogon (more details on this function in future updates of the tutorial). The next section of the tutorial will review the SG templates.
Nested triples can be created both in the Text and Graphical editor. All nested triples are visible in the Relations Tab, Text Editor, and Graphical Editor. The directionality of the relations used in Nested Triples is extremely important.
8.8.1. Nested Triple Theory
The Nested Triple Theory builds on the relationship triple theory used in Vogon.The Nested Triple Theory uses subjects, predicates, and objects. Nested triples have specific directionality. This directionality provides direction and understanding of the nested triple.
A single triple may be a part of multiple nested triples. The specific directionality of the nested triple indicates which other triples are included when looking at a network of multiple Nested Triples.
For example,
Triple 1 is part of Triple 2 and Triple 3.
Triple 2 is part of Triple 1, but not a part of Triple 3.
Triple 3 is part of Triple 1, but not a part of Triple 2.
or simplifying each triple as; Rn (n=1,2,3,...) = (Subject n) (Predicate n) (Object n)
R1 is the subject of R2
R1 is the subject of R3
R2 and R3 are not connected and have no directionality.
8.8.2. Visualizing Nested Triples
Any triple can become the subject or the object of another triple. The same Subjects and Objects can be used in multiple triples.
Nested triples are connected by the predicates of each triple.
For example let’s look at the sentence:
The University of Colorado employed Stanley Cohen in 1948.We are familiar with the first triple from this sentence:
Subject of first triple = University of Colorado
Predicate of first triple = employ
Object of first triple = Stanley Cohen
Represented in the Relation Tab as R1 << [Subj: University of]:[Pred:employ][Obj:Stanley Cohen] >>]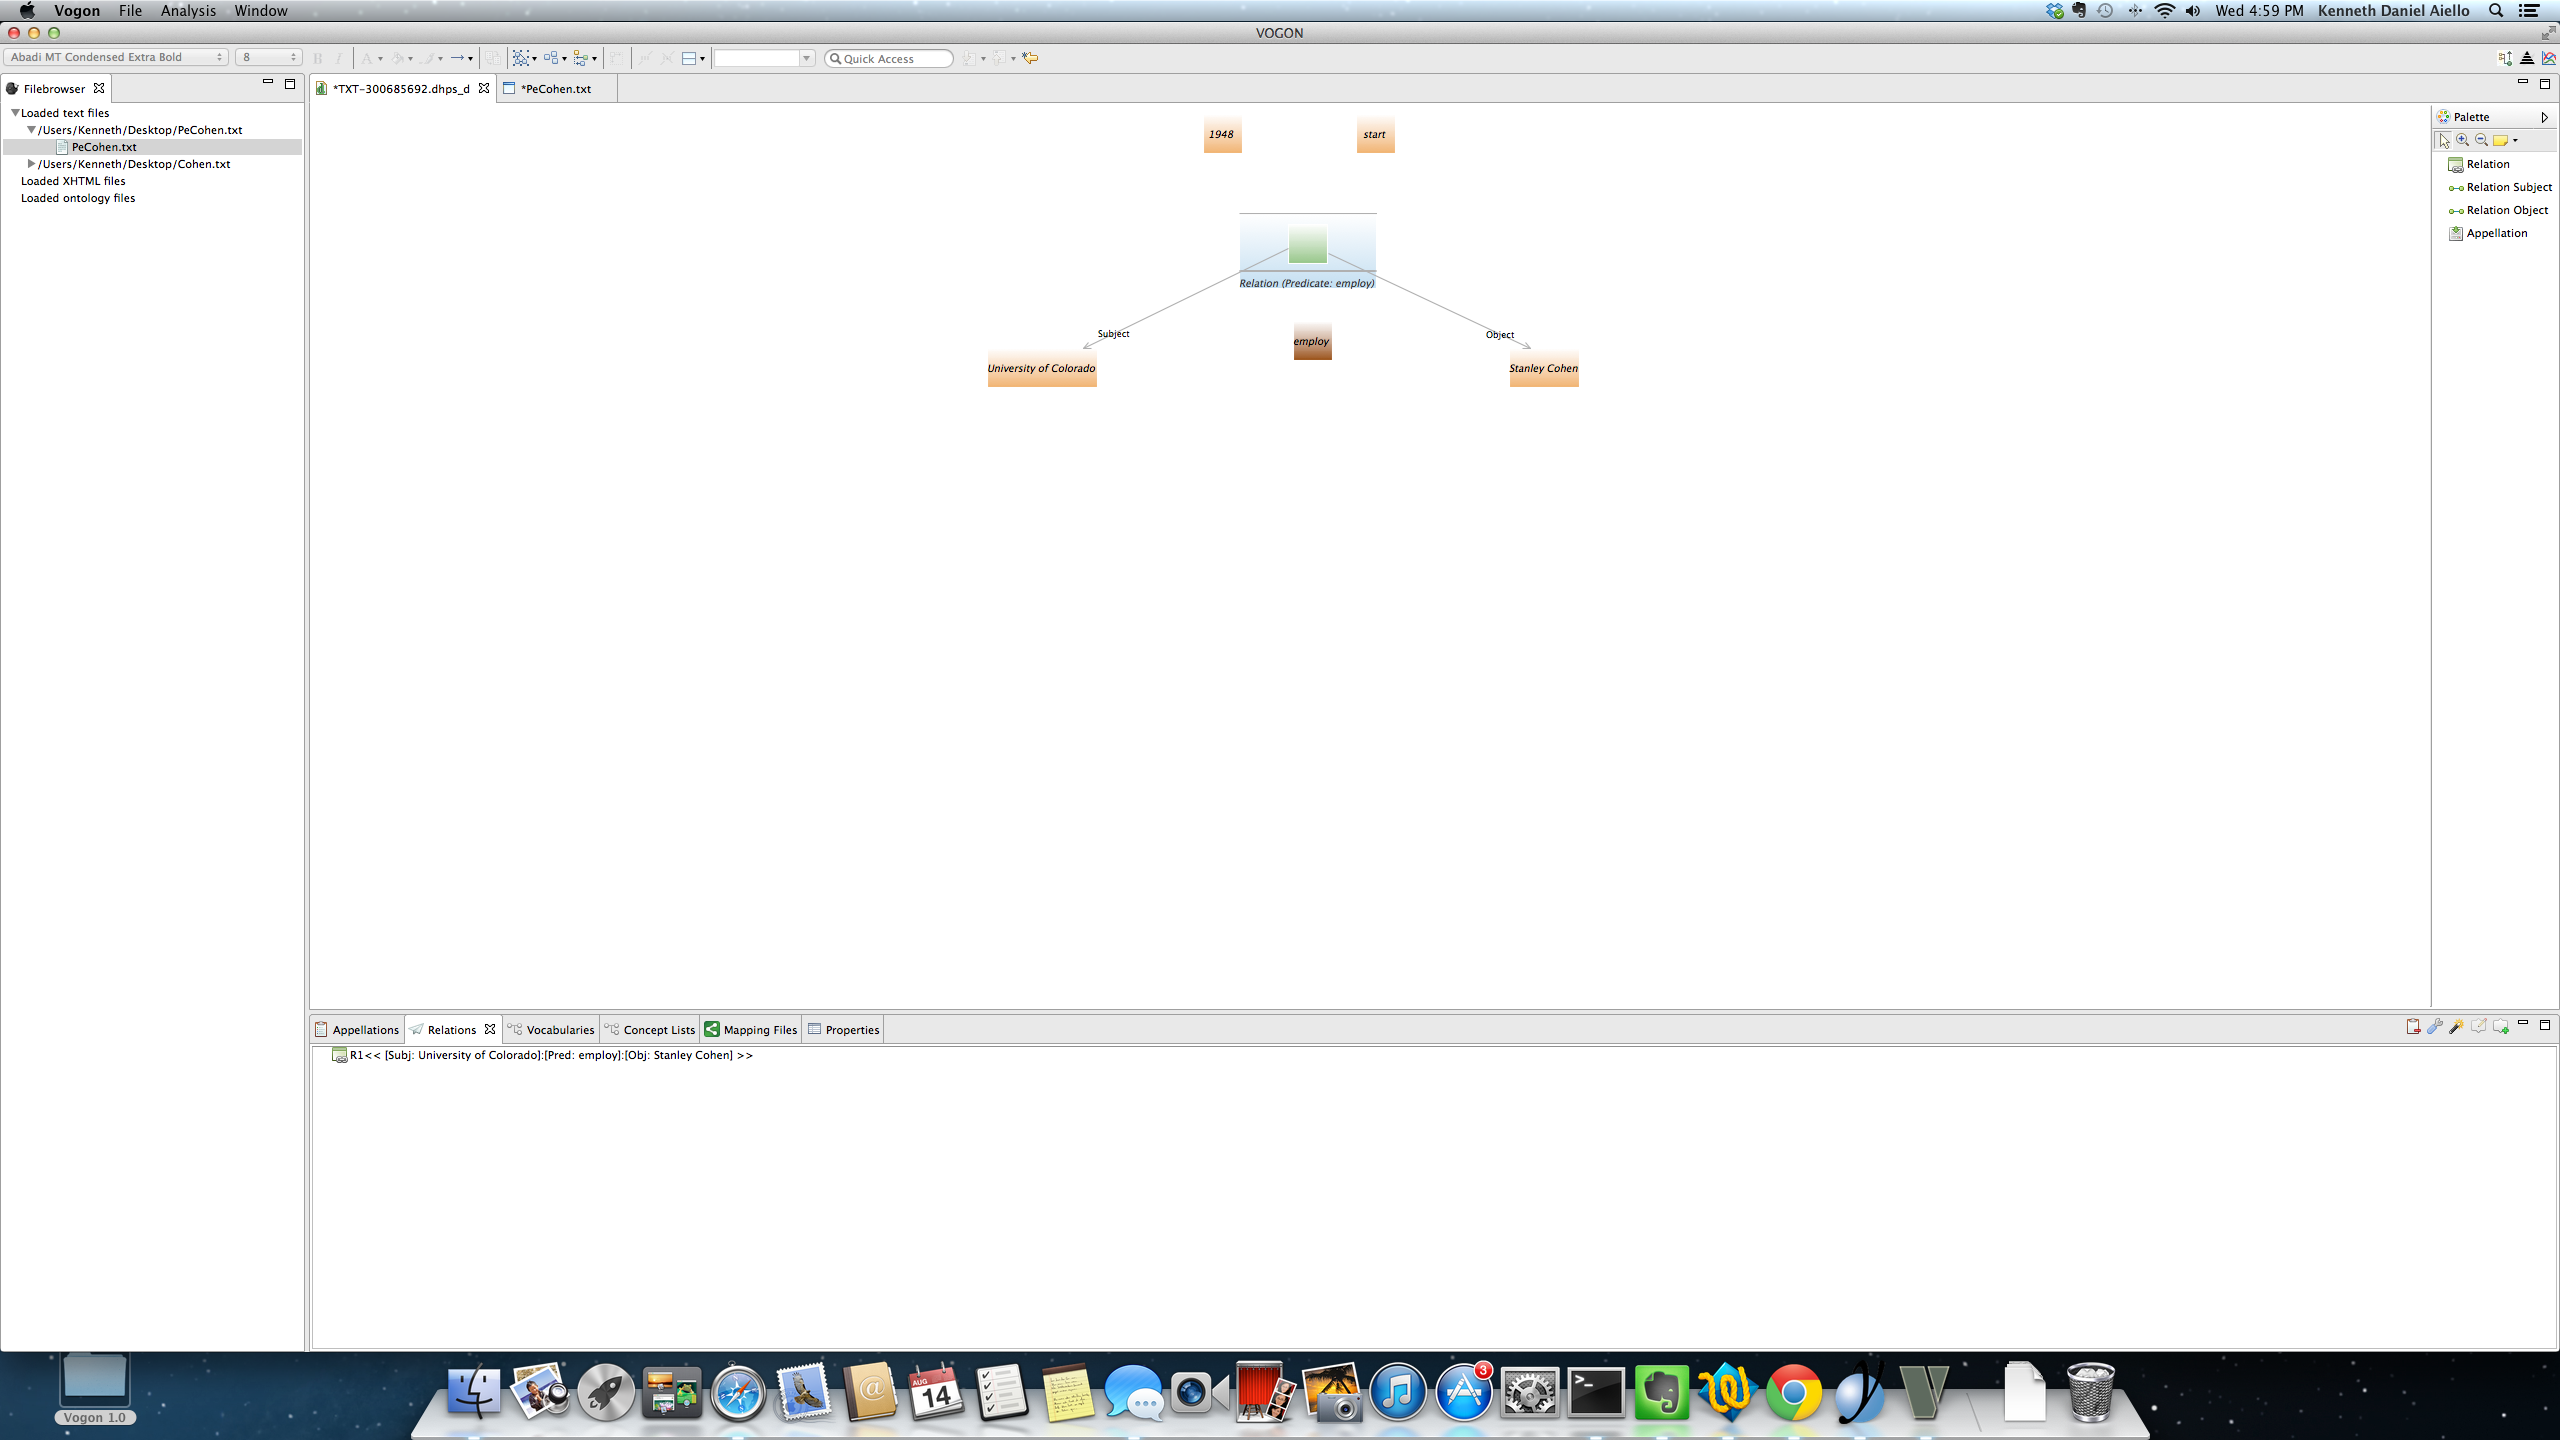
8.8.3. Connecting two triples (R1 as the Subject of another triple)
For all nested triples one triple will be the Subject or Object of another triple.
Continuing with this example, let’s abbreviate the first triple we made as R1
In the sentence:
The University of Colorado employed Stanley Cohen in 1948. R1; R1 = << [Subj: University of Colorado ]:[Pred:employ][Obj:Stanley Cohen] >>].
The second triple helps us convey when Stanley Cohen started working for the University of Colorado. The second triple is inferred from the meaning of the sentence.
The second triple’s parts are:
Subject of second triple = R1 (the first triple becomes the Subject for the second triple or R2)
Predicate of second triple = start
Object of second triple = 1948
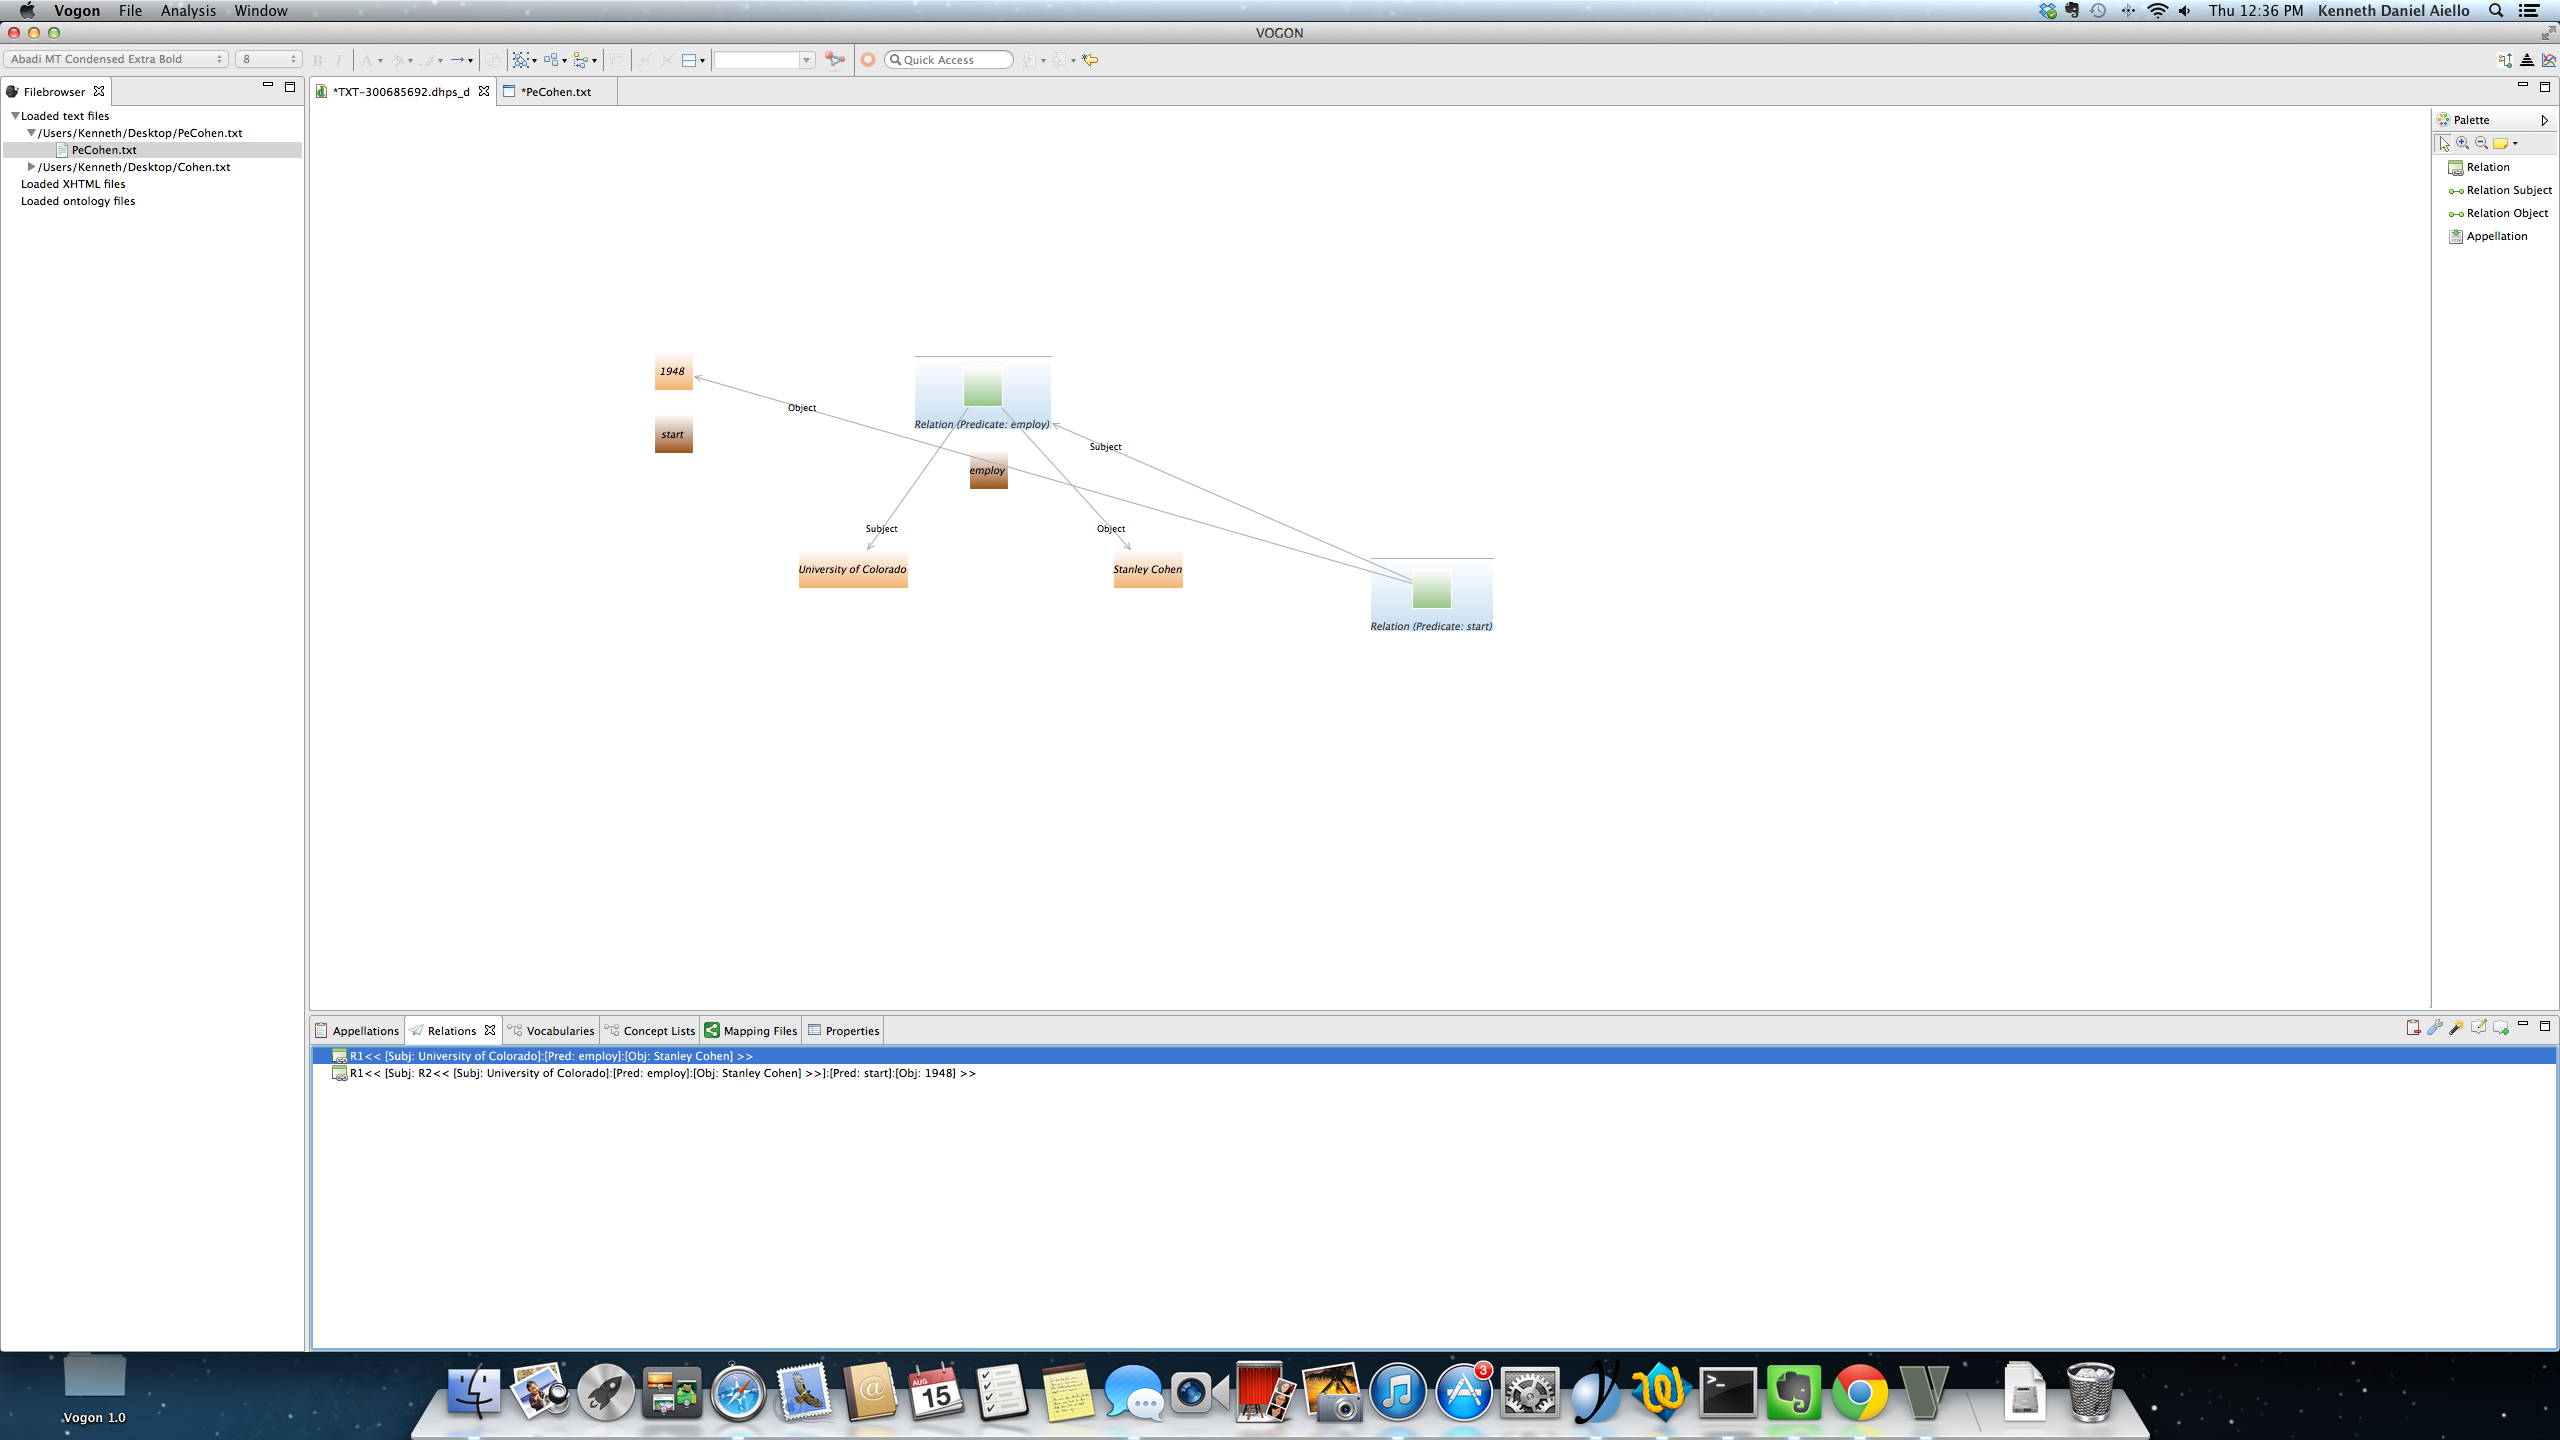
In the Graphical Editor Main Window the subject connector from R2 is connected to the Relation Compartment box Predicate:employ of R1. This nested triple is represented in the Relation tab in triples format as:
R1 << [Subj: R2 [Subj: University of Colorado ]:[Pred:employ][Obj:Stanley Cohen] >>]:[Pred: start] [Obj:1948] >>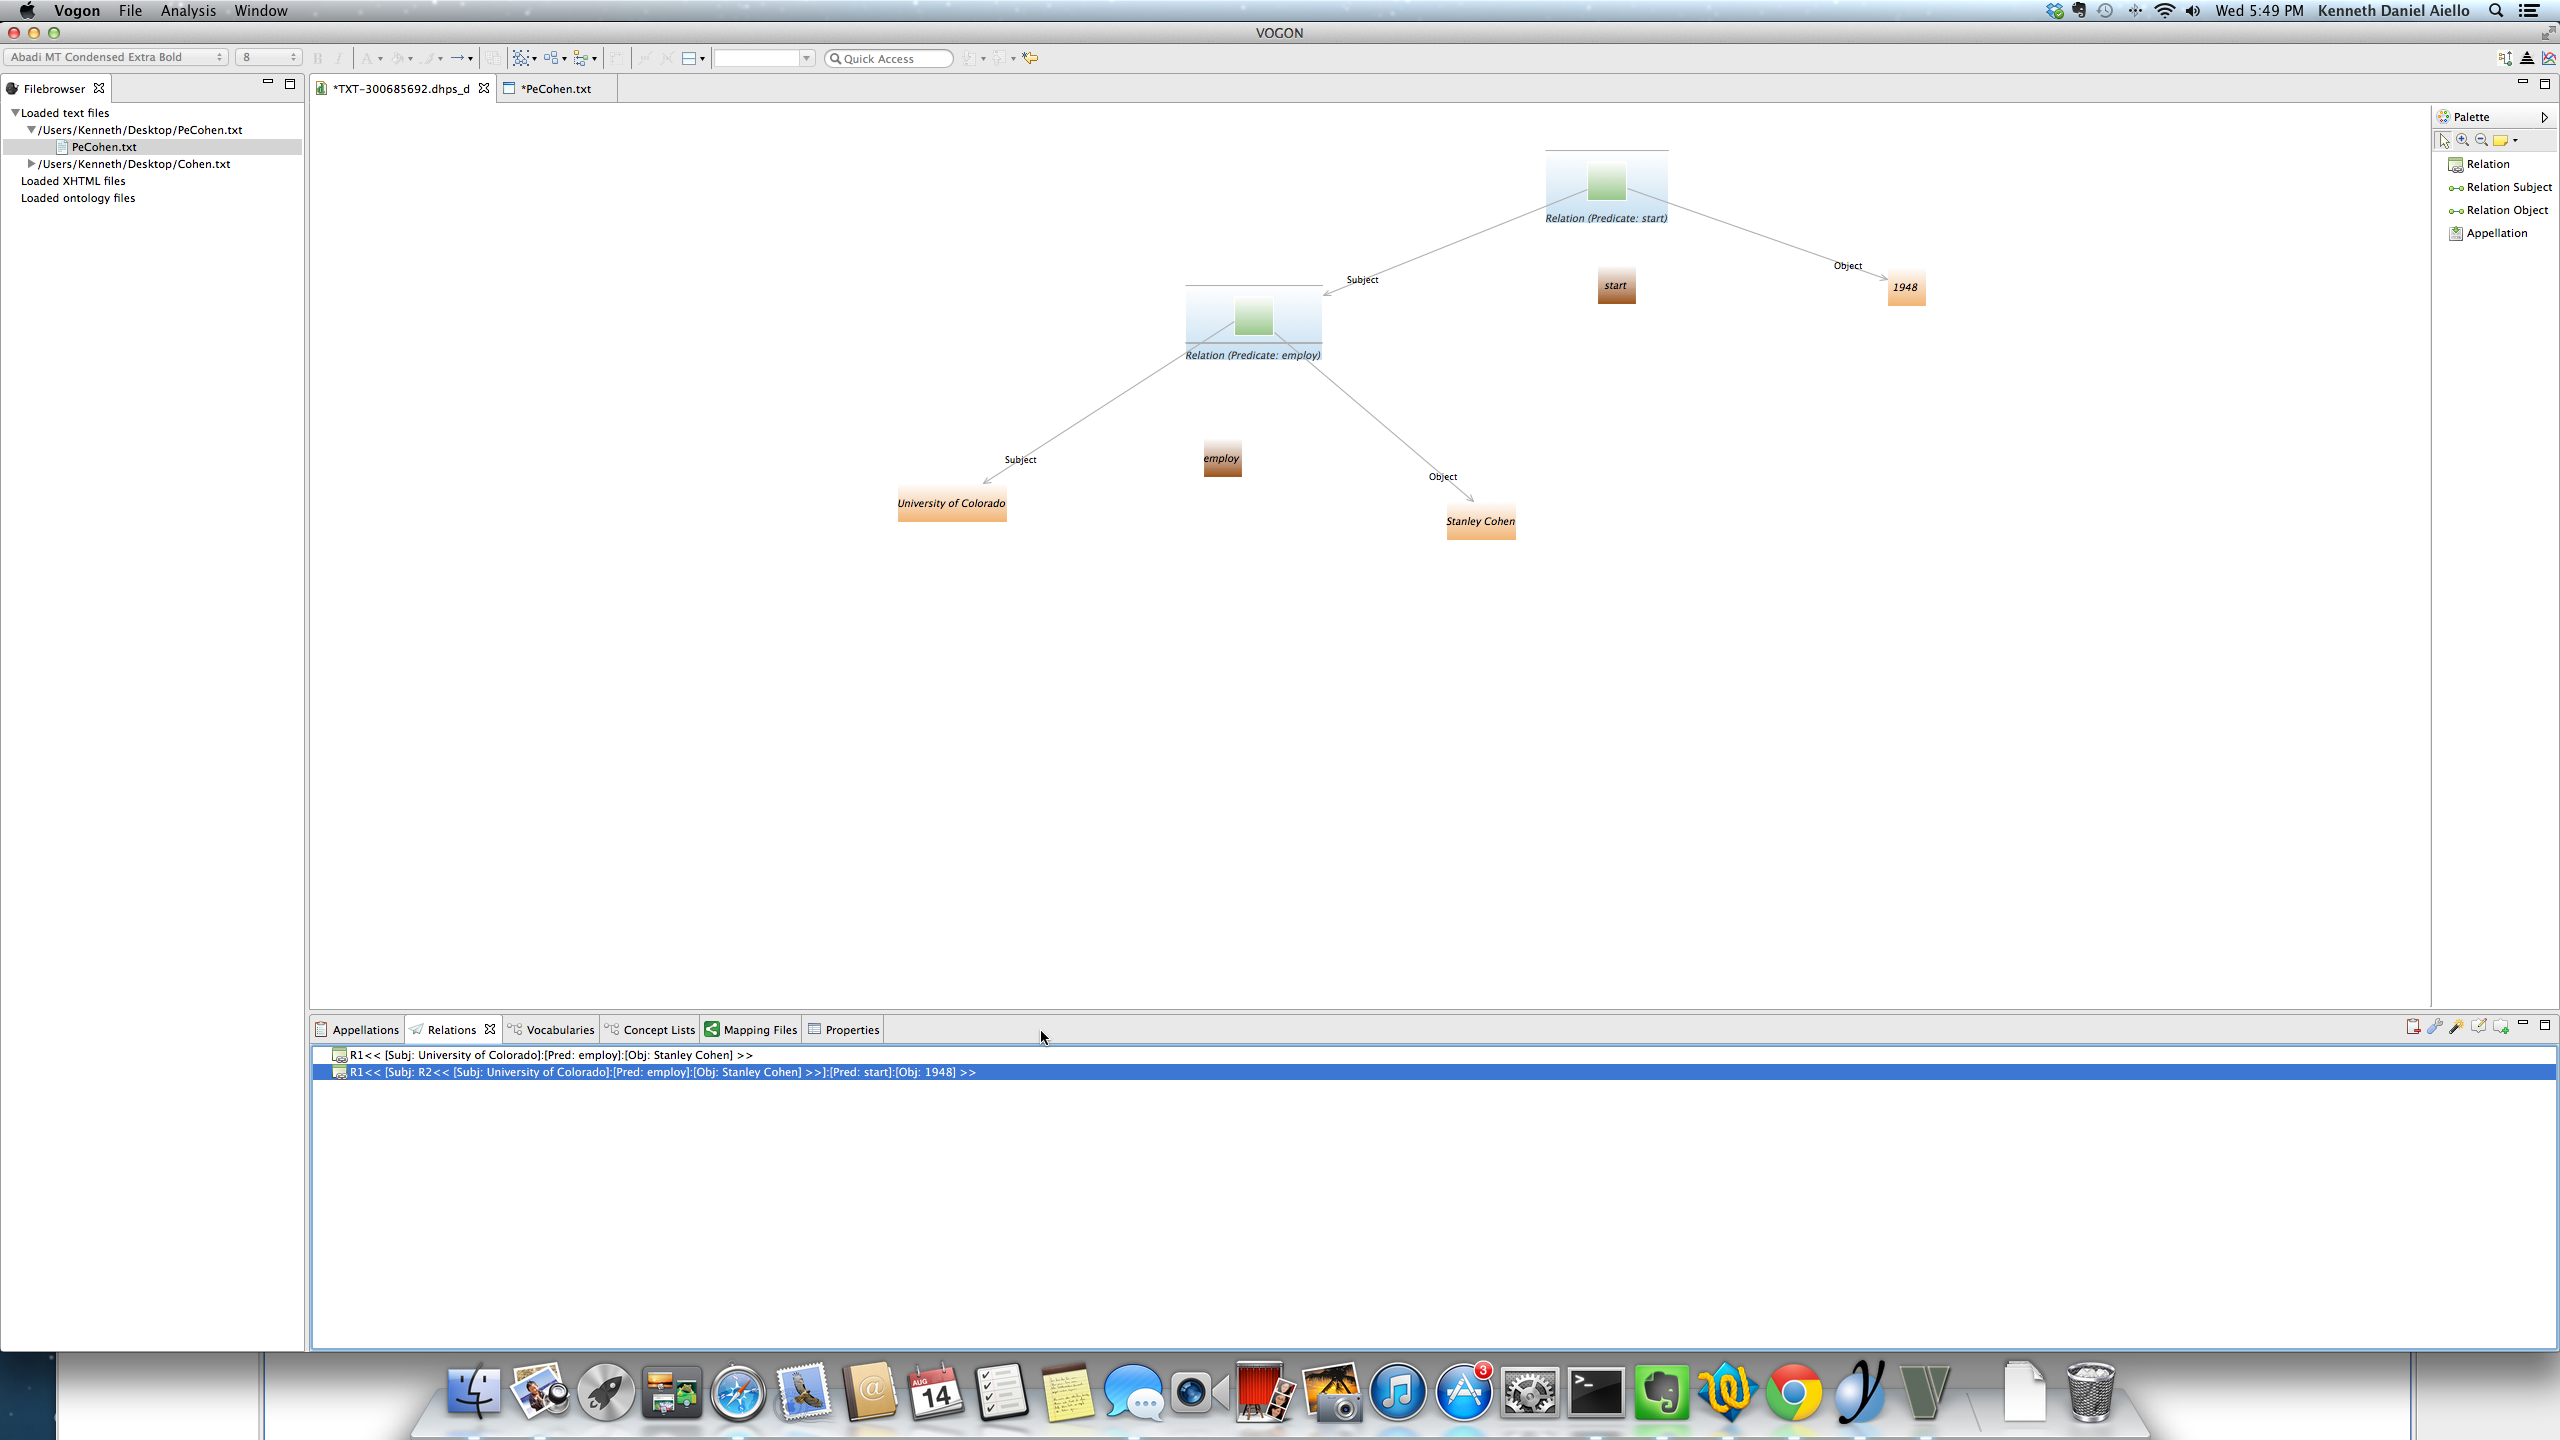
8.8.4. Creating nested triples in Vogon
The Relations Tab is used in both Text and Graphical editor to create nested triples in Vogon.
8.8.5. Creating Nested Triples in the Text Editor using the Relation Tab
Creating a Nested Triple in the Text Editor requires for all appellated words that are part of the Nested Triple to be previously appellated. Once all words for the entire Nested Triple are appellated each individual triple or relation of the Nested Triple is created one triple at a time.
For example,
In the sentence:
The University of Colorado employed Stanley Cohen in 1948.
- The oringinal triple has already been created and is visible in the Text Editor Main Window and the Relation tab as:
- R1 << [Subj: University of Colorado]:[Pred:employ][Obj:Stanley Cohen] >>]

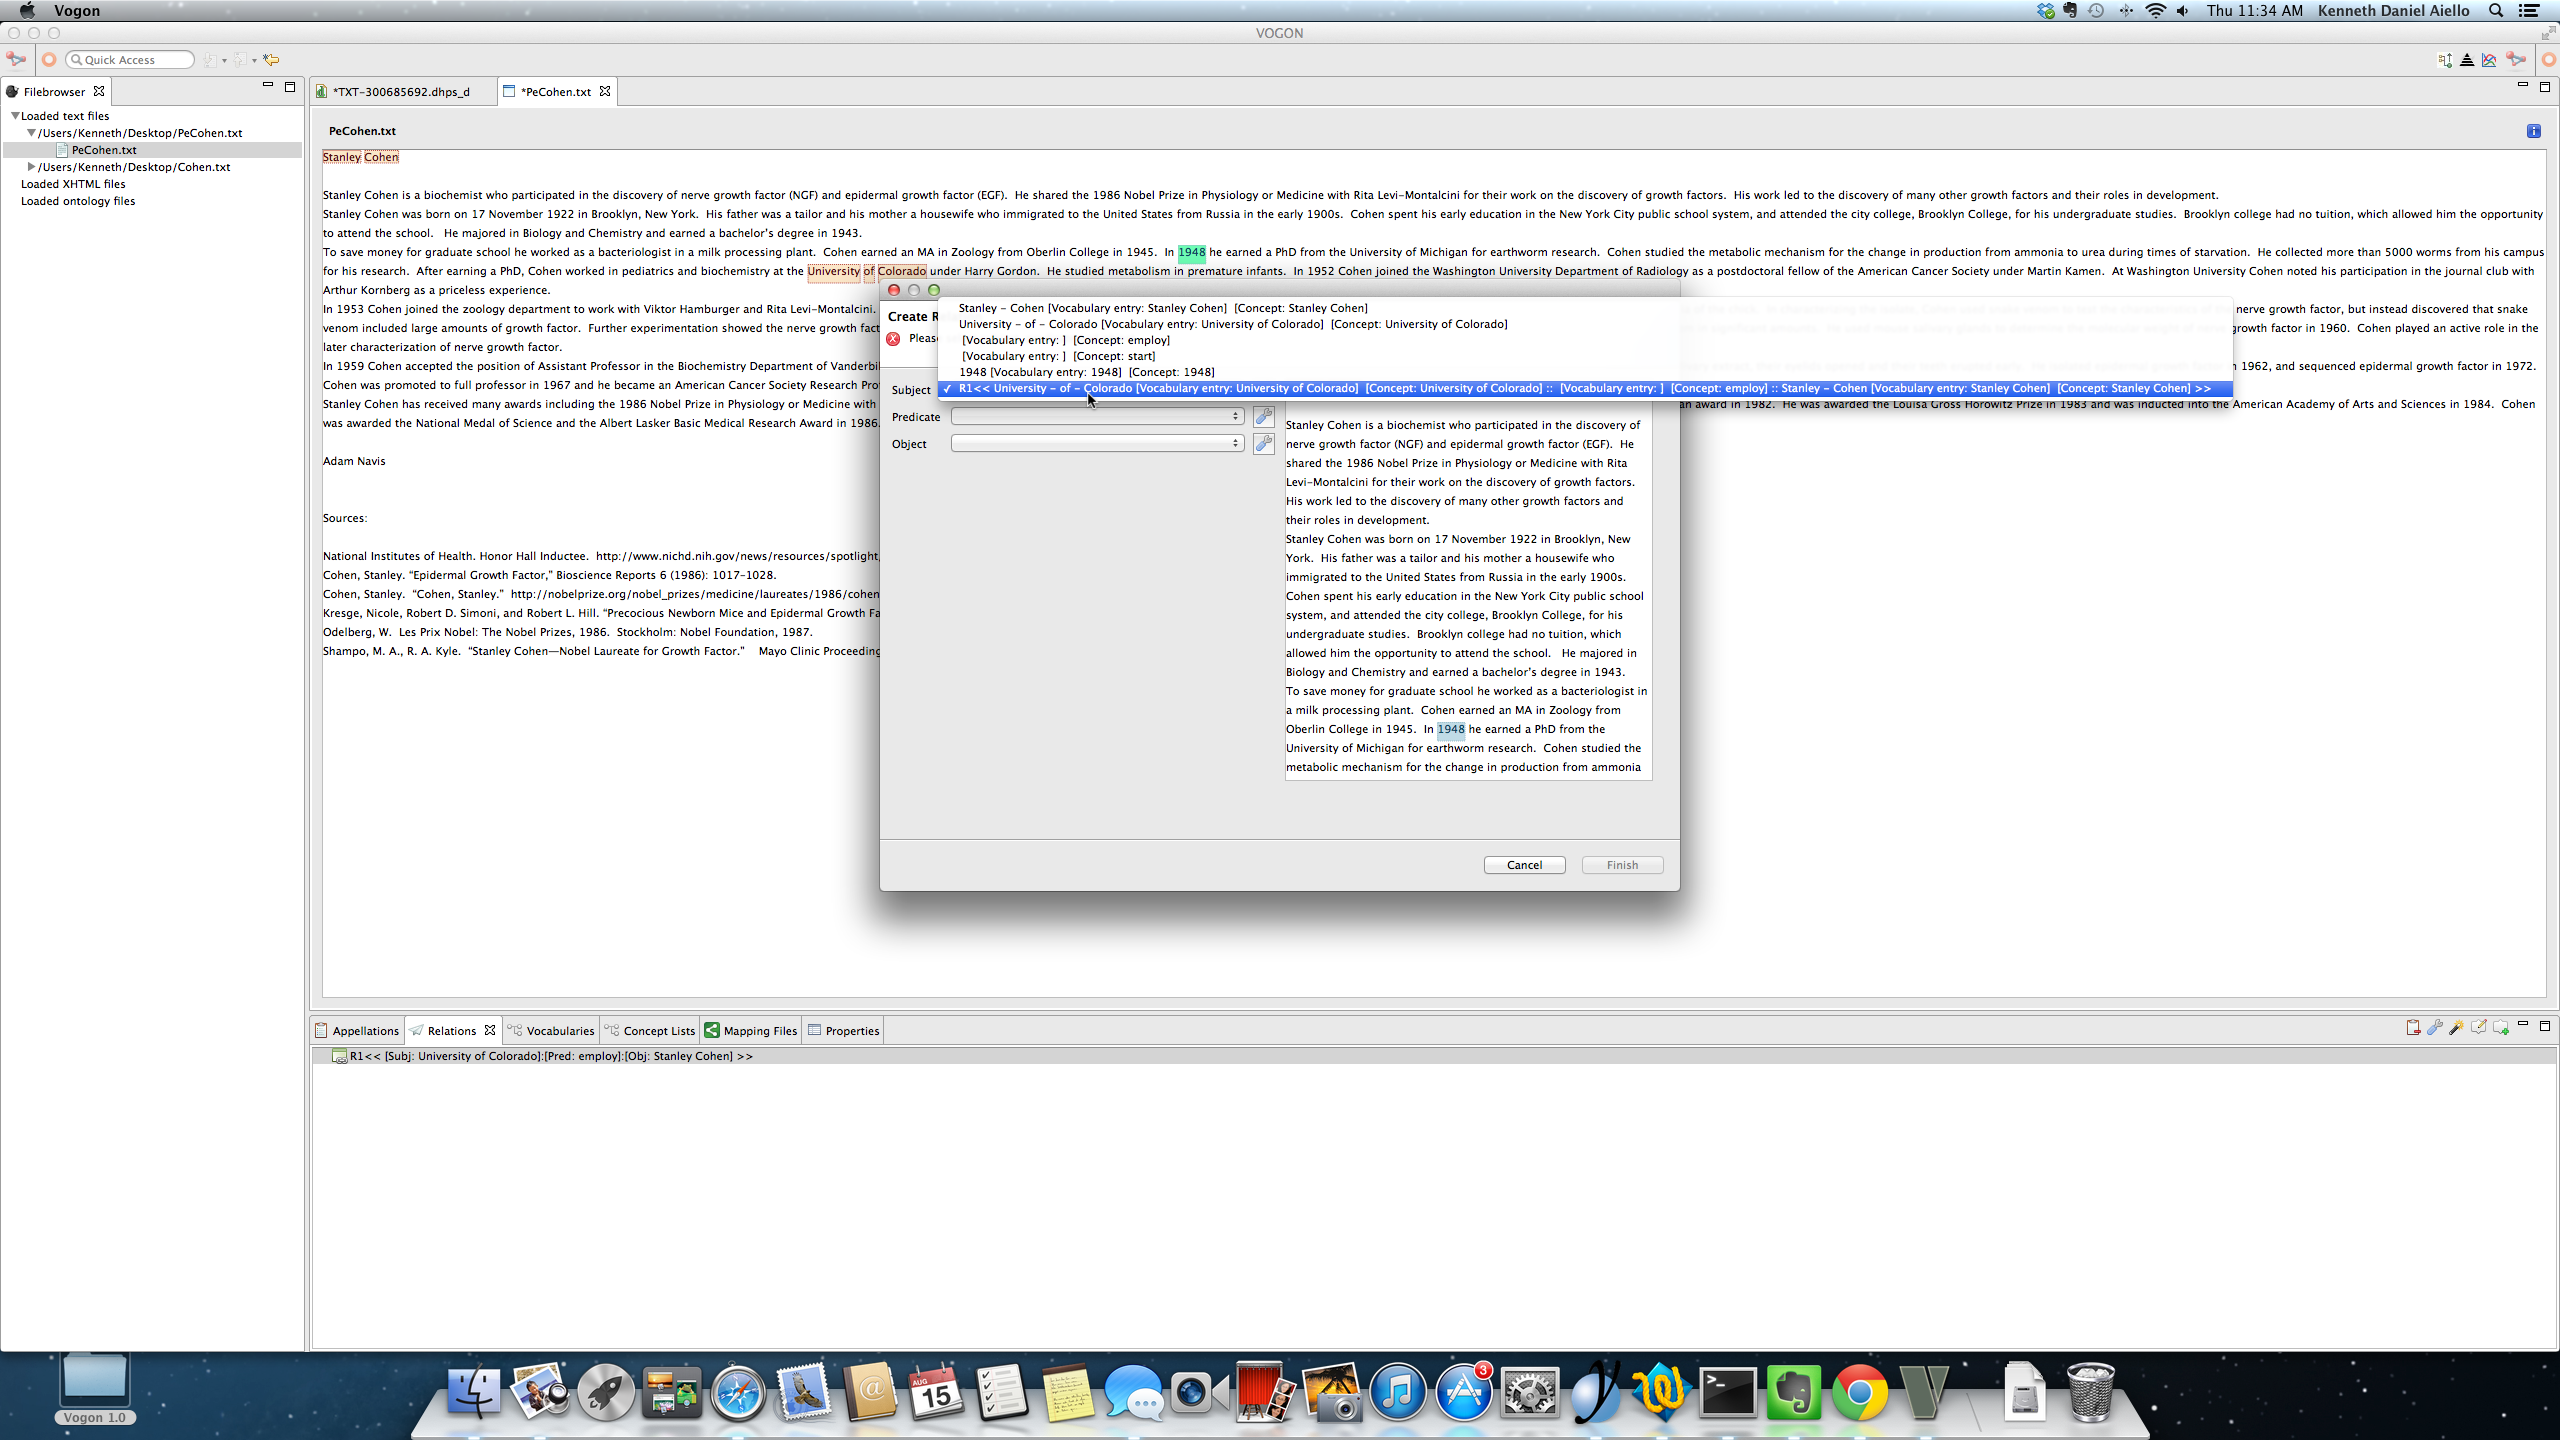
After a triple has been created the next triple is created clicking on the Add New Relation button in the Relation Tab. After clicking on the Add New Relation button the Create Relation Window pops up. Here the user can select any relation to be used as part of the current relation they are building.
Triples can only be used as Subjects or Objects.
For example,
- The original triple was already created and is visible in the Relation tab as R1 << [Subj: University of]:[Pred:employ][Obj:Stanley Cohen] >>]
- The next triple will use the original triple as the next triple’s subject.
Finish the next triple by populating the corresponding predicate and object of the next triple. Once you have populated both the Predicate and Object Relation Triple Bars then click on the blue Finish button.
Continuing with the current example, the next triple has (Subject = R1) (Predicate = start) (Object = 1948).

After clicking on Finish the next triple has been completed and all appellated words that are part of the nested triple or relation have changed color from green to orange in the Text Editor Main Window. The relations tab is now populated with both the original relation (R1) and the next relation
In this example,
The appellated words Stanley Cohen, University of Colorado, and 1948 are orange in the Text Editor Main Window.
- The Relation tab has been populated with the Nested Triple:
- R1 << [Subj: R2 [Subj: University of Colorado ]:[Pred:employ][Obj:Stanley Cohen] >>]:[Pred: start] [Obj:1948] >>

8.8.6. Creating Nested Triples in the Graphical Editor using the Relation Tab
Creating a Nested Triple in the Graphical Editor requires for all appellated words that are part of the Nested Triple to be previously appellated. You cannot create Nested Triples using the Palette Bar or Graphical Editor Sub-Window Quick List. The only way to create Nested Triples in the Graphical Editor is to use the Relation Tab.
For example,
In the sentence:
The University of Colorado employed Stanley Cohen in 1948.
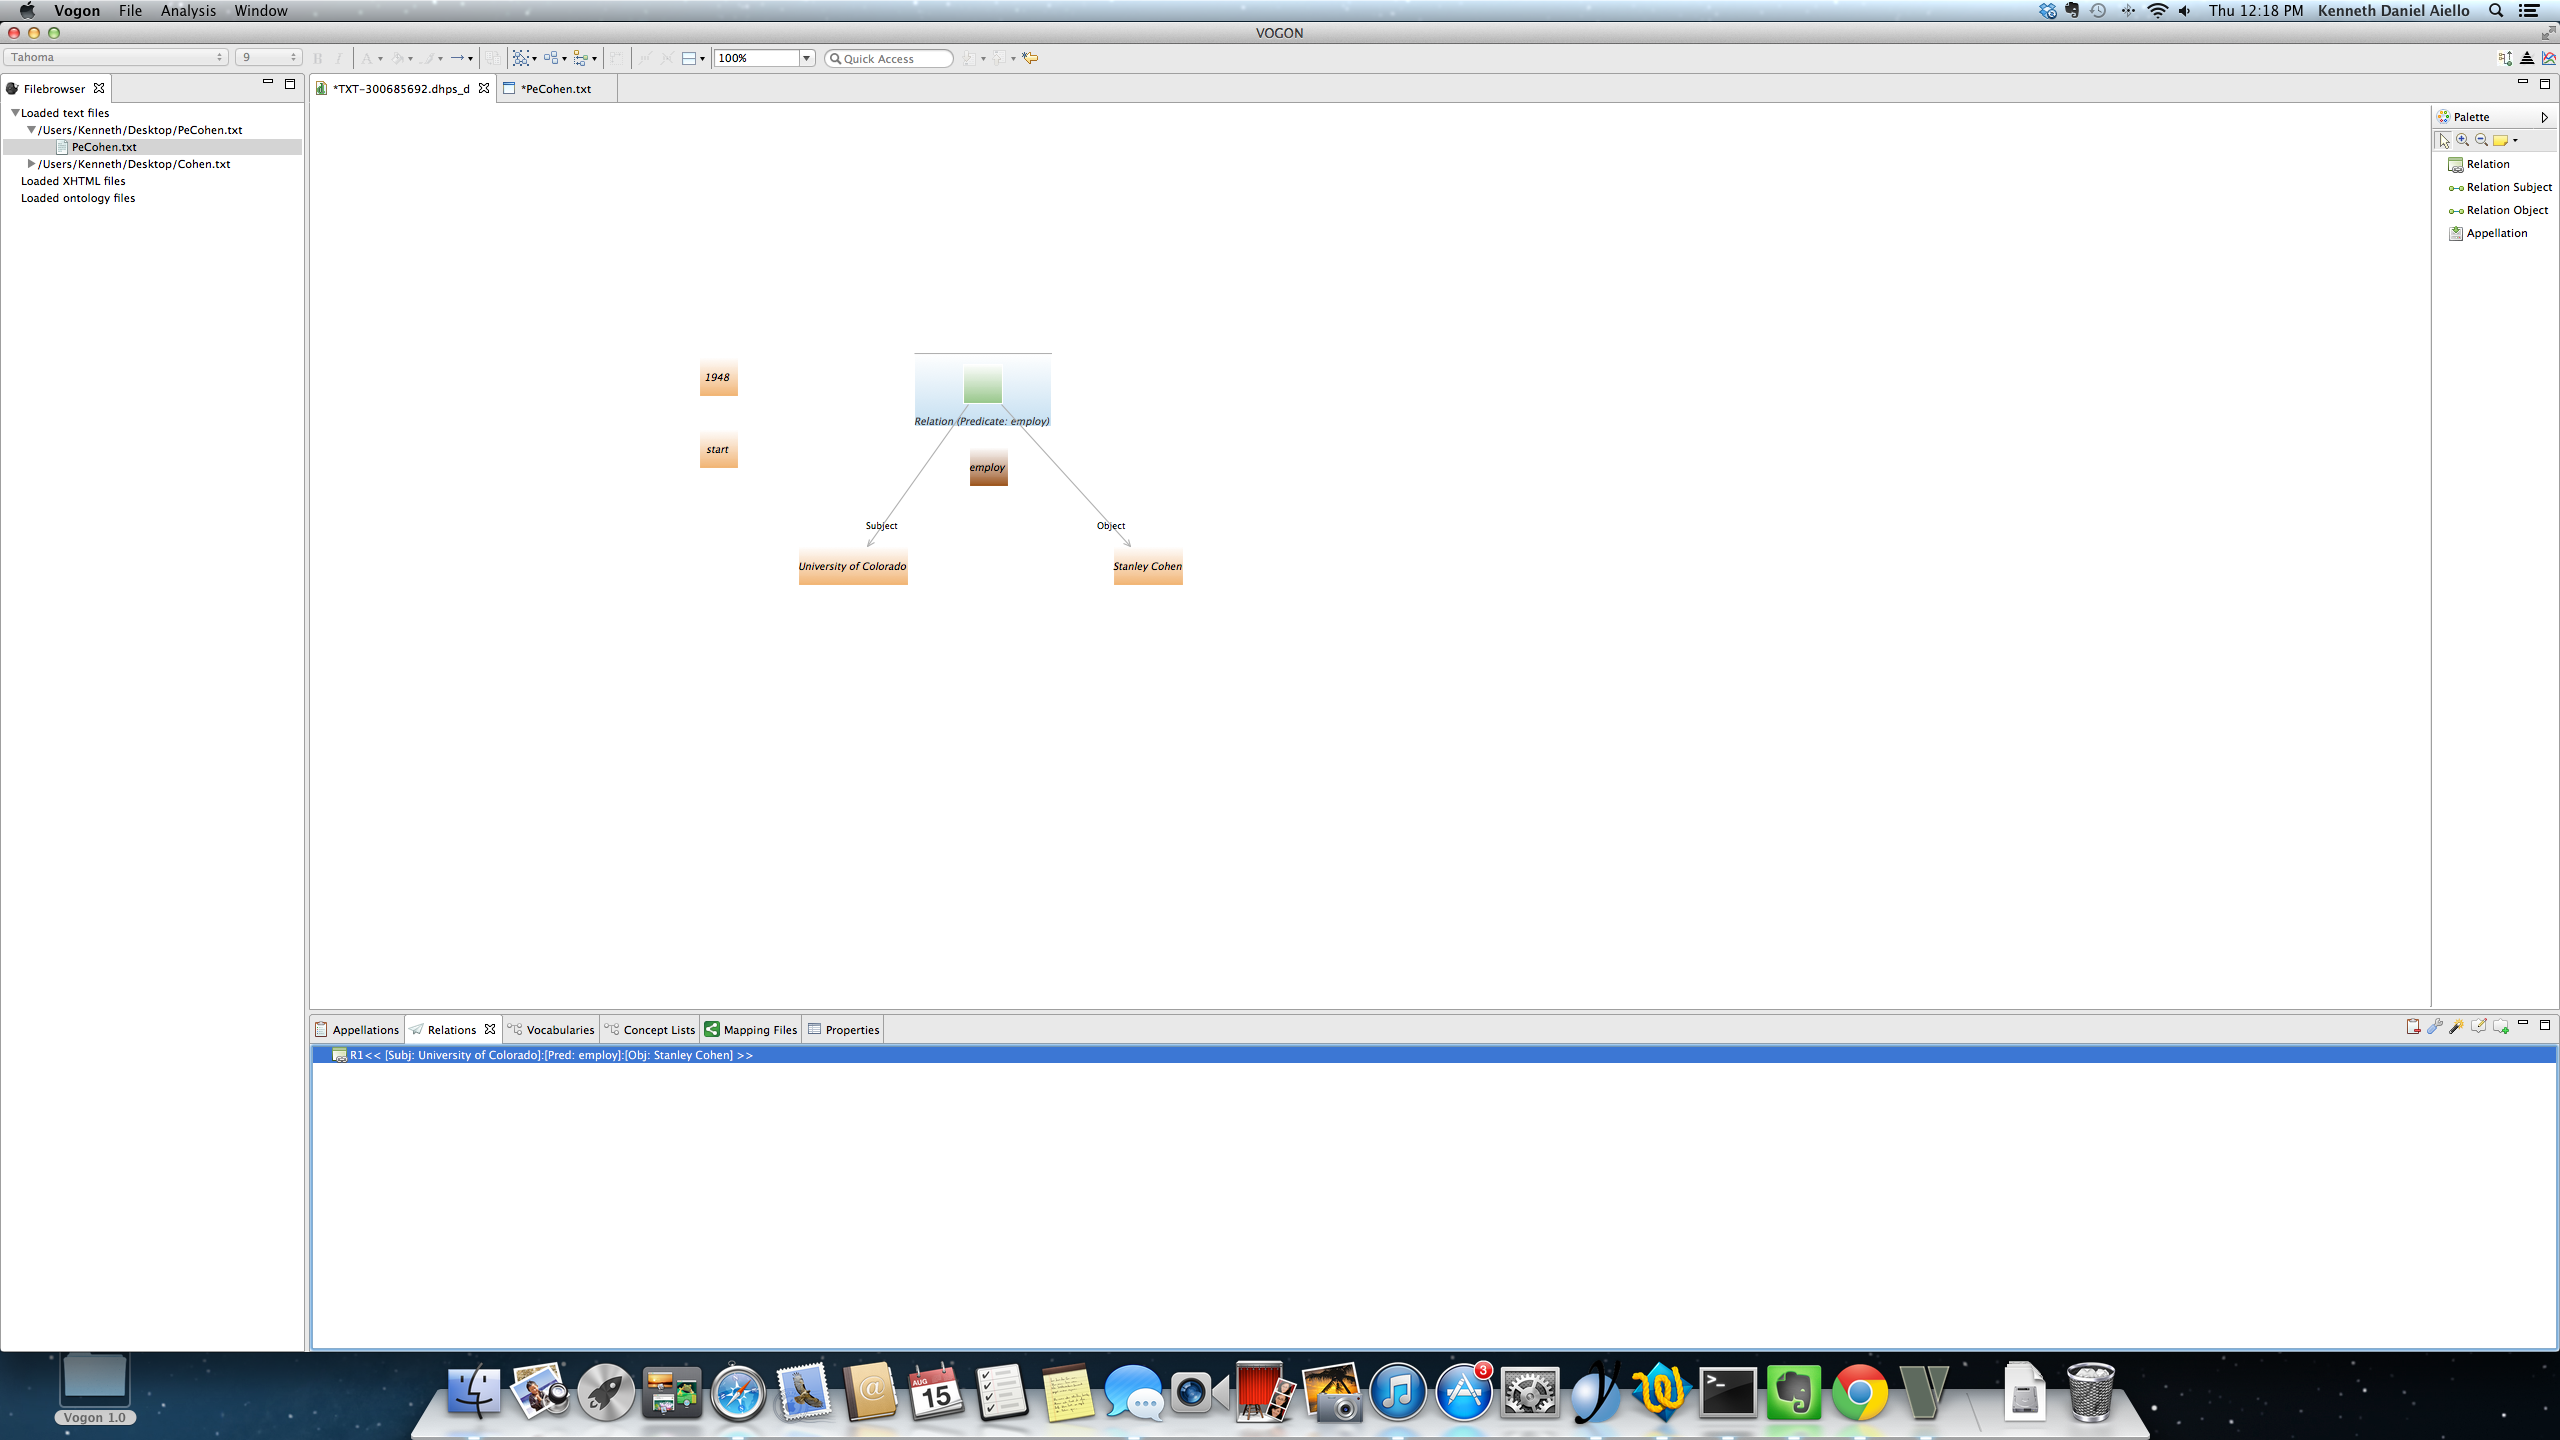
All words that are going to be part of the Nested Triple are appellated. The appellated words 1948 and start are in orange boxes to the left of the triple.
- The original triple has been created and is visible in the Graphical Editor Main Window:
- University of Colorado- subject connector - Relation Event Compartment box (Predicate:employ) - object connector - (Stanley Cohen)
- The oringinal triple has already been created and is visible in the Relation tab as:
- R1 << [Subj: University of Colorado]:[Pred:employ][Obj:Stanley Cohen] >>]
After a triple has been created the next triple is created clicking on the Add New Relation button in the Relation Tab. After clicking on the Add New Relation button the Create Relation Window pops up. Here the user can select any relation to be used as part of the current relation they are building.
Triples can only be used as Subjects or Objects.
For example,
The original triple was already created and is visible in the Relation tab as R1 << [Subj: University of]:[Pred:employ][Obj:Stanley Cohen] >>] The next triple will use the original triple as the next triple’s subject.
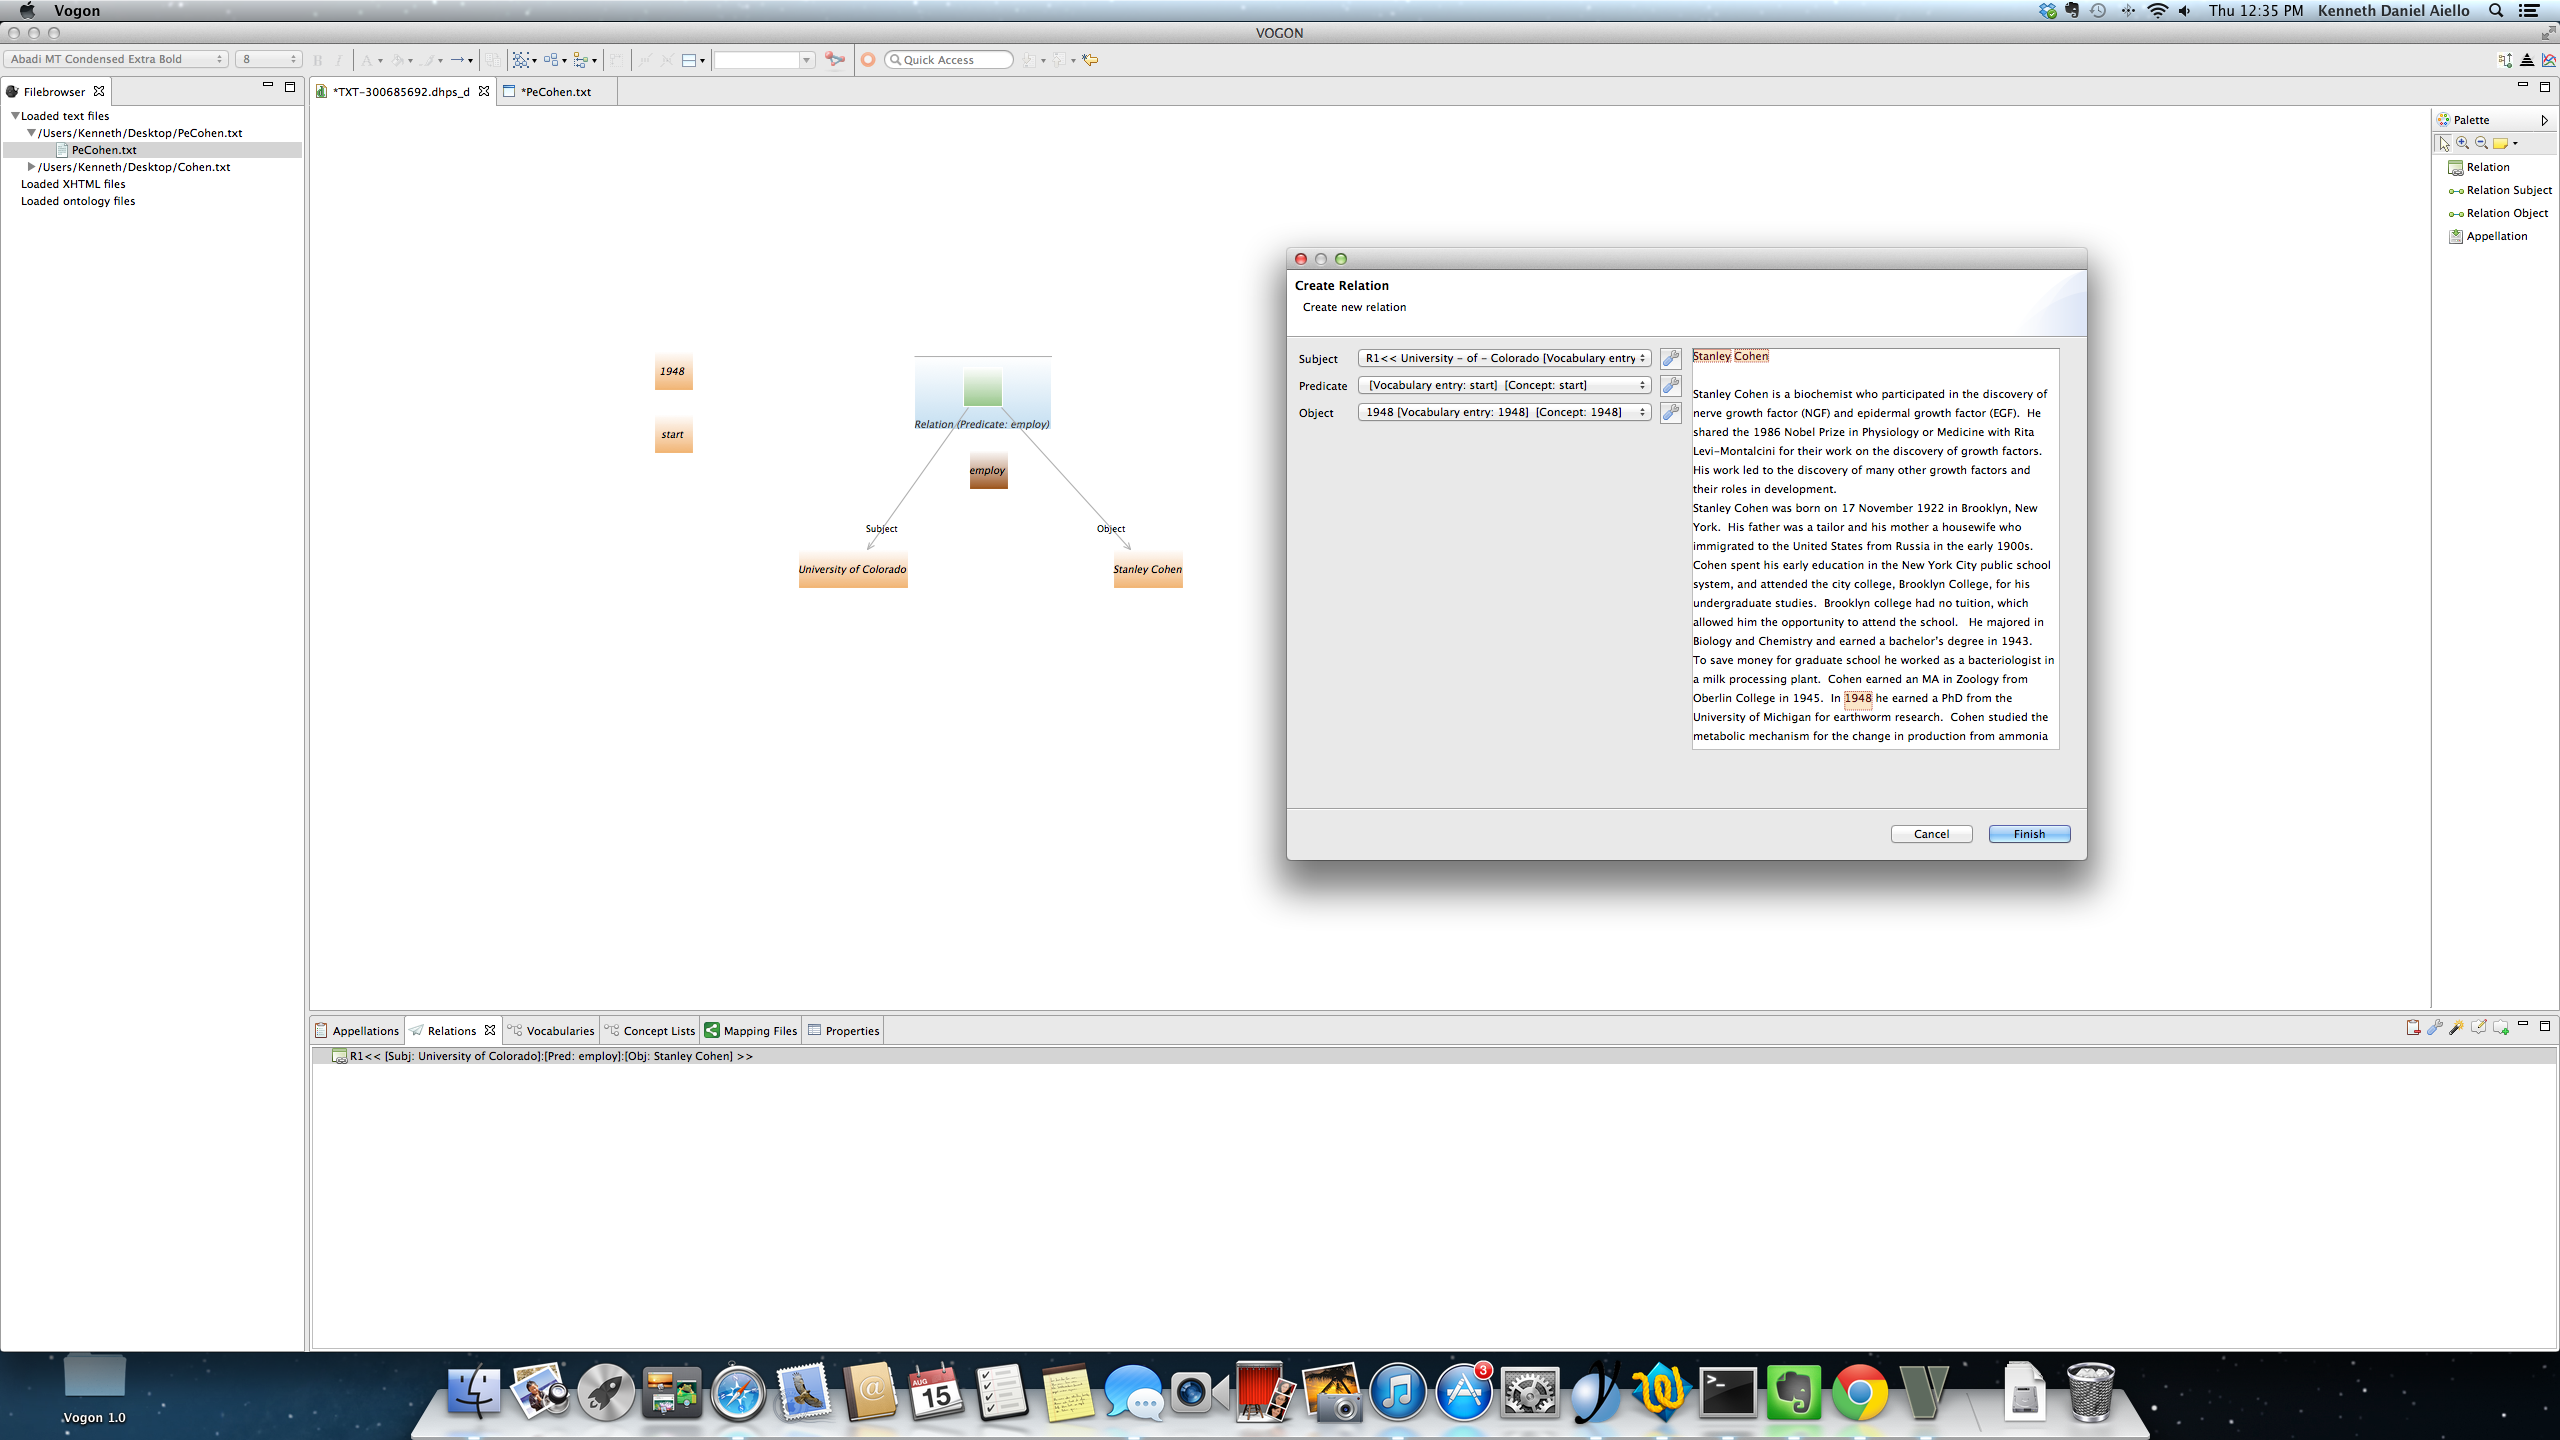
Finish the next triple by populating the corresponding predicate and object of the next triple. Once you have populated both the Predicate and Object Relation Triple Bars then click on the blue Finish button.
Continuing with the current example, the next triple has (Subject = R1) (Predicate = start) (Object = 1948).
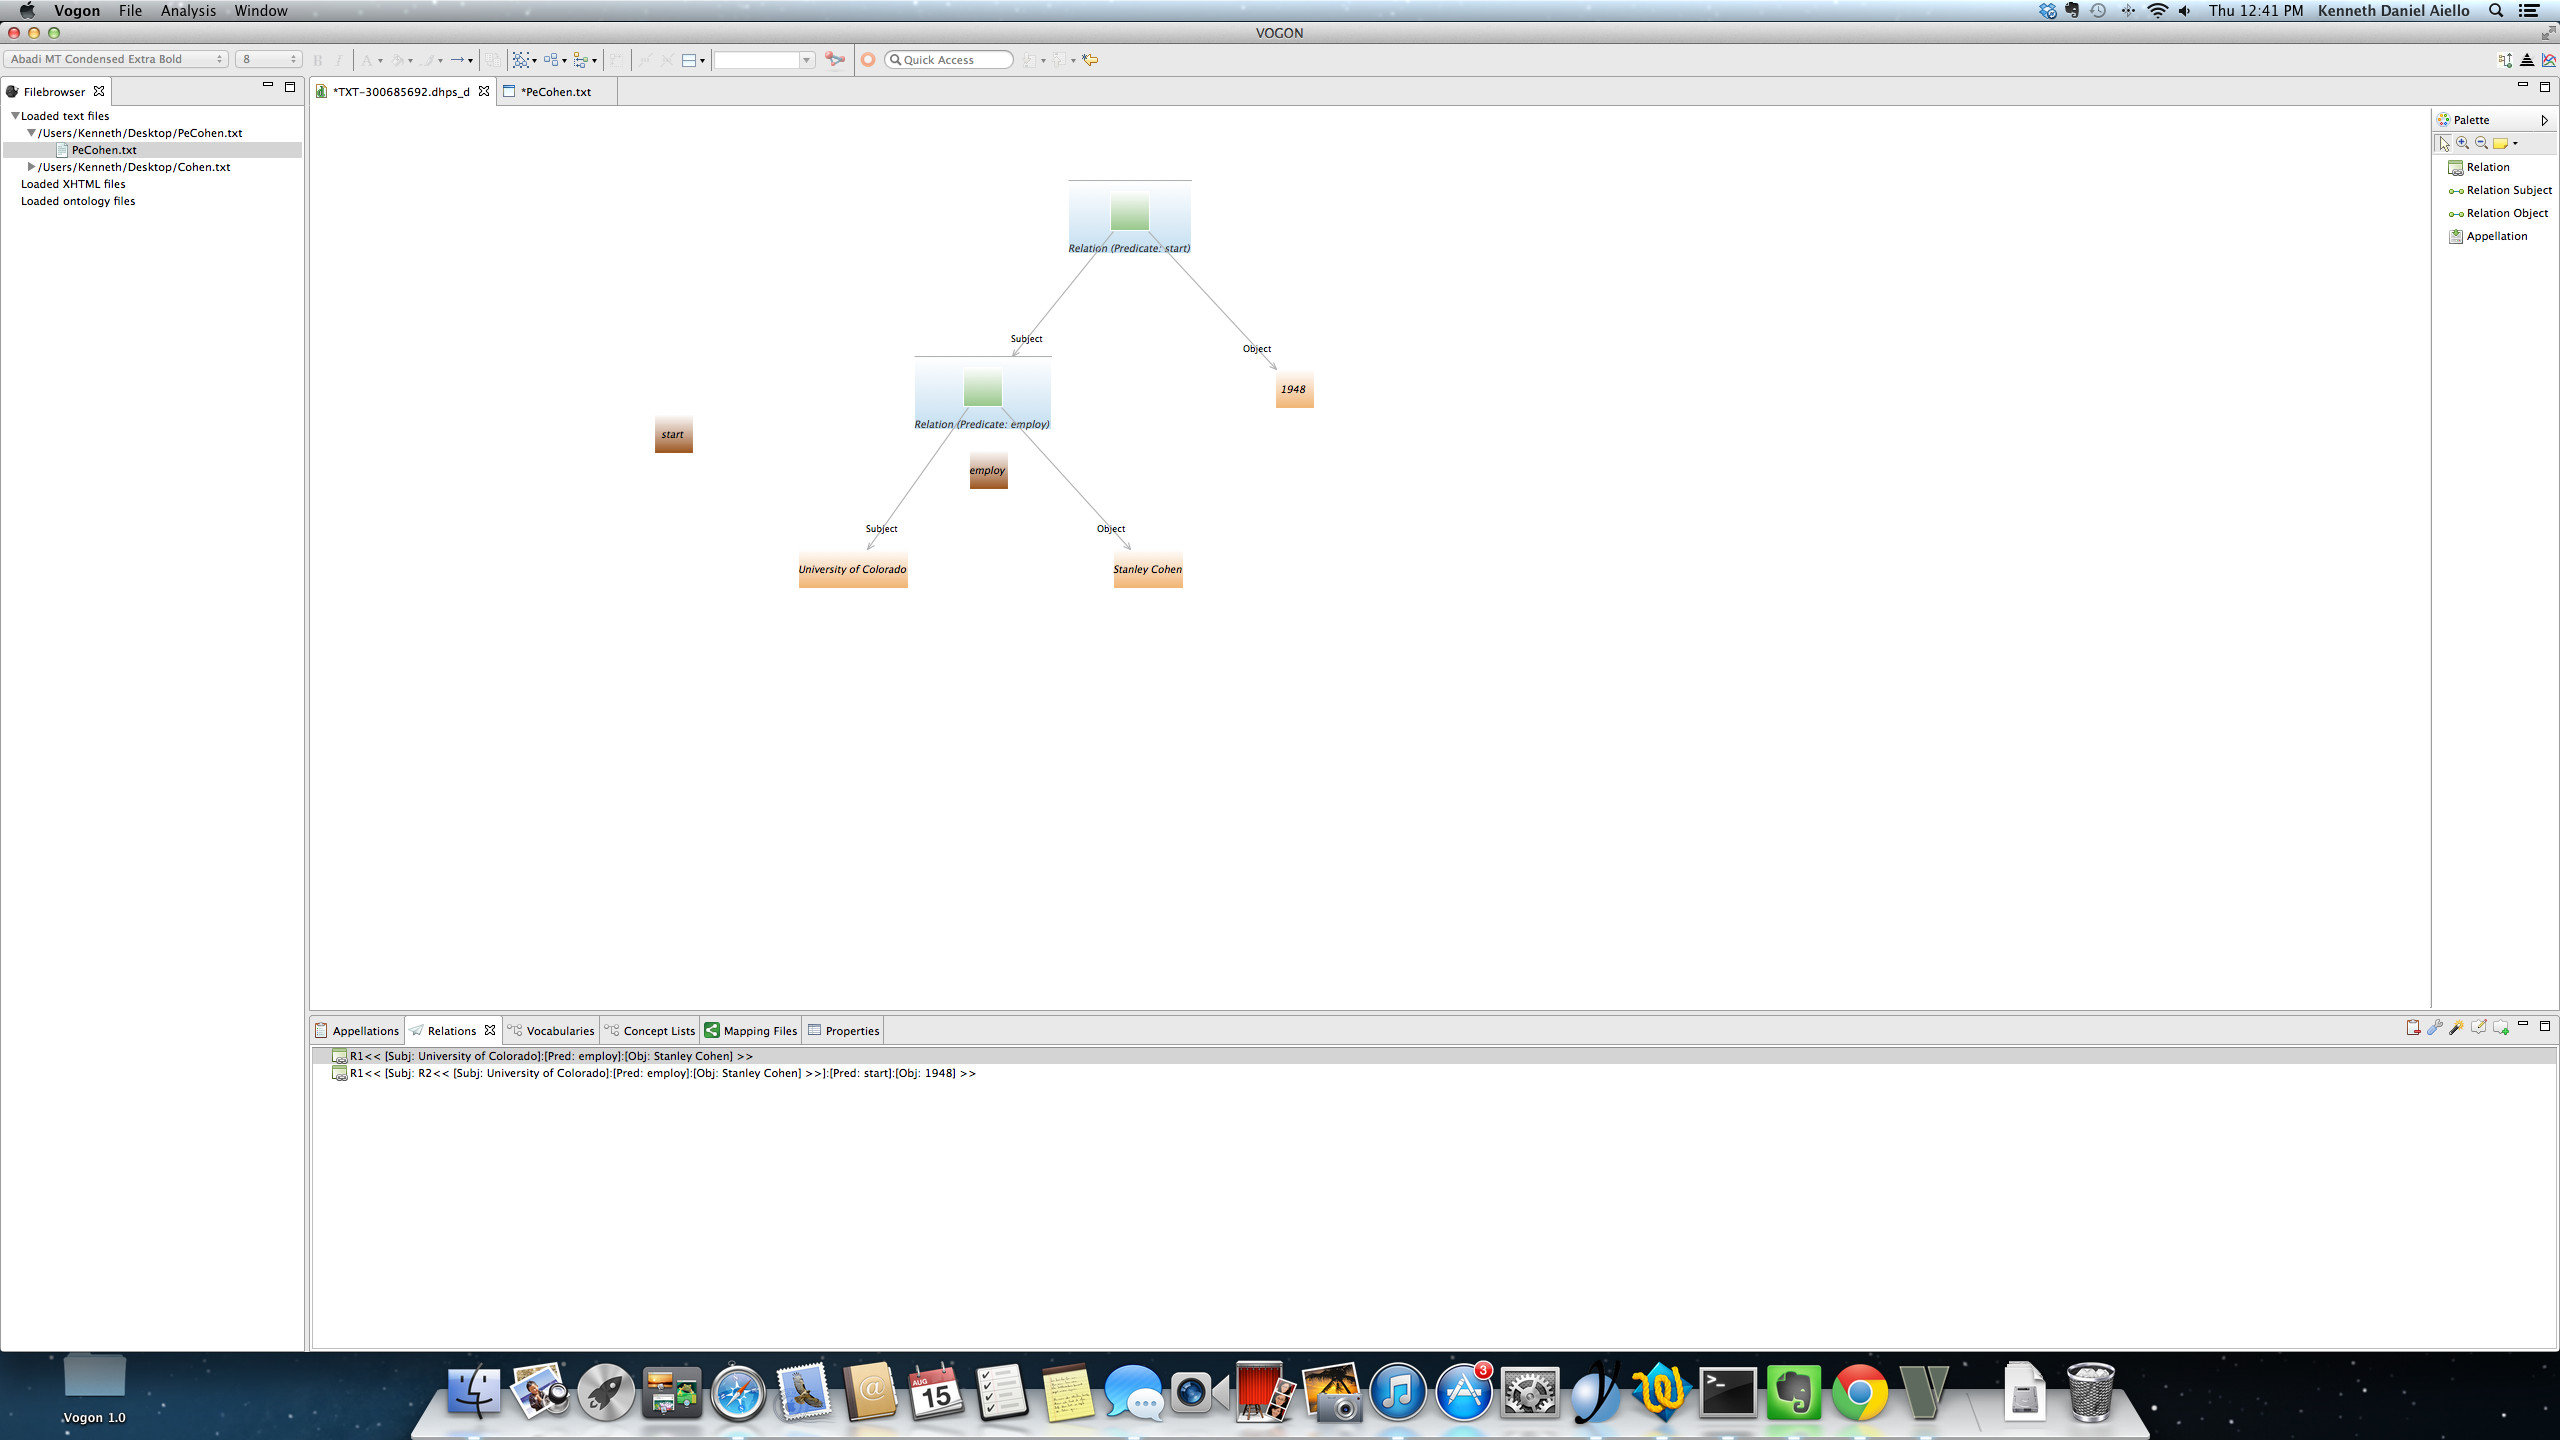
The Graphical Editor then populates the Graphical Editor with the elements of the Nested Triple.
Moving the appellations and the Relation Event Compartment box for clarity the Nested Triple is clearly visible.
8.8.7. Connecting multiple triples
Some relations extend past individual sentences or are inferred from the text.
For example,
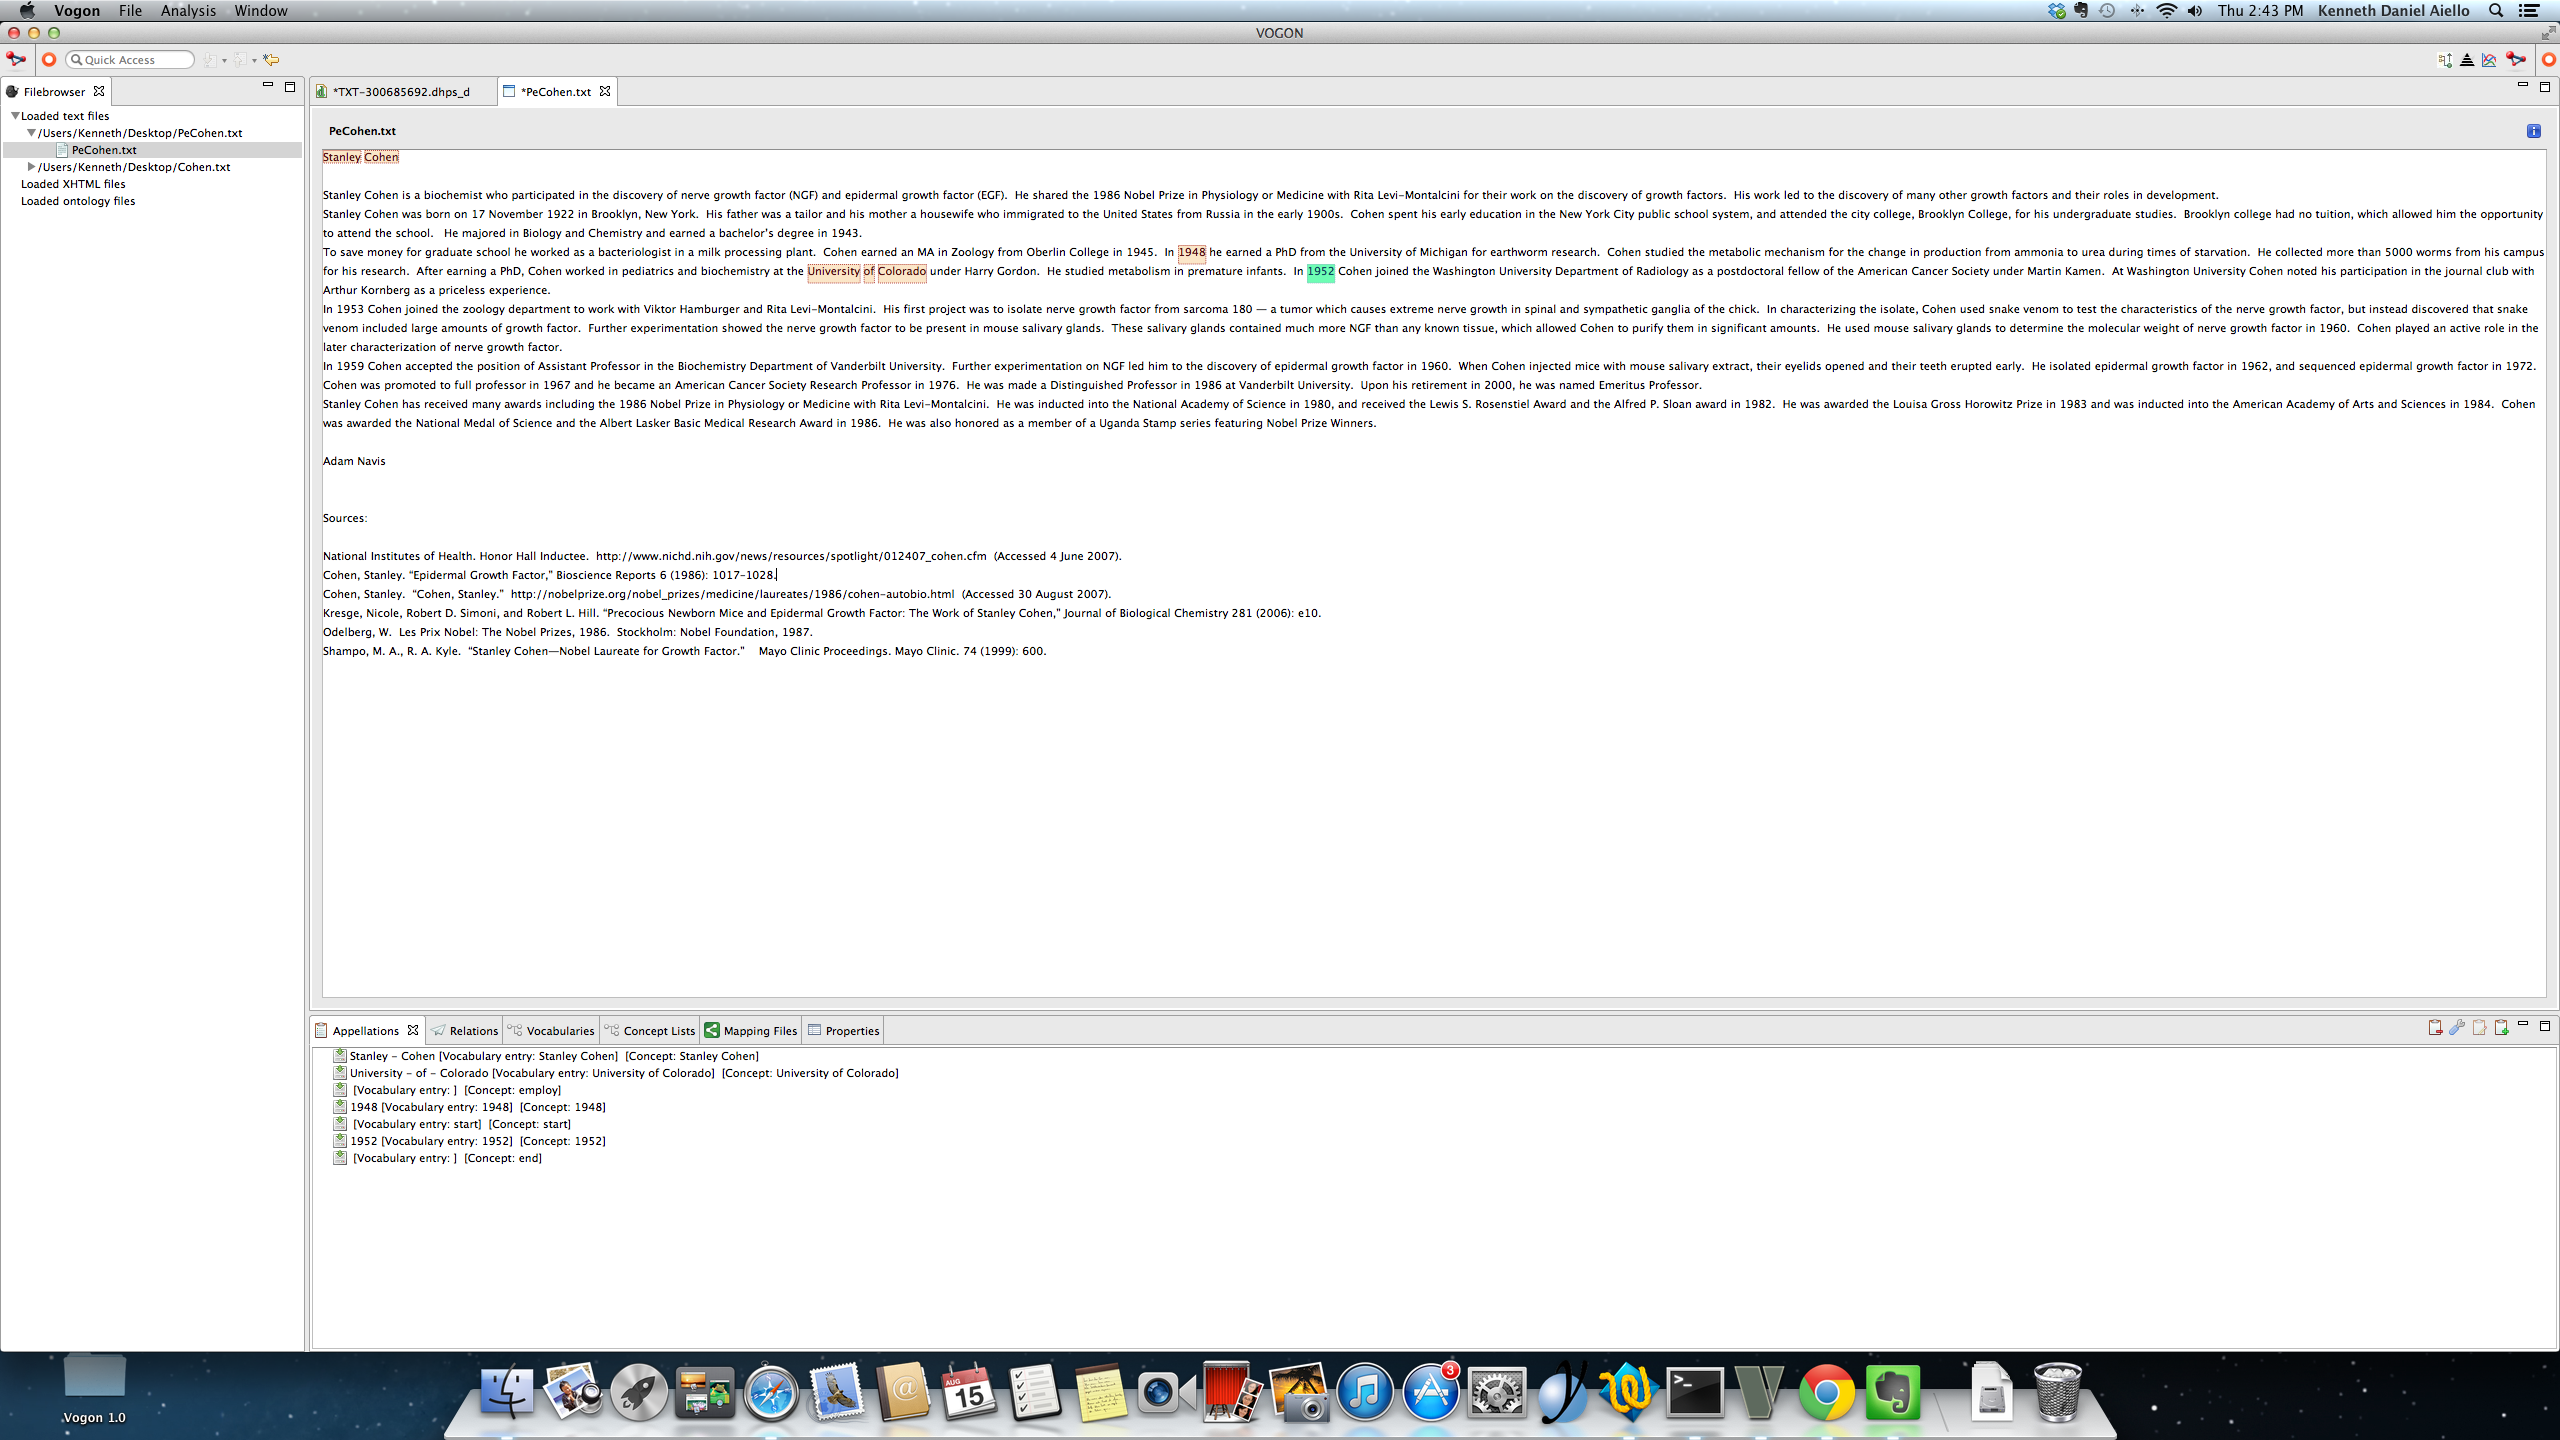
“To save money for graduate school Stanley Cohen worked as a bacteriologist in a milk processing plant. Cohen earned an MA in Zoology from Oberlin College in 1945. In 1948 he earned a PhD from the University of Michigan for earthworm research. Cohen studied the metabolic mechanism for the change in production from ammonia to urea during times of starvation. He collected more than 5000 worms from his campus for his research. After earning a PhD, Cohen worked in pediatrics and biochemistry at the University of Colorado under Harry Gordon. He studied metabolism in premature infants. In 1952 Cohen joined the Washington University Department of Radiology as a postdoctoral fellow of the American Cancer Society under Martin Kamen. At Washington University Cohen noted his participation in the journal club with Arthur Kornberg as a priceless experience.” This is an excerpt from the article, “Stanley Cohen” written by Adam Navis for the Embryo Project Encyclopedia.
In this example the relation The University of Colorado employed Stanley Cohen in 1948 is inferred from the text. The text mentions that Cohen earned his PhD in 1948, and that after Cohen earned his PhD he started working at the University of Colorado. It does not explicitly state “The University of Colorado employed Stanley Cohen in 1948”. This relation is inferred from text.
Similarly, the text does not explicitly state that Cohen’s employment with the University of Colorado ever ended. However, the text does mention that Cohen begins working with the Washington University in 1952. Therefore, it can be inferred from the text that The University of Colorado employed Stanley Cohen from 1948 to 1952.
When creating Nested Triples create the individual triples and then connect them.
Using the inferred meaning “The University of Colorado employed Stanley Cohen from 1948 to 1952” from the text the parts of the Nested Triple are:
R1= [Subj: University of Colorado]:[Pred:employ][Obj:Stanley Cohen]
R2= [Subj: R1 ]:[Pred: start][Obj: 1948]
R3= [Subj: R1 ]:[Pred: end][Obj: 1952]
(Multiple processes have been presented in the tutorial on how to appellate words and create relations. From this point forward the steps to appellate words or create relations will not be articulated.)
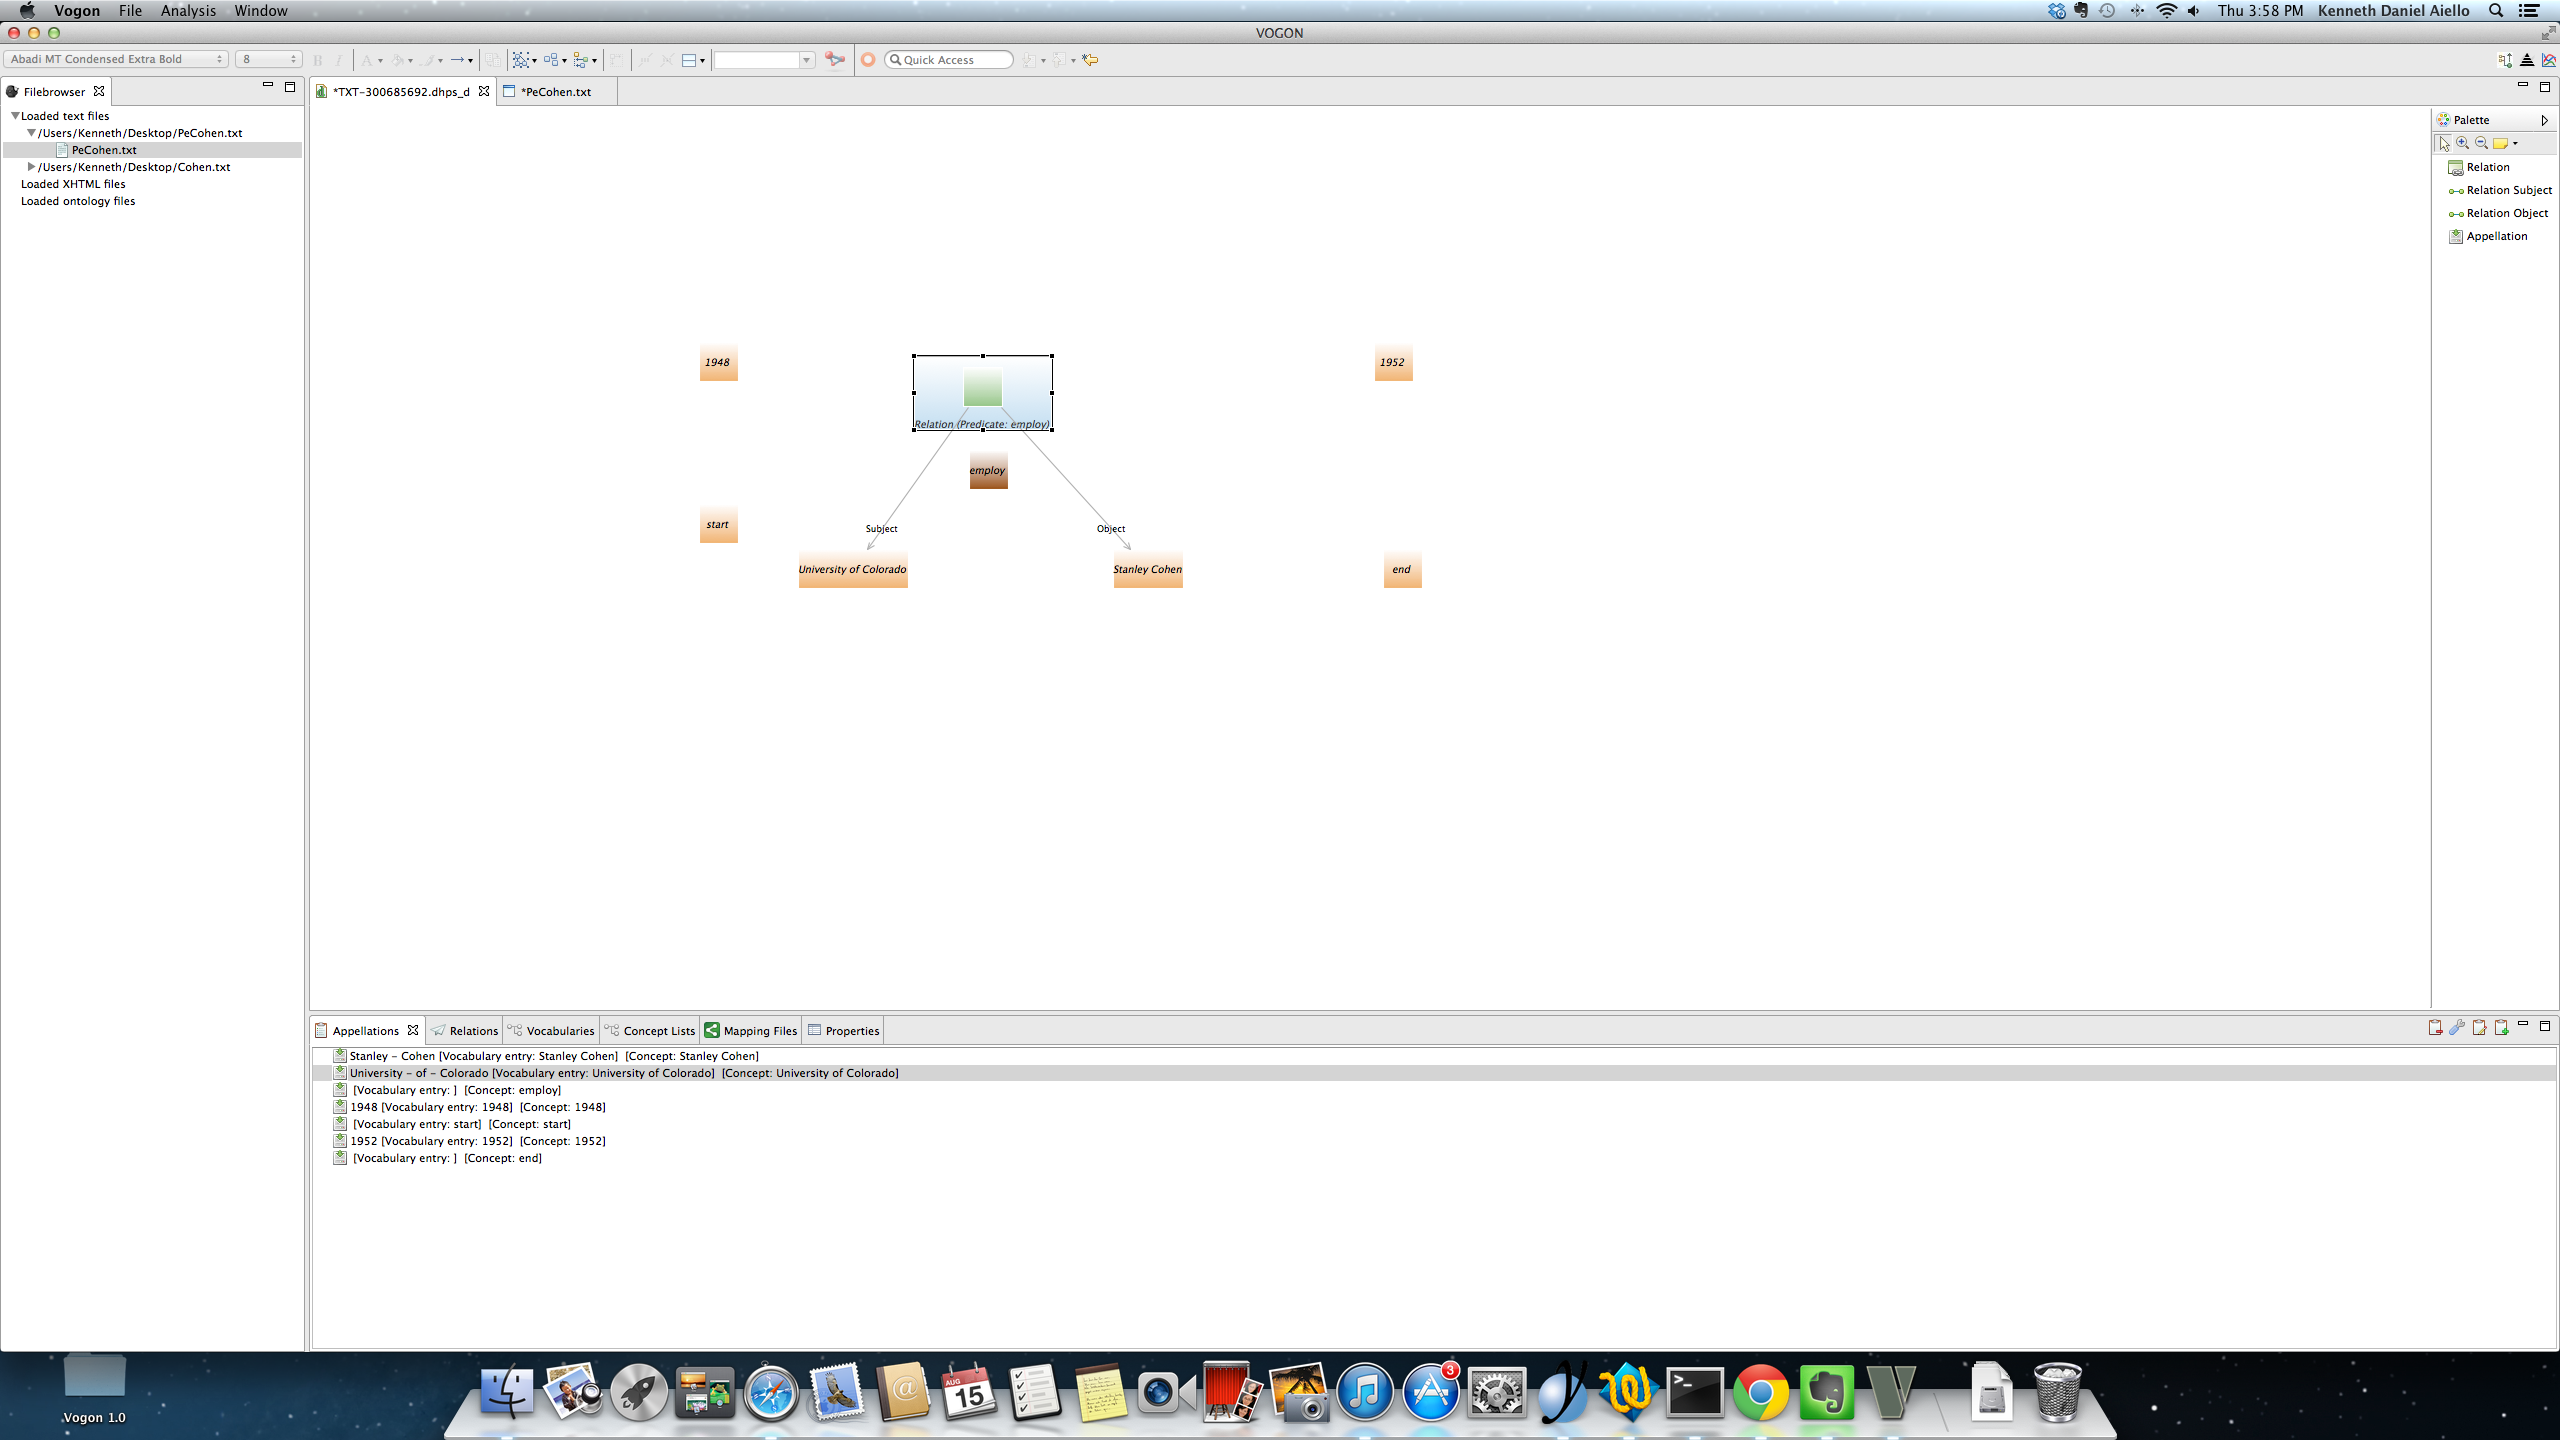
To annotate this Nested Triple begin by appellating all the words needed to create all of the relationships.
All the words necessary to create the relationship in the Text Editor:
All the words necessary to create the relationship in the Graphical Editor:
The relationship between R1 and R2 has already been created.
R1 and R2 in the Text Editor:
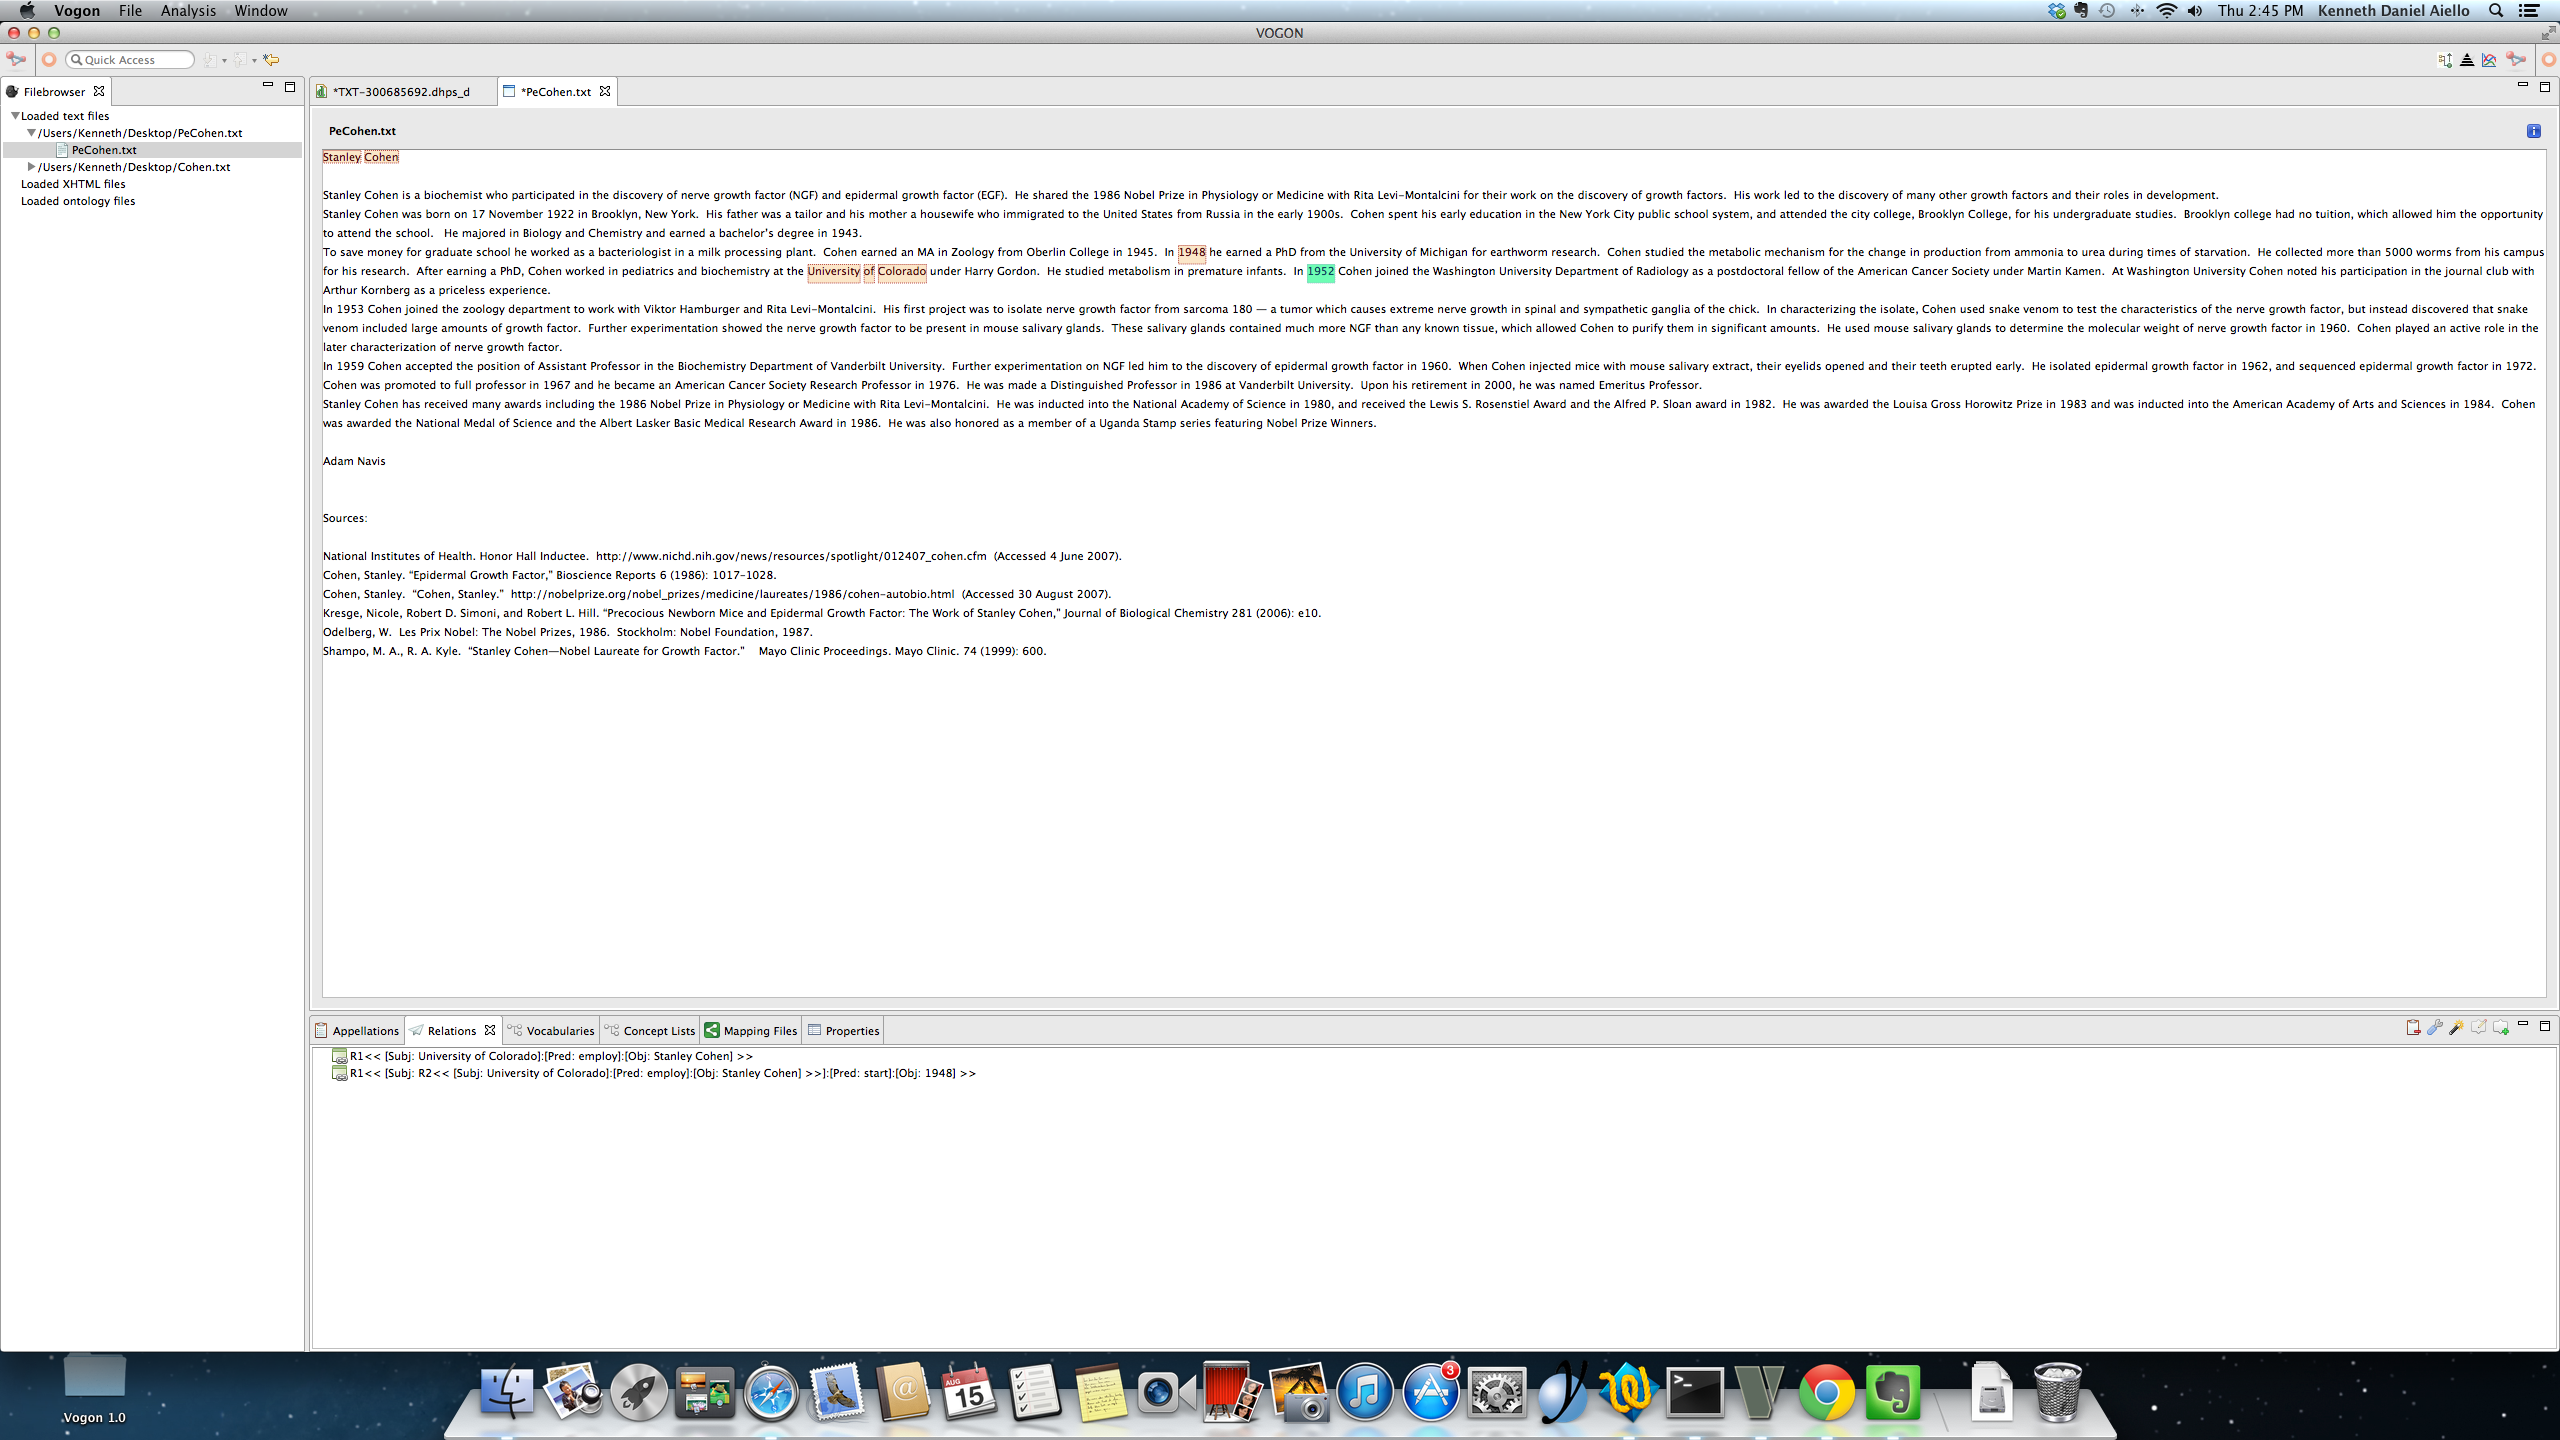
R1 and R2 in the Graphical Editor:
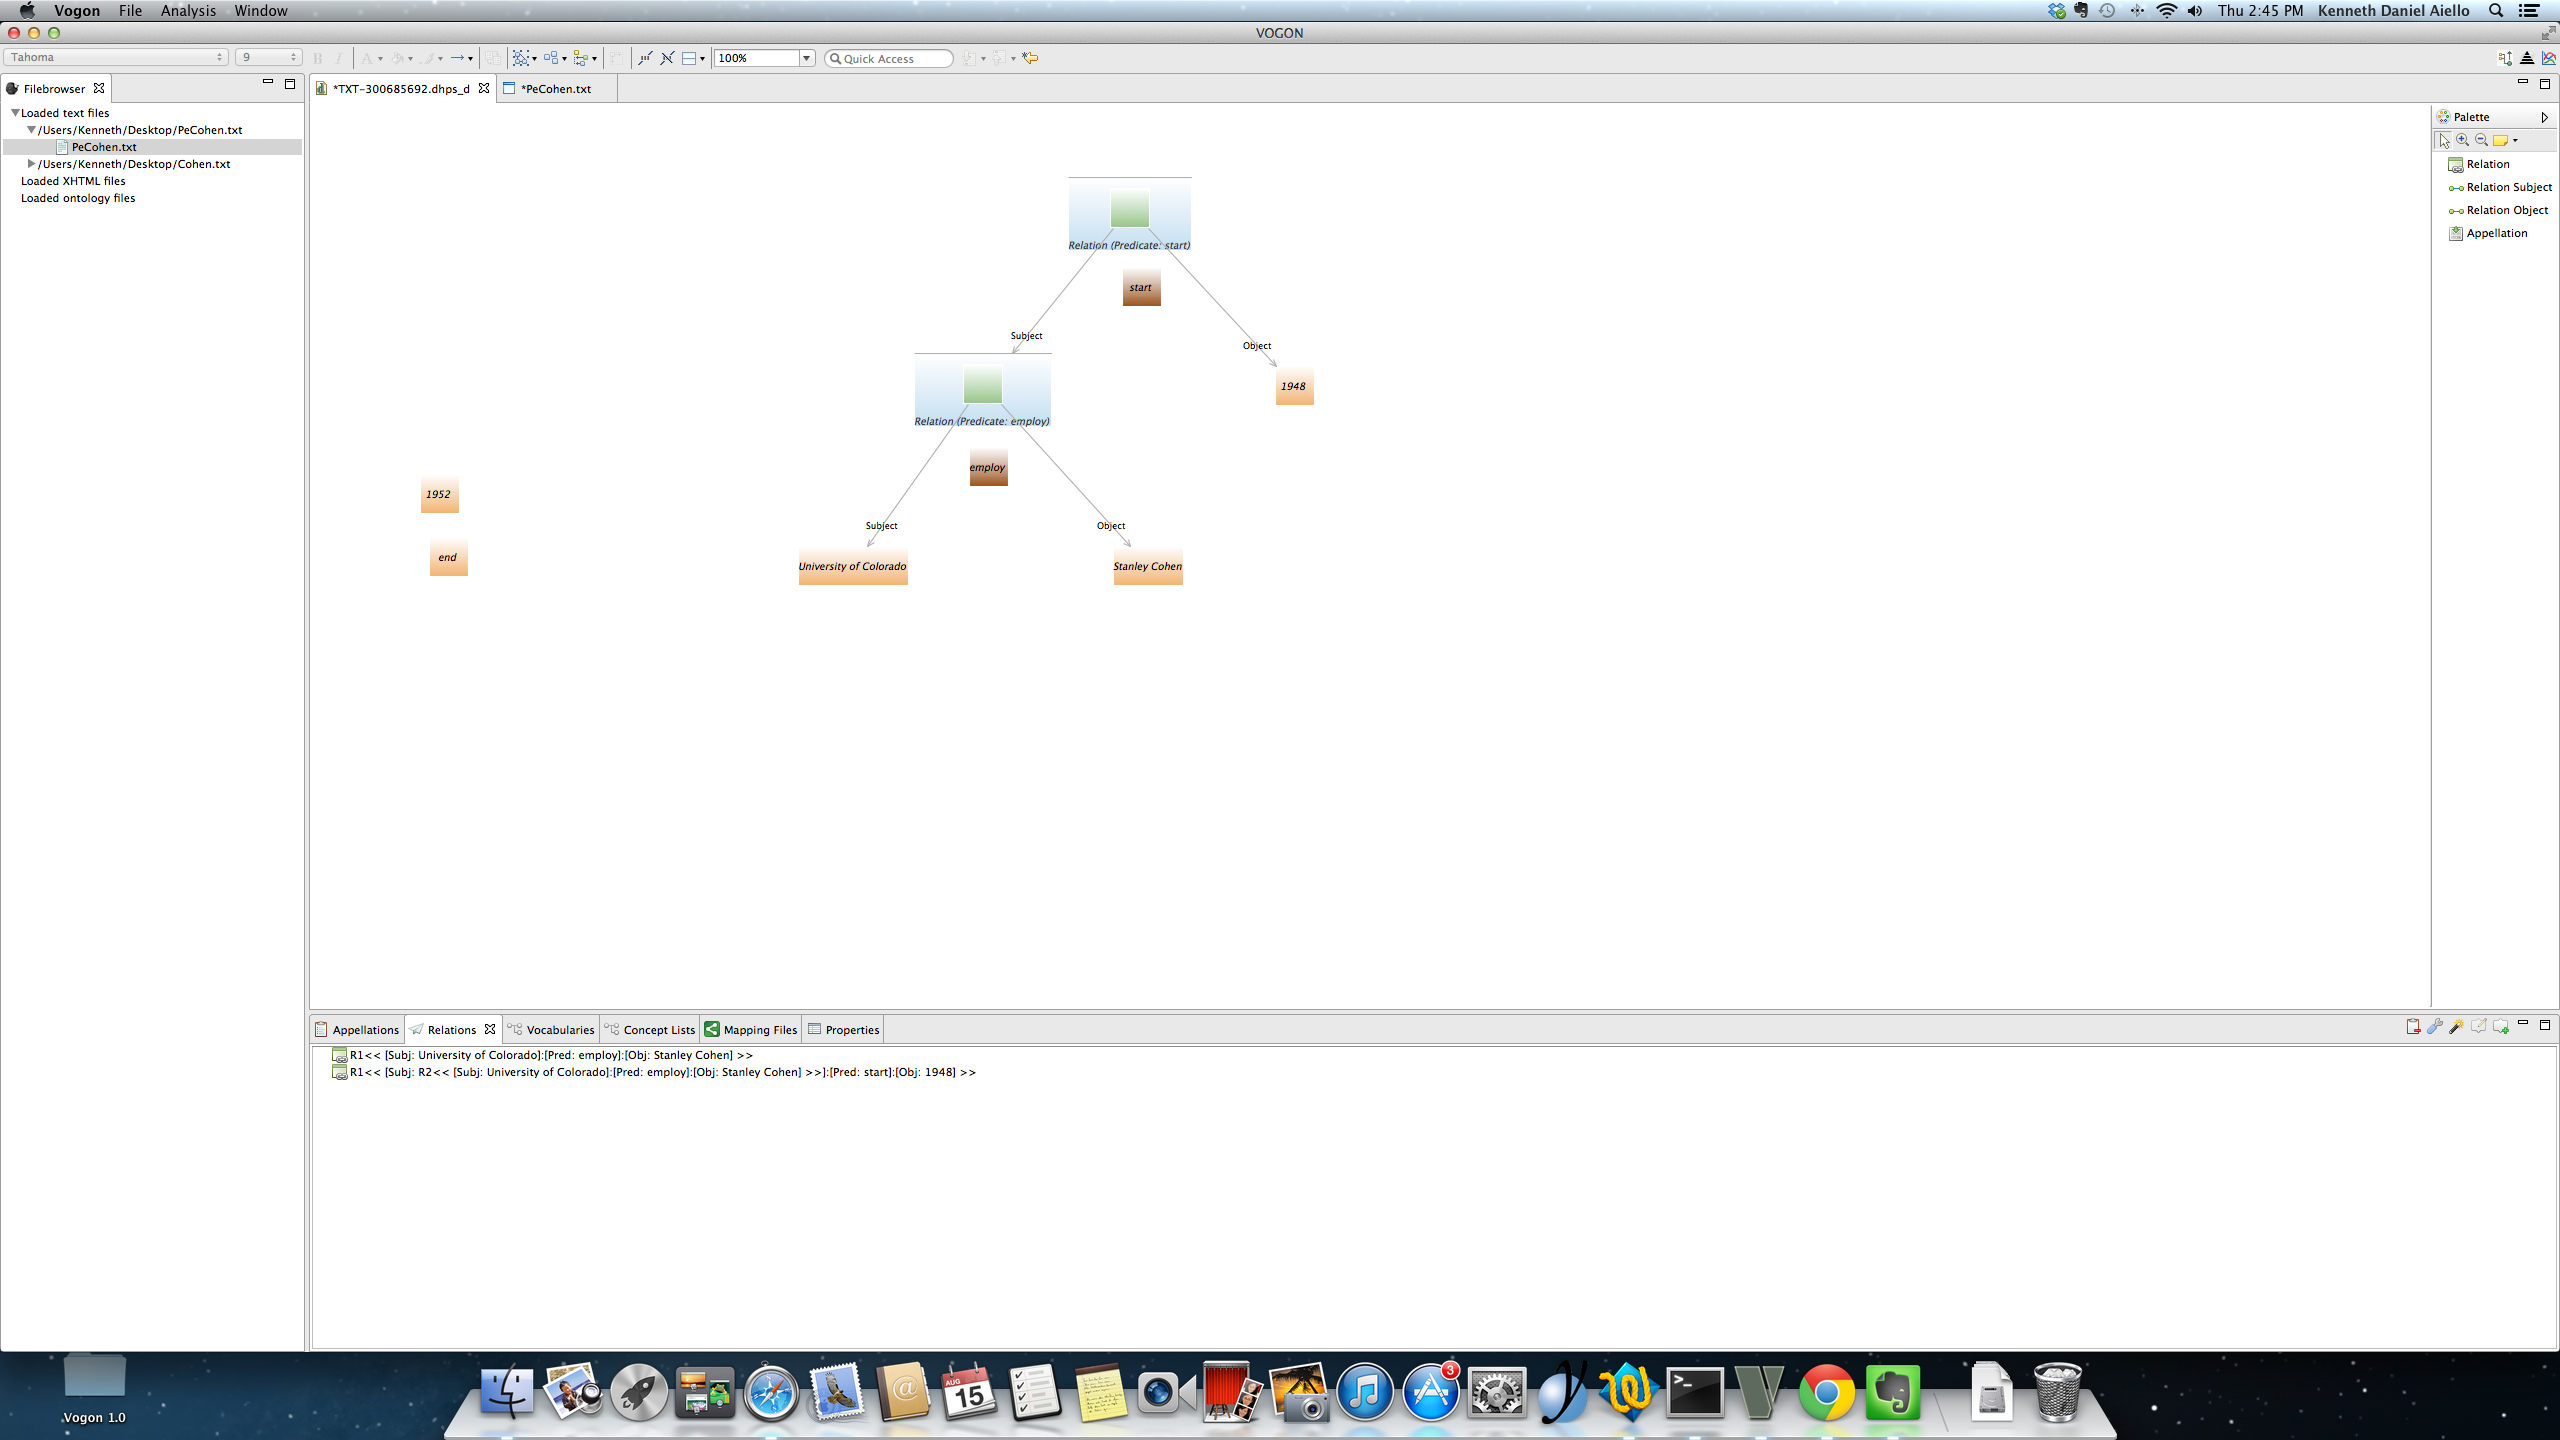
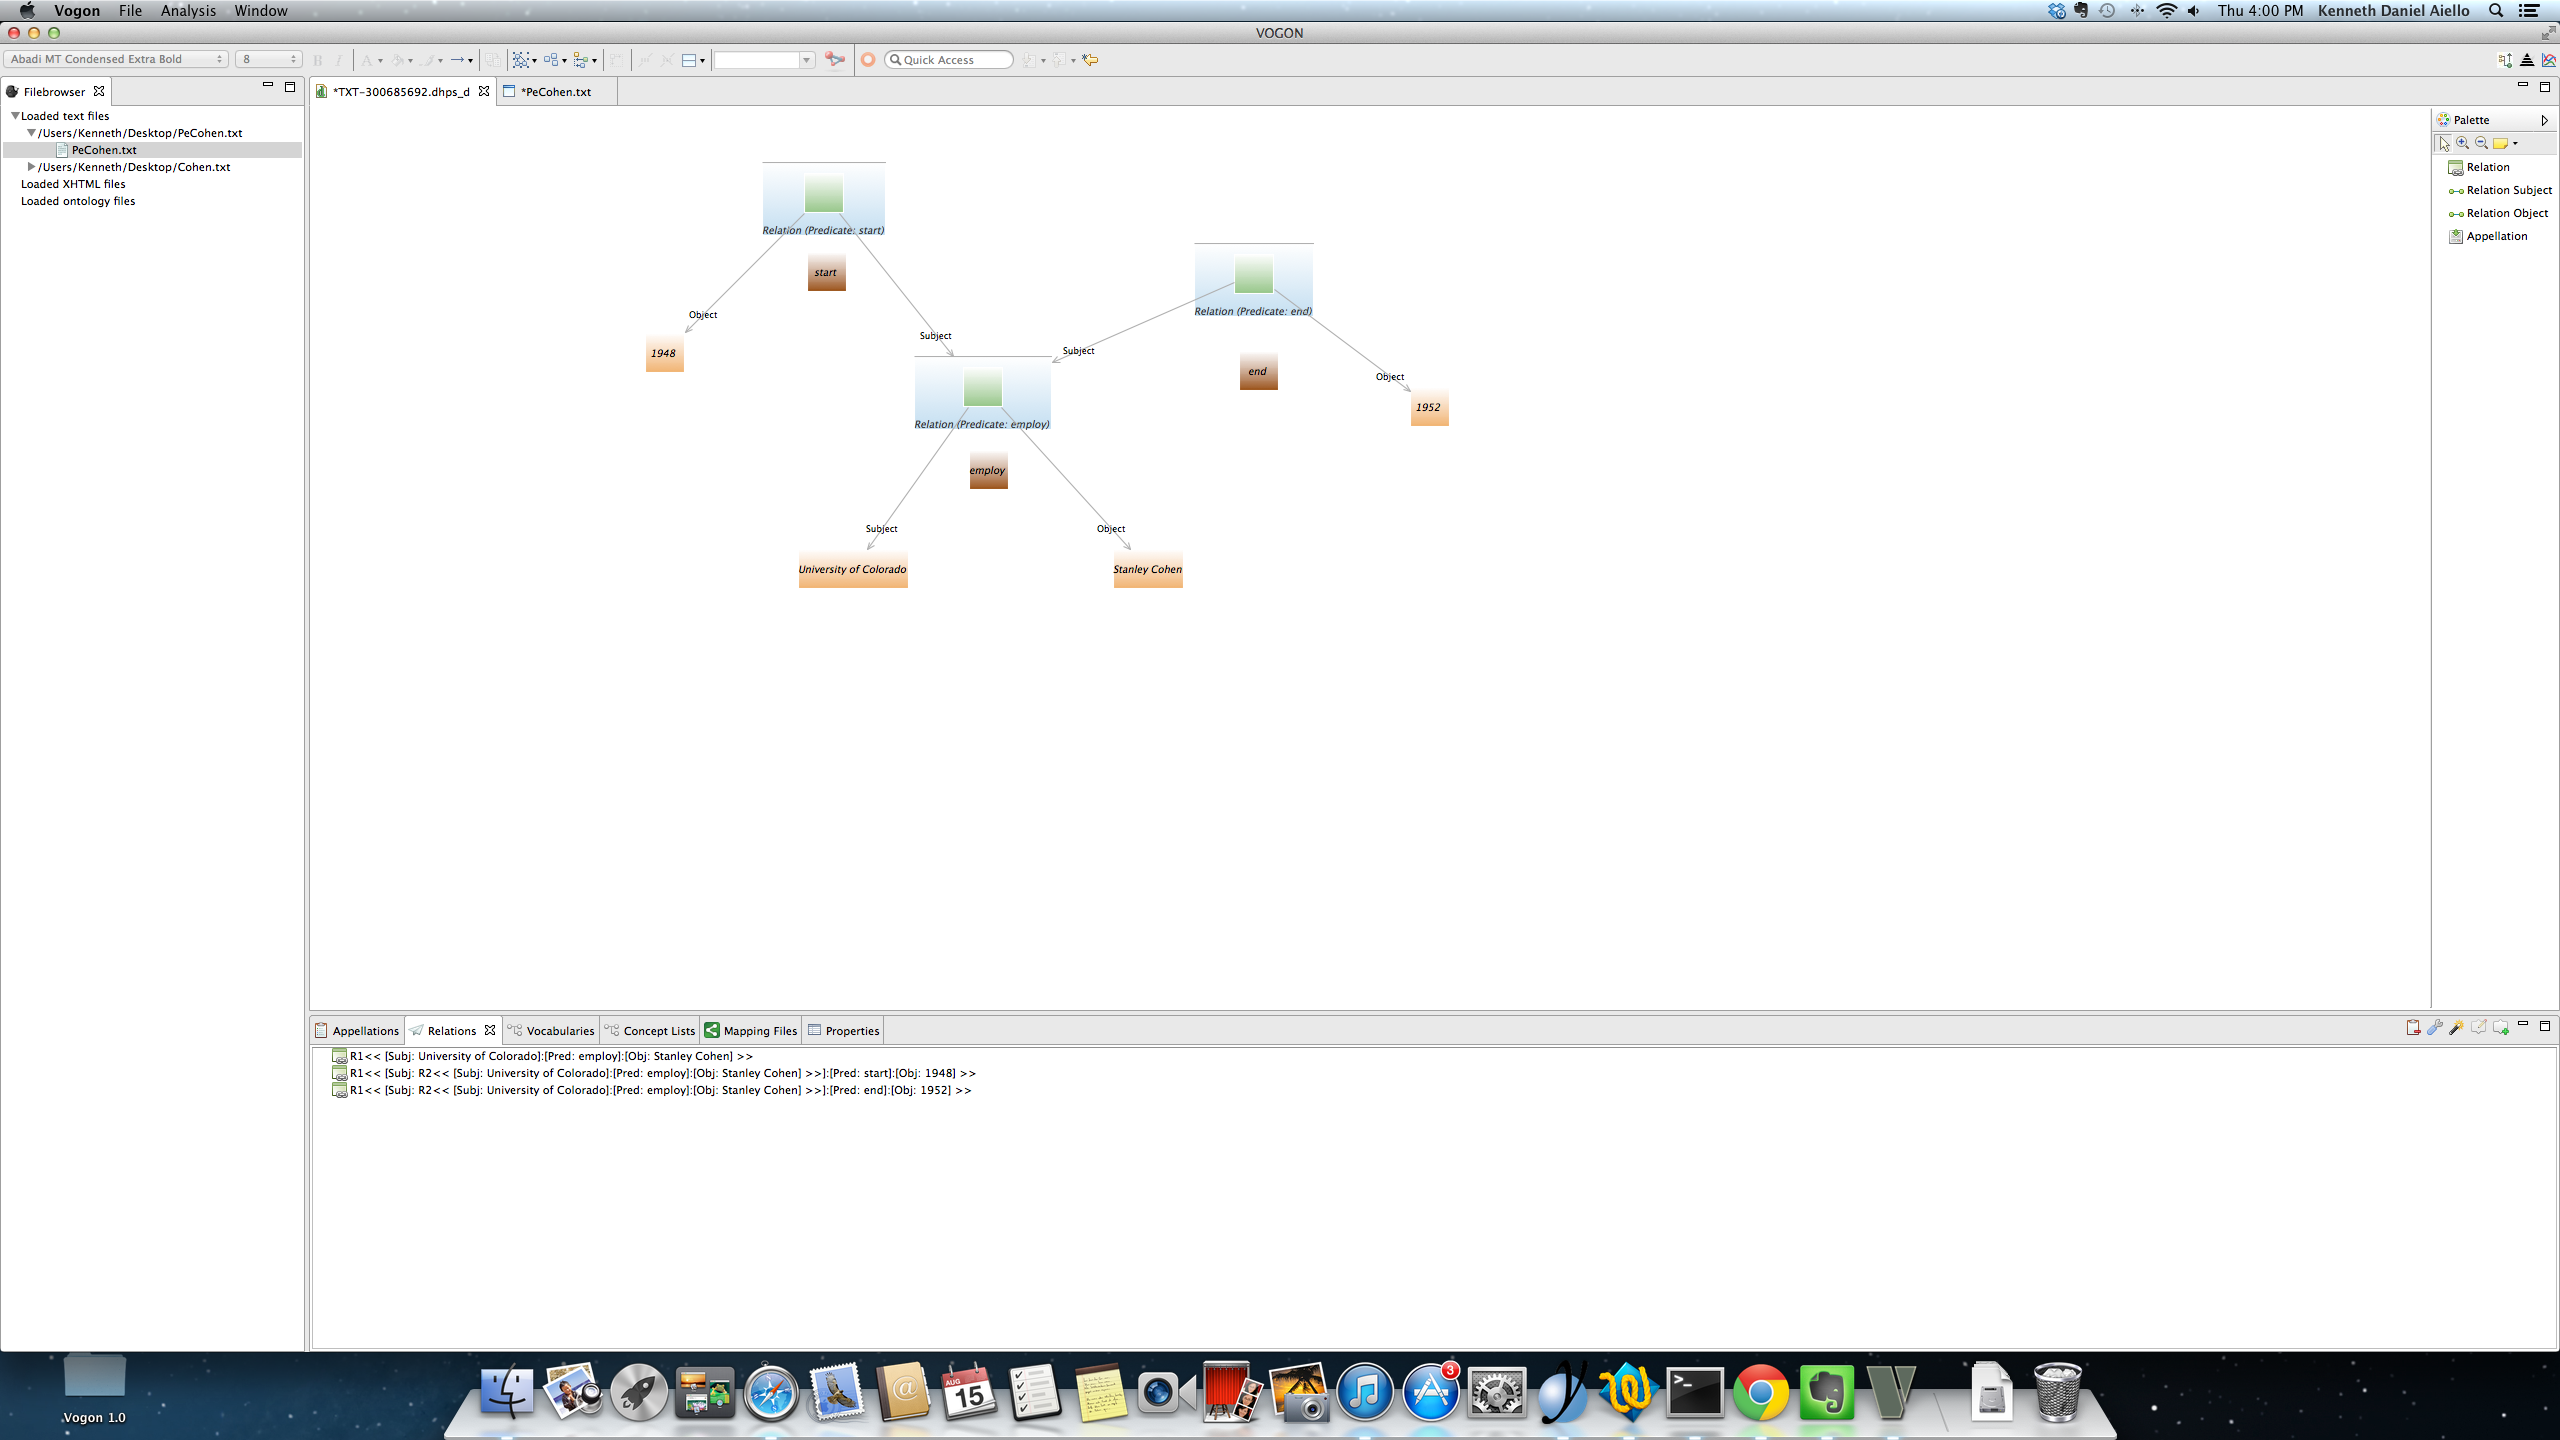
Create the relationship between R1 and R3 in the Relation tab (R1 is the subject for R3). The relationship “The University of Colorado employed Stanley Cohen from 1948 to 1952” has now been annotated. The relationship will not be labeled as R3 in the Relation Tab. The relations R1 and R2 in the Relation tab are labeled according to the number of triples and the location of the triple in the relation. In any given Workspace a user can have an infinite number of R1’s and R2’s.
Any R1 in the Relation Tab refers to an original triple; and R2 refers to any second triple made from the first triple.
R1, R2, and R3 in the Text Editor:
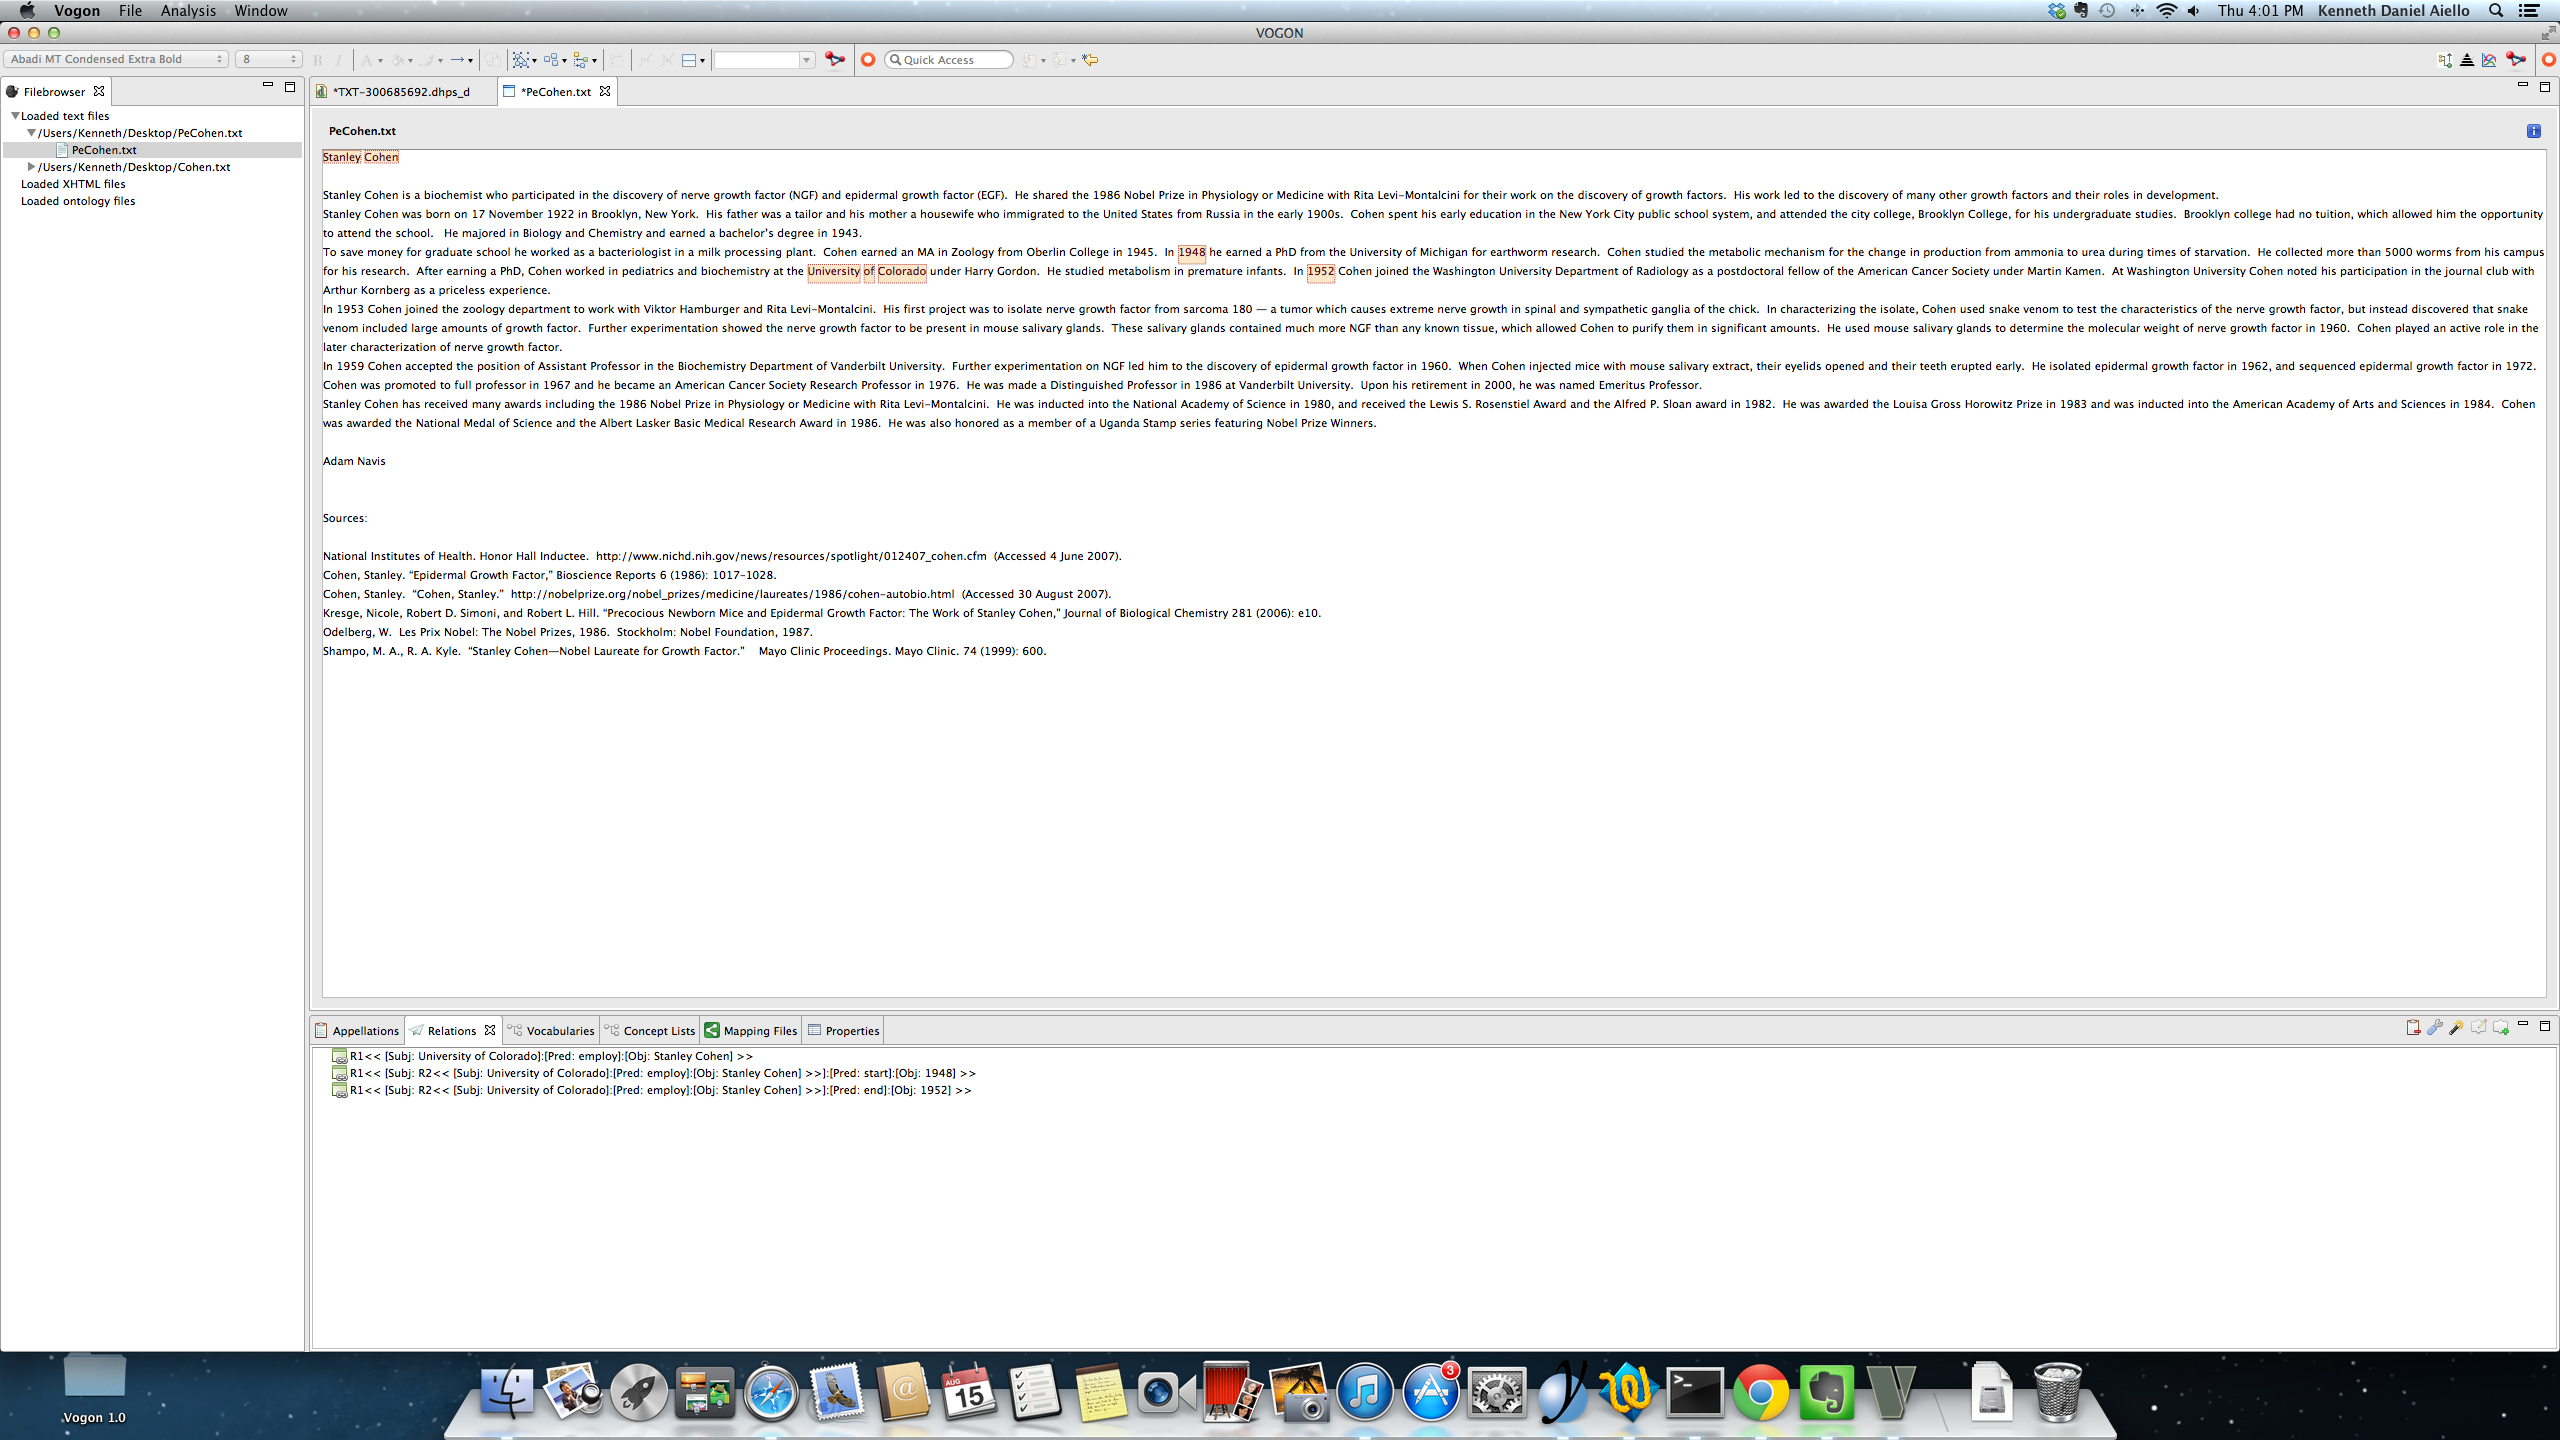
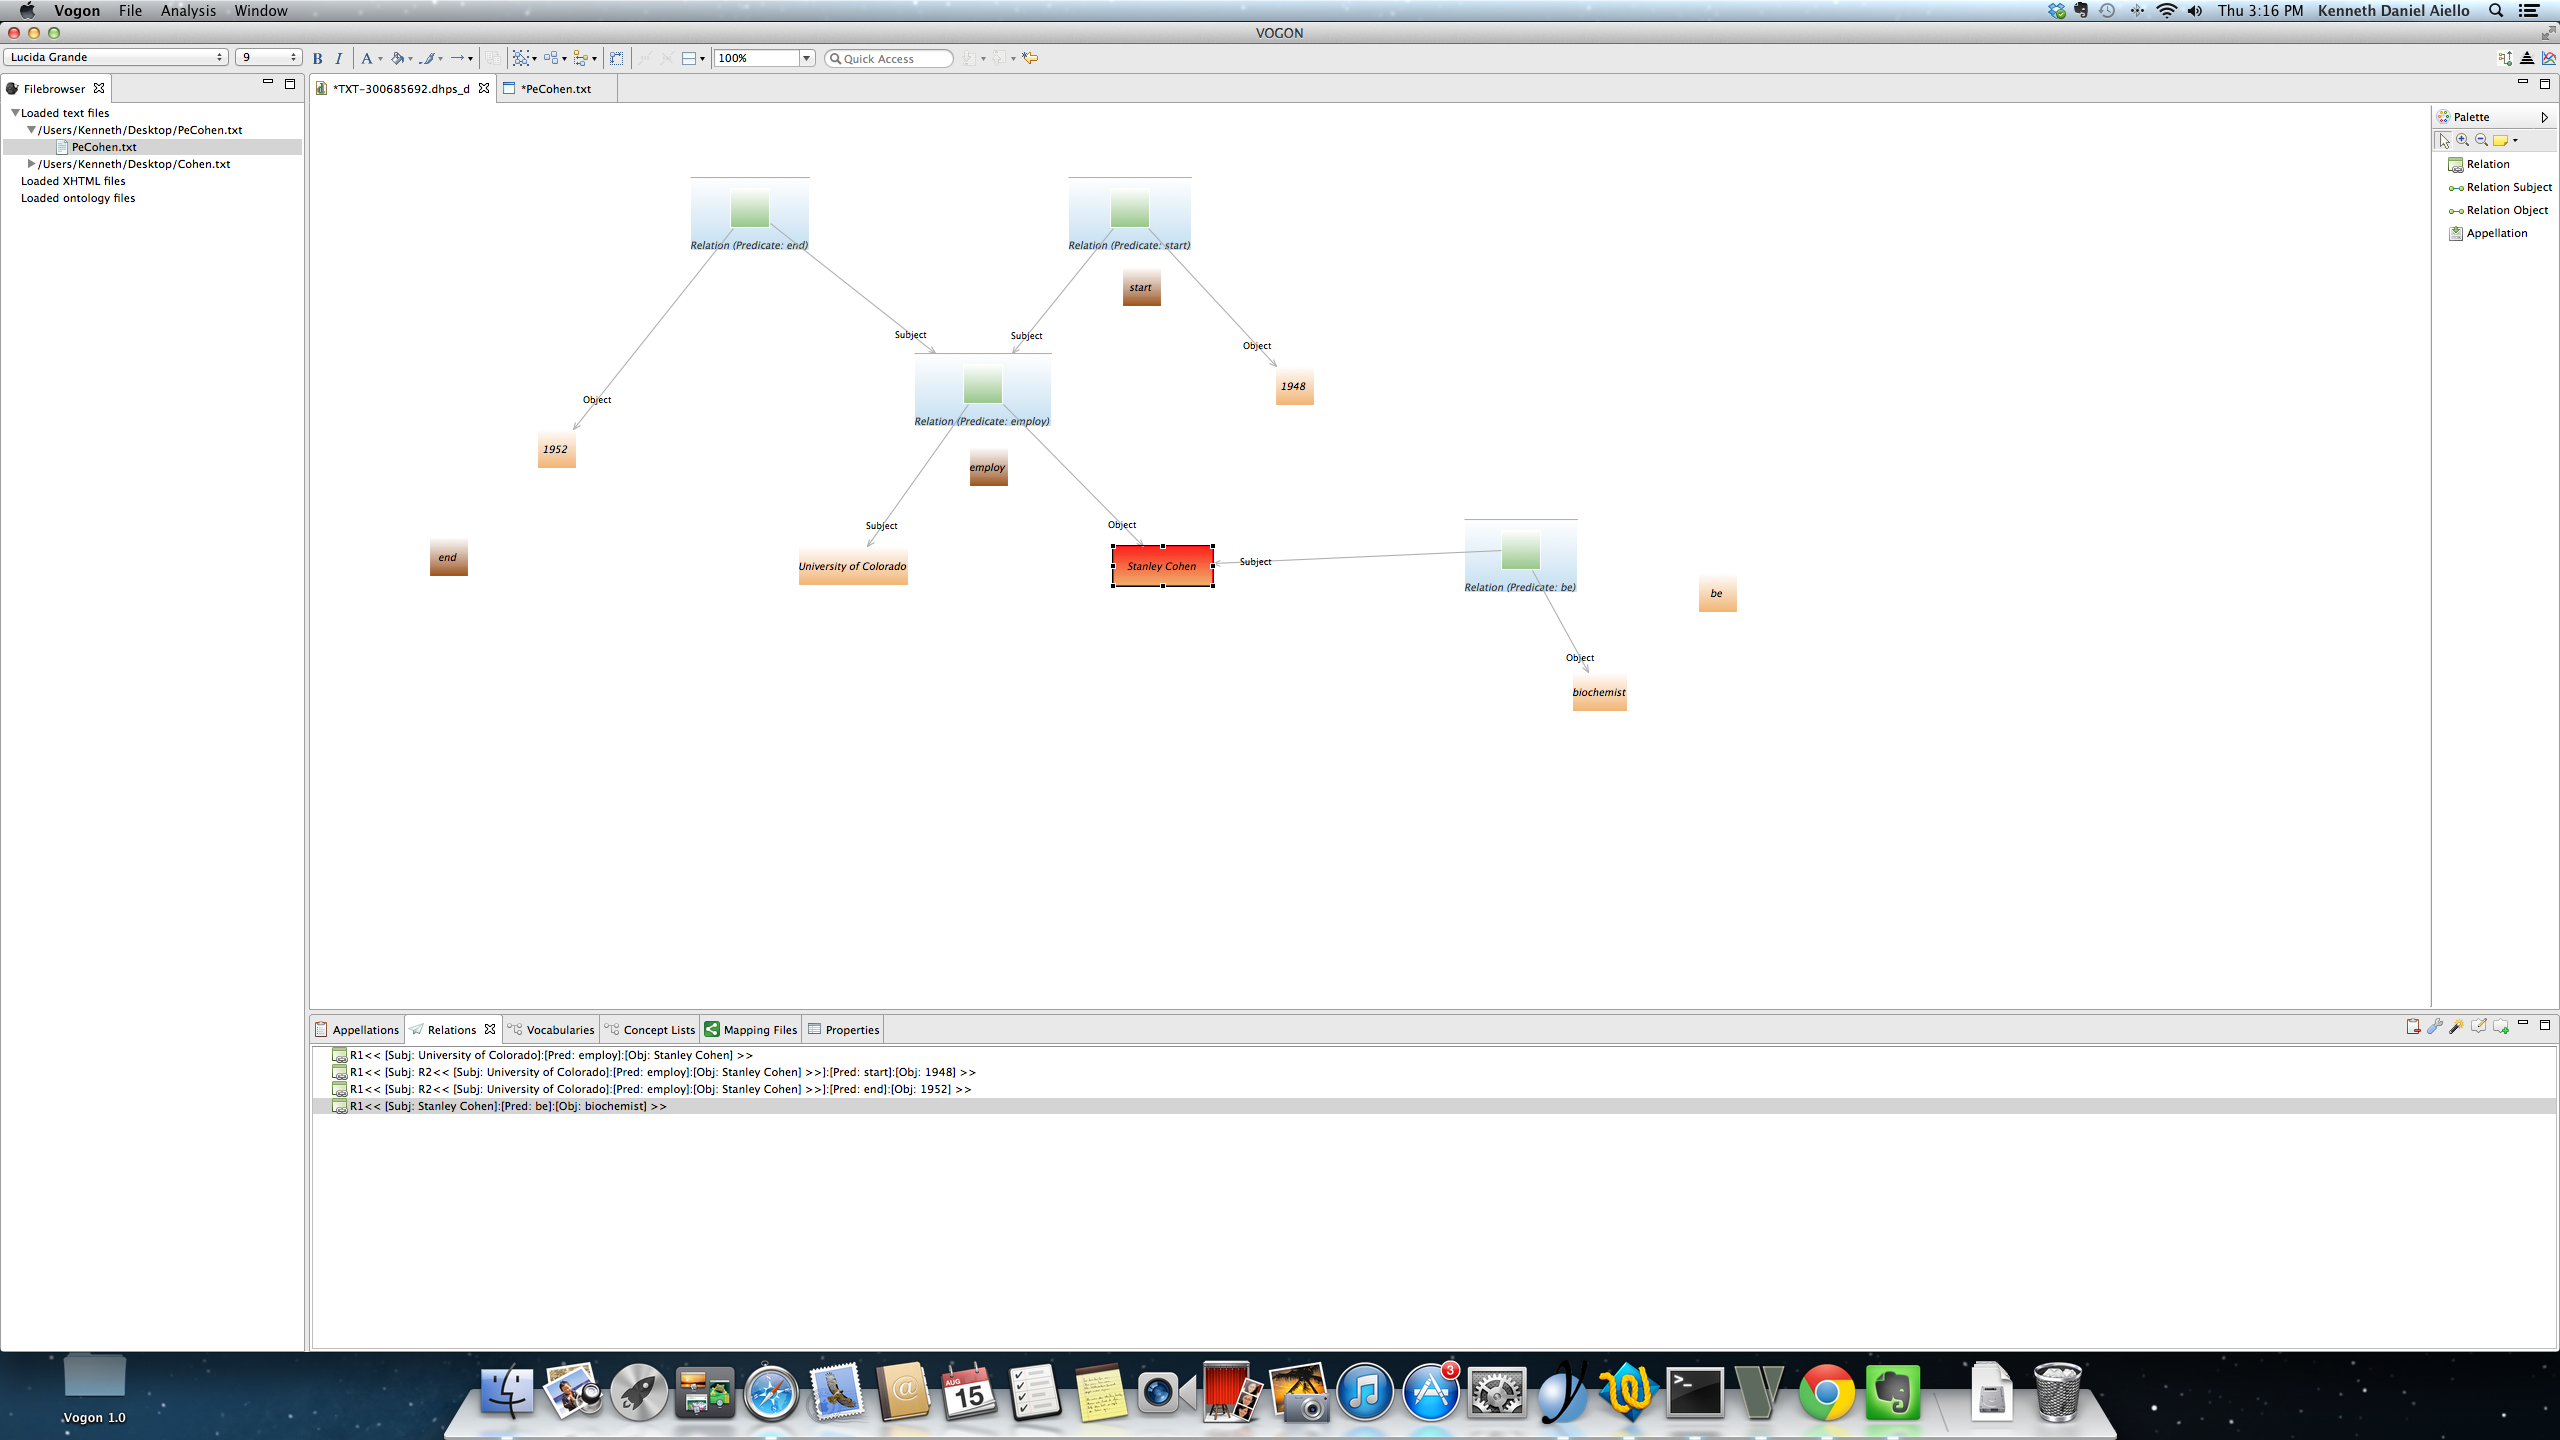
R1, R2, and R3 in the Graphical Editor:
8.8.8. Relation Tab nomenclature
Any R1 in the Relation Tab refers to an original triple; and R2 refers to any second triple made from the first triple.
In this example there are four separate relations that have been annotated. Apellated words can be used as Subjects and Objects in multiple triples.
The appellated word Stanley Cohen is a Subject in the triple “University of Colorado employ Stanley Cohen”;
and the Object in the triple “Stanley Cohen be a biochemist.”
Note
Skills covered
8.9. Progress Flowchart

Create A Workspace
- 2.1.Install Vogon - Download and install newest version of Vogon.
- 2.2.Create a Vogon Workspace - Creating a workspace where Vogon can save all of your data (local or online) available.
Vocabulary & Concept List
- 5.2.Vocabulary Selection - Selecting a Remote vocabulary.
- 5.3.Creating A Vocabulary - Adding words to the Vocabulary or Vocabularies..
- 5.4.Concept List Selection - Selecting a remote Concept List
- 5.5.Creating A Concept List - Adding words to the Concept List(s)
Appellations
- 6.3.Text Editor Window Appellations: Highlighting a Word- Appellating a word by highlighting the word in the Text Editor.
- 6.4.Text Editor Window Appellations: Adding a Word- Appellating a word by adding the word in the Text Editor.
- 6.5.Text Editor Window Appellations: Edit the Interpretation or Normalization of an Appellated Word - Editing appellated words in the Text Editor..
- 6.6.Text Editor Window Appellations: Baseless Appellations - How to create baseless appellations in the Text Editor.
- 7.3.Graph Editor Window Appellations: Appellating from the Palette Bar- Appellating a word using the Palette Bar in the Graphical Editor.
- 7.4.Graph Editor Window Appellations: Appellating from the Bottom Window - Appellating a word using the Bottom Window in the Graphical Editor.
- 7.5.Graph Editor Window Appellations: Appellating by Hovering in the Main Window - Appellating a word by Hovering in the Graphical Editor.
- 7.6.Graph Editor Window Appellations: Editing & Deleting Appellations - Editing appellated words in the Graphcial Editor.
- 7.7.Graph Editor Window Appellations: Baseless Appellations - How to create baseless appellations in the Graphical Editor.
Create Relations
- 8.5.Creating Relations: Text Editor - How to create relations in the Text Editor.
- 8.6.Creating Relations: Graphical Editor - How to create relations in the Graphical Editor.
- 8.7.Editing Relations - How to edit relations in both the Text and Graphical Editor.
- 8.8.Deleting Relations - How to delete relations in both the Text and Graphical Editor.
- 8.9.Complex Sentences or Nested Triples - - How to delete relations in both the Text and Graphical Editor.